
That’s right. A stage.
So your kids can totally rock it out during your spring break Staycation. Or so your house becomes THE house for playdates. Or so you and your husband can John and Olivia to some Summer Lovin’. Or whatever floats your boat.
Think: a stage for plays, songs, acts, dances. Lots of pretending, lots of imagining, lots of dreaming.
Maddy, Owen, and Cora woke up Christmas morning to their very own homemade stage–a gift that came complete with rockstar karaoke machine and superstar lights. And it was–hands down–a big win for everyone.
We’ve had kids on stage, parents on stage, grandparents and aunts and uncles on stage. We’ve had cousins on stage and friends on stage and pets on stage. And that’s only the beginning.
Here’s the skinny. . .
- An Easy-to-Build Stage for the Performers in Your Family: I’m going to let my amazingly talented father-in-law take over here, since he and my husband were the masterminds behind this awesome stage.
They did the hard part. The planning and heavy lifting. I embellished.
——————————————–
from planner & stage builder, Tom Mascott:
Last fall our son asked me to help him build a simple stage for his and Amy’s three kids, ages 5, 7, 9. Like most kids they love to do skits, sing karaoke and dance. They thought a stage would be fun to highlight the kids’ performances.
We designed an easy-to-build 4’x6’ stage made up of two, independent 3’x4’ platforms, which can be used separately, or bolted together to make one larger stage. Two platforms have the advantages of being lighter to move and being able to use only one when floor space is limited.
The kids love it. Turns out to be fun for the entire family, including Grandma and I who perform a mean karaoke number. On stage is a great place to spend fun time together with the family.
Material list:
- 4- 2”x6”x8’ pine*
- 1- 2”x4”x8’ pine*
- 1- 4’x8’x 5/8” plywood- good one side
- 1¼ “ flat-head wood screws
- 3” flat-head wood screws
- 2- 3½”x1/2” dia. hex bolts, four washers and two hex nuts
- 8- 1½ “ corner brackets and approximately 35- ¾” round-head wood screws**
- Wood glue
- Linoleum or other flooring material and appropriate glue
- Wood filler
- Paint, we used interior, high-gloss enamel, latex black paint
*It is important to select framing lumber that is straight, without being bowed or twisted.
** We used ¾” sheet metal screws, which worked just as well.
—————————————————————–
Tools required
- Power circular hand saw
- Hand power drill
- 10’+ tape measure
- Carpenter square
- Phillips head screw driver
- Hammer
- Selection of small drill bits, ½” flat drill or round drill
- Counter-sink bit to drill for counter sinking wood screws. You can use a standard, round drill bit but be careful not to drill too deep a hole.
- Two clamps
- Tools required for installing the type of glue and flooring you choose
- Medium grade (60-80 grit) sand paper
- Sanding block
- Paint brush
- Wrench to tighten bolts and nuts
—————————————————————–
Instructions:
1. Cut the tops of both platforms. Cut two 3’x4′ pieces from the 4’x8′ sheet of plywood. All corners must be square.
cut framing lumber
2. Cut framing lumber. From each 2″x6″x8′ cut a 35 15/16″ piece and a 44 15/16″ piece. (The 1′ length remaining from each 2″x6″ will not be used.) Use a carpenter square when drawing cut lines. Place the 2″x6″s along the edges of the plywood to see if they are the correct length. The longer pieces will fit inside the shorter ones. The 2″x6″s should fit just inside the edges of the plywood. If they fit properly, they’re ready to be attached. (see photo)
3. Screw plywood to framing lumber. The “better” side of the framing 2″x6″s should face out. We preferred to screw the plywood to the frame using 1 1/4″ wood screws, 8”-10” apart, before screwing the frame together, however either order works.
Later, the two platforms will be bolted together along the 4’ sides. Identify which 4’ sides will be fastened together. It is critical that the 2’x6”s NOT stick out past the edge of the plywood along these sides.
fasten one 2’x6′ at a time (photo 3)
Fasten one 2’x6” at a time. Pre drill and counter sink screw holes in the plywood. Spread wood glue on the top edge of the 2″x6″s before screwing down plywood. The 2″x6″s should be attached just inside the edges of the plywood. (see photo 3)
4. Screw the corners of the 2″x6″s together using 2- 3″ wood screws in each corner. Pre drill and counter sink screws.
install corner brackets (photo 4)
5. Install corner brackets. Fasten the corner brackets to each inside corner of each platform, up approximately 1″-1 1/2″ from the bottom edge of the frame using 3/4″ round-head wood screws. Pre-drill screw holes. (see photo 4)
cut and attach 2’x4′ supports (photo 5)
6. Cut and attach 2″x4″ supports. Turn both platforms upside down. Cut the 2″x4″s to fit snugly inside the 3′ sides of each frame. Apply wood glue to one edge of the 2″x4″s. Place the glued edge down on plywood half way between sides of frame. Screw in place with 2- 3″ wood screws at each end. Pre drill and counter sink screws. Turn platforms right side up and screw plywood to 2″x4″s with 1 1/4″ wood screws. Counter sink screws. (see photo 5)
7. Prepare frame for painting. Fill the groves between plywood and 2″x6″s, and the holes in the frame with wood filler. Also, fill all screw holes in frame and plywood. Sand wood filler when filler dries. Refill any holes that remain and sand. Also, sand any splinter edges on the plywood and frame.
We primed and painted the frame before installing linoleum.
8. Install the flooring to the top of the platforms. The surface of the plywood should be smooth with no screw heads sticking up and free of dust and debris. Cover each platform separately. Refer to manufacture’s instructions when gluing flooring to plywood.
If you use linoleum, cut 2 pieces, each piece at least 2″ longer and wider than the platform. If there is a pattern in the floor covering, be careful to cut and install each piece so that when the two platforms are side by side the pattern is repeated from one platform to the other. Remember, platforms will be attached along the 4′ sides that you identified in Step 3.
trim excess flooring (photo 2)
After glue dries, trim excess flooring back to edge of plywood. We used a utility knife to trim our linoleum. (photo 2)
fasten two platforms together (photo 6)
9. Fasten the two platforms together. Stand up the two platforms on the 3’ sides such that the two 4’ sides that will be bolted together are next to each other. Clamp the two platforms together. Check to be sure that the surface of the platforms are flush, as well as the 2”x6” sides. If adjustment is necessary, loosen the clamps slightly, adjust the frames as needed and re-tighten the clamps. (photo 6)
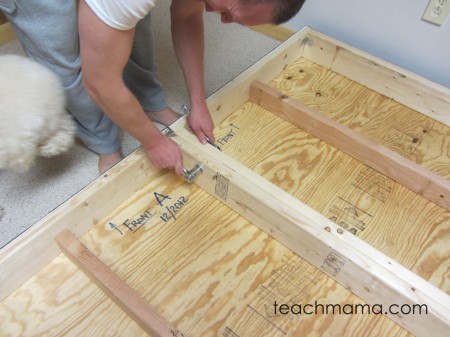
drill holes (photo 4)
Drill two ½” holes through the double 2”x6”s, each about 8”-10” from the end. Put a washer on each bolt, tap the bolts through the holes, slip on a second washer and turn on a nut. Tighten snugly. Remove clamps. Lower top edge of stage to floor. (photo 4)
My husband (and Brady) tighten up the stage before we set it out. . .
. . . and now it’s ready to go!
Your stage is finished!
—————————————————————–
Do you want the Easy-to-Build Stage Directions to download and print? Here they are: Easy-to-Build Stage Directions.
Have questions as you’re building? Feel free to tweet with my father-in-law: @TMascott
Thank you, thank you, Tom for doing an incredible job with this!!
—————————————————————–
Now? Make that stage even more beautiful than it already is! Decorate!
taping our mirror plates
We hung two plastic hooks on the wall for the ‘curtain’. . .
. . . and secured it with a fancy-schmancy ribbon.
These may not be exactly what we used, but they’re pretty darn close.
- hot pink window sheers as our backdrop
- self-adhesive wall hooks
- self-adhesive mirror tiles (we used two packs of 4, but I’d like them to cover the back wall)
- string of star lights
- black tree lamp with multi-colored lightbulbs
- our standing easel as an announcement board
- and of course, our Karaoke Machine! (This is exactly our model, and we love it!)
- several party song CD’s for the machine (though if you have an iPod, you can dock it on the machine)
The possibilities are endless–I’d love to see what other people come up with, so do please share your photos here or on our facebook page!


My dream was a curtain that opened and closed, but that was just too much for us with the holiday crunch. Maybe soon!
And that’s it–an easy-to-build stage for the little (and not-so-little) performers in your family. Something that will yield hours of fun family time, loads of memories, and (okay, I’ll be honest) maybe a headache or two. . . but it’s so worth it.
What are you waiting for? Get the stage plans printed, get to the hardware store, and start building–then watch those creative-kids go!
fyi: Affiliate links are used in this post. Many thanks for your consideration in using them!
Huge, huge, huge and happy thanks to my husband and his talented dad, Tom Mascott, for their hard work in making our stage dream come true! Thanks also to Tom for writing this detailed and difficult post with easy-to-follow directions. You both are amazing, and we are s lucky to have you! What’s that next project going to be, I wonder? . . .
9 comments
Ohh this is sooo cool! I love it!
thanks, Alexandra!! We love it, too!
It looks like Brady helped too! Thanks for sharing, Tom!
he DID!
What did you use for the flooring?
we used a laminate from the hardware store–the checks–is that what you mean?
Wow, this is awesome! A cool stage for indoor activities 🙂
Do you sell these? I need to find someone to make 3-4 for our classroom!:)
hi, Jody! Where are you located? I can ask my husband and father in law if they’d be willing to make them for you. . . but I can’t commit! 🙂