Teach Mama
  • Reading
  • Early Literacy
  • Writing
  • STEM
  • Activities
  • Digital Literacy
Top Posts
Effective Techniques for Teaching Complex Historical Topics
4 Neighborhood Adventures That Teach Kids Real-World Skills
What Does an Urgent Care Visit Cost in...
Future Trends Influencing Enterprise Learning Management System Adoption
How to Survive Your Husband’s Grad School Years...
How Technology is Reshaping the Rules of Education
How Advances in Artificial Intelligence Are Making Modern...
How Technology is Transforming Learning Experiences
A Practical Guide to Managing Family Finances Without...
Retirement Planning for Parents Who Feel Like They’re...
Teach Mama
  • Reading
  • Early Literacy
  • Writing
  • STEM
  • Activities
  • Digital Literacy
Teach Mama
Teach Mama
  • reading
  • early literacy
  • writing
  • STEM
  • Activities
  • digital literacy
  • Contact
Just-hatched painted lady butterflies in a mesh butterfly habitat
animalsscience

Hatch a Butterfly!

by Teach Mama April 27, 2025
written by Teach Mama

Watch the magic of nature unfold right at home! Hatching butterflies is an unforgettable STEM adventure for kids—and it’s easier than you think. With an affordable butterfly hatching kit, you and your little explorers can witness caterpillars transform into beautiful painted lady butterflies in just a few weeks!

This spring, our oldest grandson announced that he wanted to see a butterfly hatch out of its cocoon. The engineer and I spent quite a bit of time tromping around our farm trying to find such a cocoon but to no avail. After a bit of digital sleuthing we found a great butterfly hatching kit.

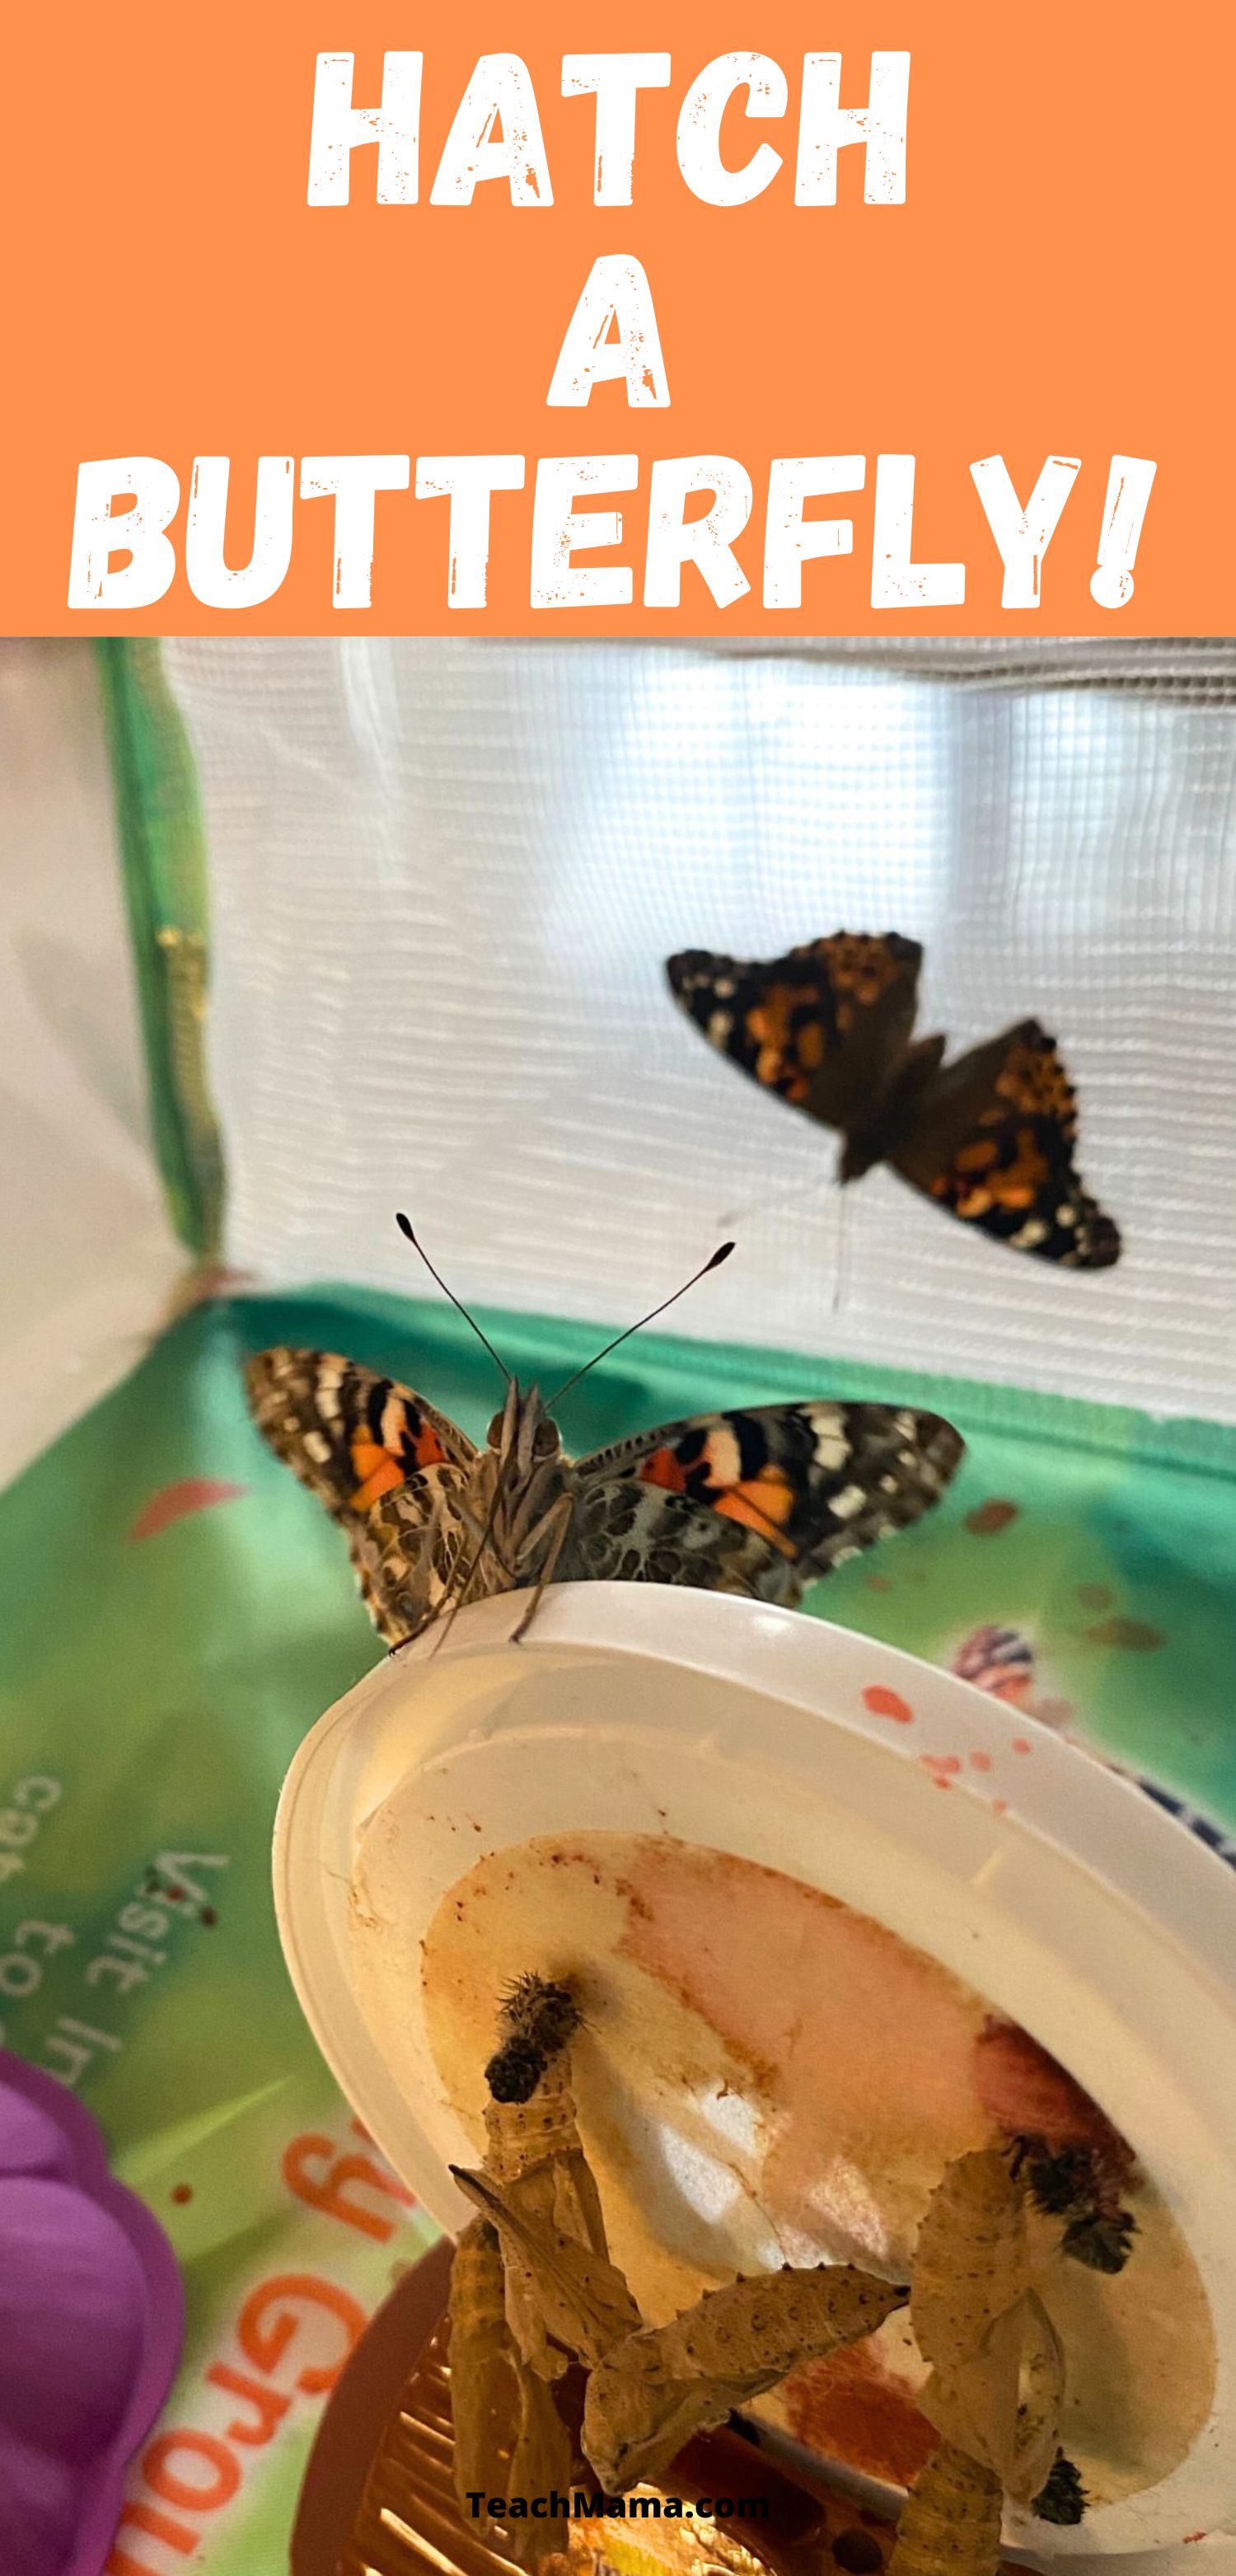
Our grandson was thrilled and we were relieved! The kit was very affordable, the instructions were clear and all five caterpillars hatched into beautiful painted lady butterflies! I’ll bet you can enjoy this same experience with your kiddos!

How to Hatch a Butterfly!

The process of hatching our very own butterflies took about two weeks from the time the kit arrived until the butterflies hatched. I think the engineer and I enjoyed the process as much as our grandson did!

Insect Lore Butterfly Farm on a wooden table

What you need

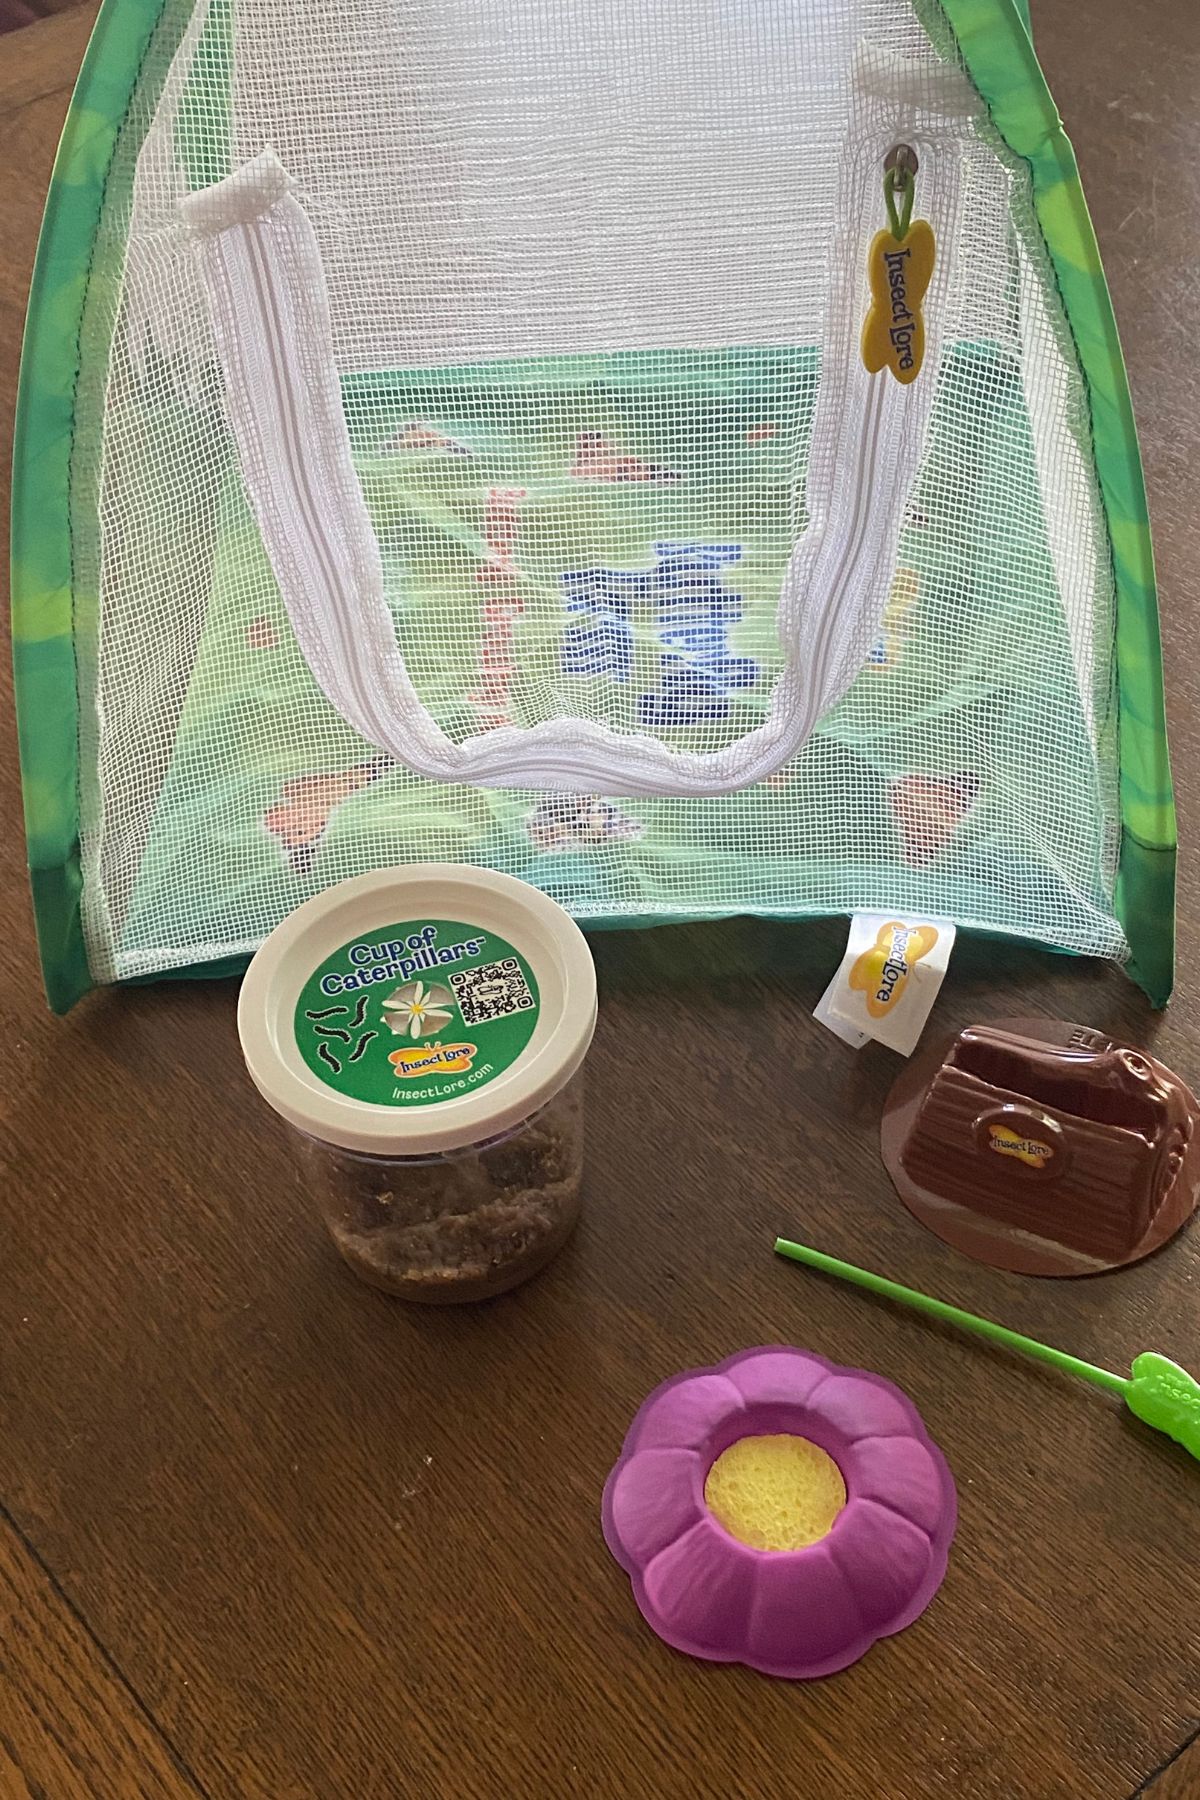
The kit we used is provided by Insect Lore. The company has been in business for over fifty years. They have the process of watching caterpillars turn into butterflies down to a fine science! The caterpillar cup even includes all the food the little critters need to grow and spin their cocoons.

The kit comes complete with a butterfly habitat, a butterfly feeder and a cup of five live caterpillars. You and your kiddos get to watch the wonder of nature without any hassle!

What to expect

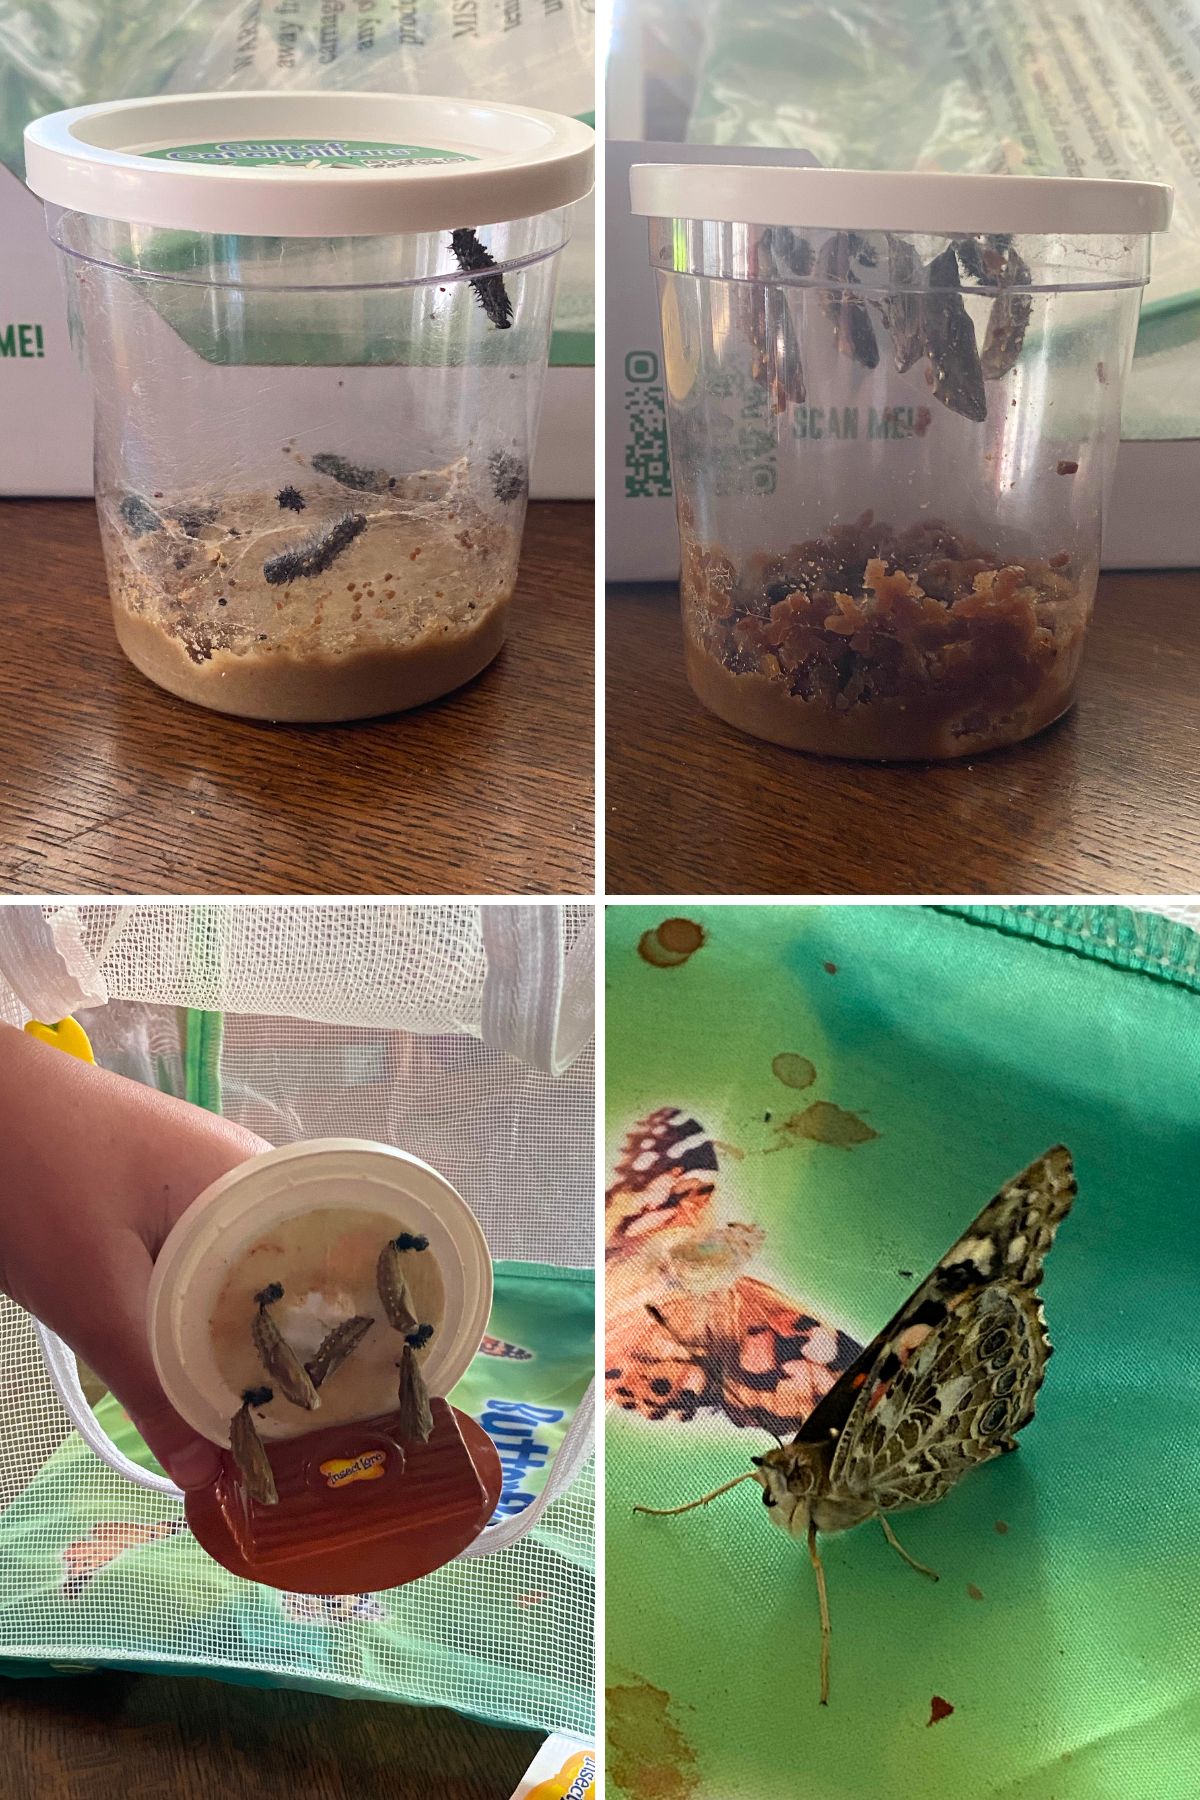
We watched the caterpillars crawl around in the cup each day. They grew very quickly and in less than a week were spinning their cocoons.

We followed the instructions that told us to wait for three days for the cocoons to dry and become stable. The we moved the lid with the cocoons into the habitat on the included stand.

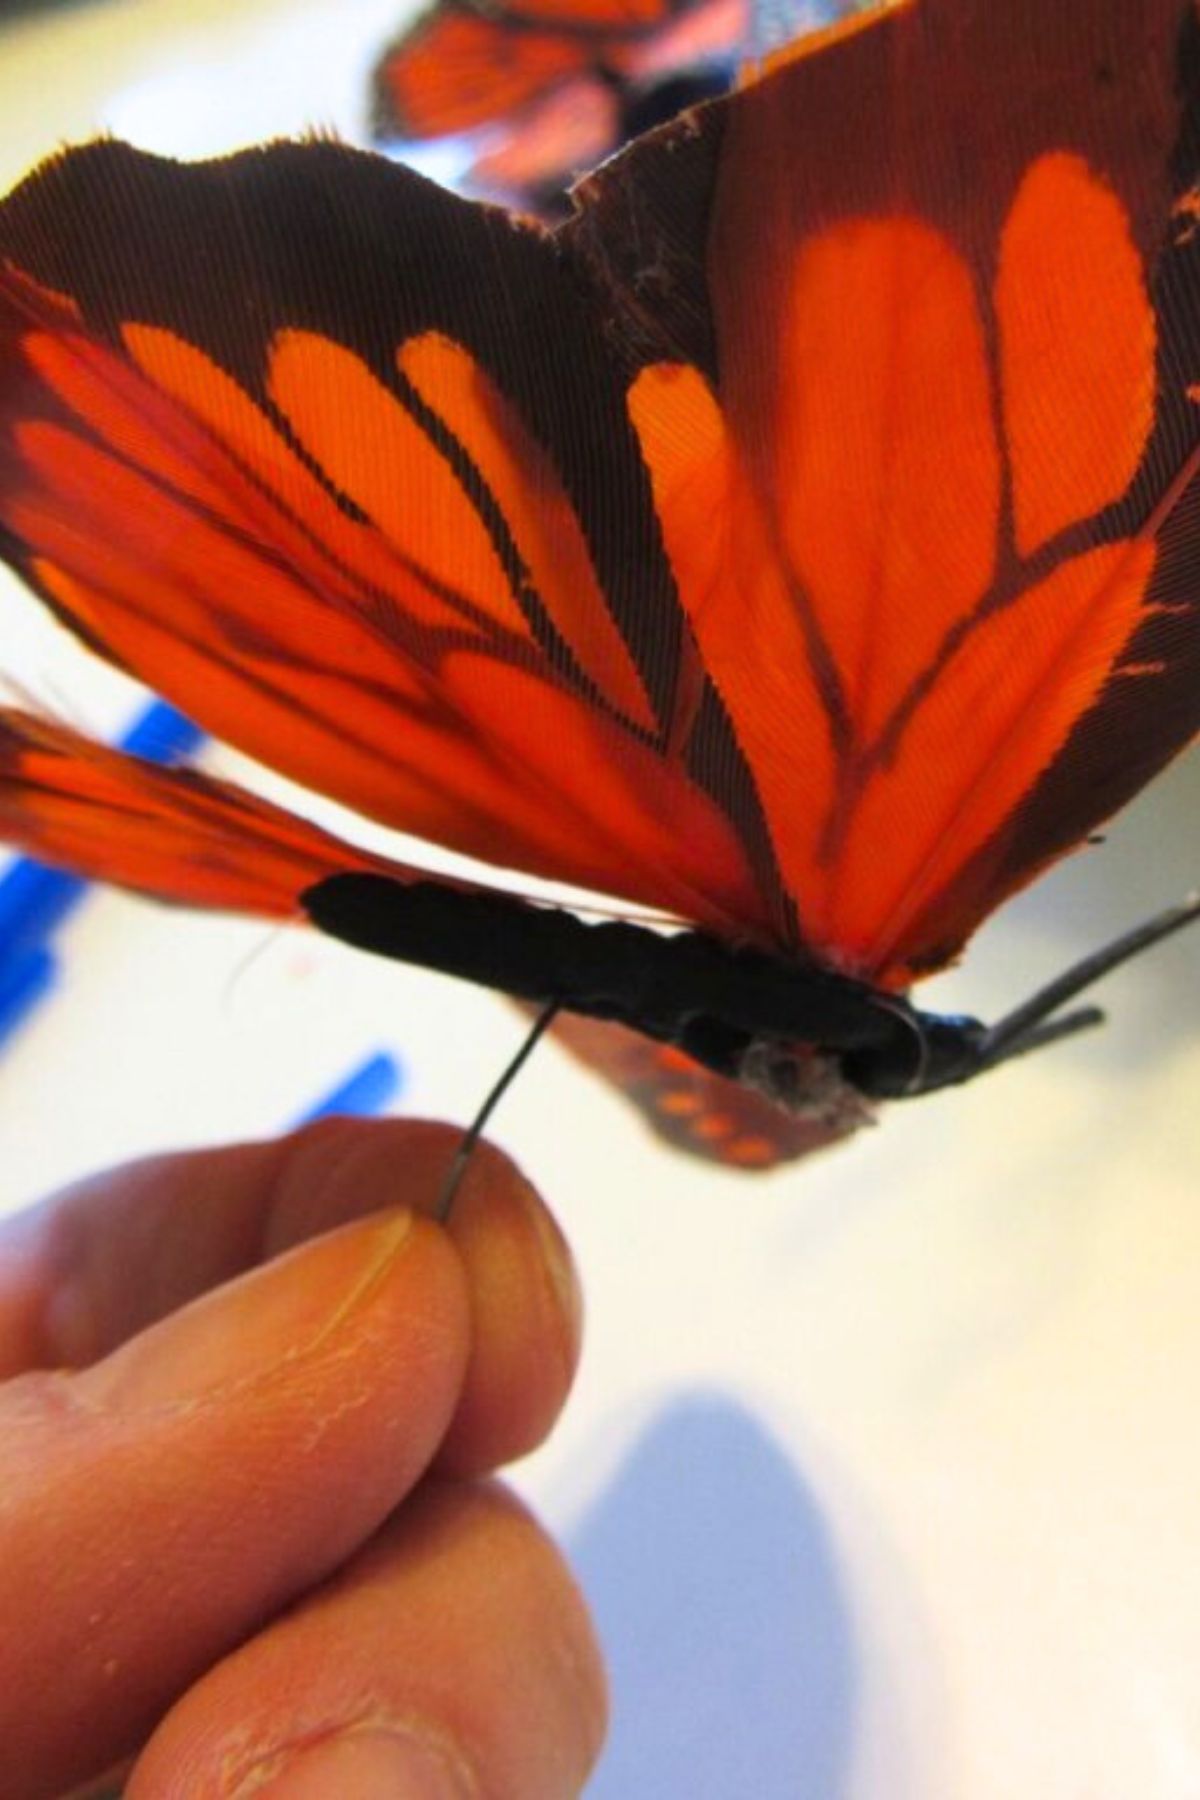
After another seven days, we woke up and checked the habitat. We had three butterflies! It took another day but we eventually had all five brand new painted lady butterflies and fed them with orange slices.

After a couple of more days we released the butterflies into the wild. I hope to see them around this spring!

This project was inexpensive STEM fun from the moment we opened the box. I wish you and your kiddos as much fun as we had!

More Great STEM Content

  • How to Make the Most of a Day Trip with Your Child
  • Fun and Tasty Moon Activities for Kids
  • Color Puzzles – Fun Math and Logic for Kids
  • Raising Kids Who Love Science

PIN THIS FOR LATER

April 27, 2025 3 comments
0 FacebookTwitterPinterestPocketEmail
Happy Father's Day written in chalk on a small chalkboard with a wooden frame
family lifefather's dayholidays

Father’s Day Gift Guide

by Teach Mama April 27, 2025
written by Teach Mama

Tired of giving Dad the same old socks and ties? This year, think outside the gift box! From treasure hunts for new horizons and toe-tapping concerts to gifts of love and backyard adventures, these fun and unexpected Father’s Day ideas will make Dad smile, laugh, and feel like the appreciated superhero he is.

Growing up we did the standard issue tie or can of car wax for Dad along with a card and lots of hugs. There are a lot more options out there today. I am hoping to stimulate your thinking about what the Dads in your life REALLY want this year.

What Dad Really Wants for Father’s Day

Other than world peace, most Dad’s want to know that they are loved and to share experiences with their family. This father’s day we can do better than the old tie trick!

Collage of photos; man and boy fishing on a dock, man hiking, raized arms at a concert, baseball, glove and bat

Experience Gifts

1.  Ball Game: Wrap up a new baseball gloveicon or baseball bat, but surprise Dad with tickets to see his favorite team.  Professional baseball games can get expensive, so consider attending a minor league or local college game—they’re just as fun!

2.  Hiking day: Introduce your dad to the awesome art of geocaching and give him a handheld GPSicon.  Geocaching is an absolute blast, and not only will Dad be intrigued, but he’ll also be totally up for the challenge of finding those caches!

3.  Concert: Bring some of Dad’s music to life by finding out when his favorite group is coming to town.  Tickets to a concert may be a little pricey, but isn’t Dad worth it?

Another thoughtful way to enhance Dad’s daily adventures is to ensure his essentials are well-protected. A phone case like those from Ghostek can provide the durability and style he needs, whether he’s hiking, traveling, or just going about his day. With a strong, reliable case, his phone will be ready for any adventure, allowing him to focus on the moments that truly matter.  

Four photo collage. Man holding a textbook, a Piper Cub airplane, man lifting weights, blacksmith and anvil

Gifts of Knowledge

4.  Classes: Wrap up a course book from the local community college and tell Dad that he can register for a course he’s wanted to take next semester.  Or if Dad’s not the studying type (or already has the degrees he wants!), find a class that aligns with his hobbies or interests. Consider: riding or flying lessons, woodworking lessons, cooking lessons, music or dance lessons (with Mom, of course!). There’s a place near us (Heritage Homestead) where they teach all sorts of homesteading classes. The Engineer has taken bee keeping, blacksmithing and horse farming to name a few. Maybe there is a place near you that offers the perfect fun class for Dad!

5. Training: Sometimes it’s hard for dads to admit they need help with something, so a private trainer is the answer.  Whether it’s a personal trainer at the gym, a few hours with the golf pro at the course, or solo time with a speed coach, whatever Dad loves, there’s a pro out there to help him improve.

6.  Stylist: Though he may not think he needs a personal stylist or a make-over, many dads need a little jumpstart to move them in the direction of finding their best self.  Most department stores or salons offer styling and make-overs. Believe me, Dad will love it.

Four photo collage with a red sports car, a man drinking water in a gym, a man watching television and a man singing in the shower

Subscription Gifts

7.  Music Channel: Tons of music subscription channels are on the market now, so shop around and find one that suits Dad’s needs.  Wrap up a pair of headphones along with a note explaining the gift, and Dad will be a happy guy.

8.  Favorite Television Channel:  Whether Dad loves movies or sports, news or the arts, there is a premium subscription channel for him. Treat him to his favorite for a few months, and I’m betting he’ll be over the moon.

9.  Magazine Subscription:  Time, Sports Illustrated, Vibe, or National Geographic. People, Wired, Men’s Health, or Car & Driver. Though we’re in the digital age, magazines are still super fun to receive, read, and share.

Four photo collage with a girl playing guitar, a girl raking, children washing a car and children cooking

Gifts of Love

10.  Really, all Dad wants for Father’s Day is to know he is loved and respected by his family, so do for him what you know he will love and appreciate.  Consider:

  • Making all the meals for the day
  • Taking over Dad’s household chores for the day
  • Treating Dad to a foot massage or back rub
  • Putting on a show or play for Dad
  • Playing music or singing a song for Dad
  • Writing a story about Dad or a poem for him
  • Compile a picture/video file of fun family times with Dad for a digital frame
  • Or make a playlist of everyone performing (together or separately) something special for Dad to have on a digital frame

Whatever you choose, the main goal is to let Dad know how much you appreciate and love him. So this year, skip the socks and surprise him with something unforgettable. Whether it’s a memory-making adventure, a subscription he’ll love, or a heartfelt gift of time, Dad deserves to feel like the hero he is. Go big, go bold, and give a Father’s Day he’ll never forget—it’s the dad-venture of a lifetime!

 More Great Family Content

  • Host An End Of School Year Family Dinner
  • Quick, Easy Father’s Day Surprise Notes
  • Painted Flower Pots – A Simple And Special Mother’s Day Gift
  • New Year’s Interview: Fun Family Tradition

PIN THIS FOR LATER

April 27, 2025 6 comments
0 FacebookTwitterPinterestPocketEmail
A young boy wearing a blue shirt and holding a handmade cardboard thank you sign.
family lifeinformative writingnon-fictionparentingwriting

How to Write a GREAT Thank You Note

by Teach Mama April 27, 2025
written by Teach Mama

Helping kids write thank you notes turns manners into magic! From birthday surprises to sweet neighborly gestures, a fun thank you card teaches kids to slow down, say thanks, and share their sparkle. It’s an easy way to grow gratitude, boost writing skills, and make someone’s day—one doodle at a time!

Thank you notes are a little bit of magic that we can all conjure up. It is so rare these days for someone to actually take the time to write and mail a handwritten thank you note. A personal note lets the person you are thanking know how special they are to you and how much their thoughtfulness means.

You don’t have to be a professional writer, you just have to be willing to take the time and follow the simple Magic Thank You Formula. Download the formula and practice worksheet below.

The Magic Thank You Formula

This Thank You Formula works perfectly for anything! It works for thanking Grandma for the hand knitted sweater, to Uncle Ethan for taking you fishing or for a zillion wedding gifts. It is Thank You perfection!

Who?

  • Who are you thanking? Start with what you call the person. Your kiddo doesn’t call Grandma, Mrs. Robert Paul Jones after all, so start with what your child calls that person. If your child doesn’t know the person well enough for an informal name then they will want to address them more formally. One thing I really love about the South is the custom of addressing adults as Miss Sue or Mister Bob–friendly but with a show of respect too.

What?

  • What are you thanking the person for giving you? This step is straightforward. “Thank you for the whatchmacallit you gave me.
  • Optional: Add a little more about the gift or the person — “It was so thoughtful of you to find it/ make it OR How did you know it was just what I wanted? OR I know you went to a lot of effort. Something along those lines.
  • Tell how you might use it or something about the gift you especially like— “It is the perfect lure and I’m sure I’ll use it to catch a lot of fish!”
  • Optional: Add a little more to the previous thought. “I’m sure the fish will go crazy for the red feather tail!”
  • A future looking sentence or something about your relationship to the gift giver— “I can hardly wait to go fishing with you this summer at the lake” or “I’m very blessed to have a Grandma who knits such beautiful things.” or “The whatchmacallit was just what I needed to finish my rocketship! Now we can finally take that trip to Mars!”

Closing

  • A repeat thank you— but this time make it a little more casual by saying “thanks again” instead of thank you.
  • Closing— This is super easy because it’s basically saying goodbye. You might dress it up if appropriate with “I love you to the moon and back” or “See you soon” or even just your name.

Thank You Notes From Pre-Writers

It’s never too early to get kids in the habit of expressing gratitude. It’s a big part of what psychologists call “moral development”. But what if they aren’t writing yet? It’s okay. You can lead them through the steps and write what they say.

For example: “Who gave you this gift?” “Gramma and Pops”. So we write Dear Gramma and Pops. What did they give you? “The little super heroes with capes and everything!” So we say “Thank you for the little super heroes with capes and everything!”

You see how this goes. Be sure not to “clean up” the cuteness of what your child dictates to you. (Sometimes, of course, a child may be brutally honest and say something unkind about the gift. This is an opportunity to teach how to say thank you even if they don’t particularly like the gift.

They are thanking the giver for the effort and for thinking of them. At the closing you can have them “write” I love you (or whatever). You put the translation under it and have your child sign it (again with a translation).

The preciousness quotient of the note is off the chart at this point! Make this a fun joint activity with your child (where you GET to write a thank you rather than HAVING to write one) and it won’t be long before he or she is telling you what the next step is!

Extra points if you and your kiddos make personalized note cards!

Printed Magic Thank You Formula on a wooden background

Download Your Own Free Thank You Formula and Worksheet

Throw your email in the box below and the download link will appear in your inbox as if by magic!

More Posts for Intentional Parenting

  • 9 Things All Kids Must Hear Their Parents Say
  • Is My Child Gifted?
  • Dealing With Childhood Fears – A Parent’s Guide
  • Noticing Your Kids … In a Good Way

PIN THIS FOR LATER

April 27, 2025 0 comments
0 FacebookTwitterPinterestPocketEmail
Mother and child reading
alphabetearly literacyprintablesreadingrhymingsight words

Kindergarten Summer Reading Readiness

by Teach Mama April 23, 2025
written by Teach Mama

Get your little one ready for kindergarten with fun, engaging reading readiness activities this summer! From interactive story time and letter scavenger hunts to playful word games and hands-on crafts, these exciting experiences build early literacy skills while keeping kids entertained. Spark a love for reading with these creative, confidence-boosting activities! Free printable Summer activity calendar!

It’s always seemed to me that Summer had a maddening way of flying by so fast! Before I could turn around school was starting again! Is it that way for you too? By creating a Summer activities calendar you can make sure everything gets planned AND done. When school starts your little one will have had a summer of fun that secretly helped them be more prepared for a great kindergarten year!

Mix and Match Reading Fun Calendar

It’s super easy! Just print out as many calendar pages as you want then print and cut out the activity squares. Glue the activity squares on your custom calendar! Easy peasy!

No other prep is required to get started. I like this bright white card stock and these glue sticks.

What’s on the Calendar?

I know summer is a busy time so most of these fun reading activities take little to no prep time. It is important to plan time to get your kindergartener ready for a super successful school year along with all your other plans for the summer break. Print and cut out the fun summer reading activities printable and then mix and match them on the custom calendar also in included. Super easy! Here are some examples of what’s on the printable.

  • Book Cover: Talk with your kiddo about what goes on a book cover: Title, Author, Illustrator, and a Picture that gives a clue what the book is about. Have them draw a new cover for a favorite book. This seems like an easy one, but for an early or pre-reader this really helps get them ready to pick out books they will like and be interested in. “Predicting” is an important skill in school and this helps develop it.
  • Visit the Library: I recommend setting a limit on the number of books they can check out based on how often you plan to visit the library and how often you plan to read to them. I made the mistake of not doing this with our three kids… the hassle of finding all the library books and the library fines for the ones we didn’t find in time were horrrendous! Three kids can check out a lot of books!
  • Write a Letter to the Author: If your child can write the letter themselves that’s great! But if they aren’t up to that just yet, they can dictate it to you. Note that at the beginning of the letter (dictated to Mom by Sally Smith) and then have them sign their name. Writing is such a solitary work that writers really enjoy getting letters from readers, especially telling them what they liked about their book. They may even write back!
  • Retell a Story: This combines a lot of important skills: comprehension, recall (key phrases and words specific to the story), sequencing (what order things happen) and the beginning of public speaking.
  • What Might Come Next?: This is like writing an epilogue to a really great story.
  • ABC Games: ABC letter hunts in the backyard (plastic refrigerator letters work great for this!) finding or thinking of things that start with each letter, Site Word Go-Fish or this great ABC Bingo game.
  • Letter Writing Activities: Making letters out of cookie dough (buy ready made if you want to save time and mess) sand tray letters, dotted letters, practicing their name.
  • Write a Shape Book: Let your child be the author!

How the Calendar Works

Let’s face it, all our summer schedules look very different from anyone else’s. So to accommodate for that we provide blank calendar pages for the summer months and preprinted activity blocks you can chose from and work into your summer plans.

You may want to, for example, visit the library every week. Great! But maybe your schedule is so full every other week works better. Also great. Some of these activities may appeal to your child and you more than others. I have tried to provide a good variety so you and your child have lots to chose from.

Pick the ones that look the best to you and stick them on your calendar! Let your child decorate them if that will build their excitement for the things they will be doing this summer. While these activities are about learning, they are also about FUN! Have lots of fun reading with your little one this summer so they can have the best kindergarten next year!

Reading readiness calendar printable

Grab Your Free Summer Reading Readiness Calendar

Just toss your email in the box below and the download link will appear in your inbox in a jiffy!

Other Reading Resources for Parents

  • Reading Assessments For Reading Success
  • Write a Shape Book with Your Pre-Reader
  • Bedtime Stories Are More Important Than You Think
  • Tips For Helping Early Readers
  • Sight Word Games To Prepare For Kindergarten: Go Fish!
  • Leafy Indoor/Outdoor Alphabet Hunt

PIN THIS FOR LATER

April 23, 2025 9 comments
0 FacebookTwitterPinterestPocketEmail
Wooden pencil holder painted white with colorful letters glued to the side and rolled papers and pencils inside
craftsholidaysmother's dayschoolteacher appreciation

Teacher Gifts for the Last-Minute Parent

by Teach Mama April 16, 2025
written by Teach Mama

 Show your child’s teacher just how much they’re appreciated with a quick and inexpensive DIY pencil holder! Elementary students will love decorating these practical gifts with paint, some scrabble tiles (or other alphabet letters you might have) creating a colorful and personalized keepsake. Perfect for the end of the school year, these handmade pencil holders are both thoughtful and functional!

The most wonderful time of the whole kid year, second only to Christmas morning, is the last bell on the last day of school! But before your kids bust out of those school doors and head into Glorious Summer, have them take time to give their teachers a token of their appreciation for all the time, energy and love they pour into teaching.

Before the Last Bell Rings

Inspired by our Teacher Appreciation Gifts post, we made some pretty cool pencil holders this year and they turned out really awesome.

Simple. And so cute.

For this teacher gift, you’ll need:

  • A wooden pencil holder— you can go simple or more elaborate, it doesn’t matter. Or go for a wooden desk organizer or super-fancy Lazy Susan organizer
  • Scrabble letter tiles
  • Hot glue gun
  • Acrylic paint and brushes if your pencil holder is unfinished

Here’s how to make it:

1. Choose the word(s) you want displayed on the pencil holder.

We chose things like school, teach, learn, listen, math, read.

2. Glue the words onto the gift. Easy!

We used our hot glue gun, and though it wasn’t perfect, it did the job. With younger kids, a parent or older sibling may need to do the actually hot glueing or they could use a low temperature glue gun.

 3. Write a nice little thank you note:

Write a note thanking the teacher for all her hard work this year. Recount something about her (or him) from the year that you will always remember or something special you really appreciated that she (or he) did. Be sure to wish them a wonderful summer break because they really need it! Roll up the note and put a ribbon around it and slip it in one of the compartments. Voila! The perfect quick end of year thanks for being my teacher gift!

Top image of a book with a blue ribbon tied around it.  The bottom image of a framed affirmation

Hey Dads!

Homeschool teacher/moms need love and appreciation too! I can’t begin to tell you what it will mean to her if you and the kids do this for her. She pours the same amount of time and energy and tons of love into what she does, but unlike other teachers, she does it all for free! Your thoughtfulness will be SO appreciated! I promise.

If you really want to level up your gift here are some ideas.

  • Add a nice gift card to a great local store, coffee shop or restaurant
  • Include some cool framed teacher appreciation quotes (you can totally grab these as cards, too!);
  • Give her a copy of Jessica Turner’s Fringe Hours book and notepads;
  • Wrap it all in a nice gift bag.

And that’s it–a quick gift for teachers that the kids helped create and that took not a whole lot of time.

It’s a win!

More fun ideas for teacher gifts

  • Thumbprint note cards
  • Flower pens
  • Butterfly pens
  • Quick, cool teacher appreciation gifts
  • Quick and easy thank you teacher gifts

 PIN THIS FOR LATER

April 16, 2025 3 comments
0 FacebookTwitterPinterestPocketEmail
Young child watering plants from a green water can
family funfamily lifeparentingprintables

Help Your Kids Build Life Skills This Summer

by Teach Mama April 16, 2025
written by Teach Mama

Summer is the perfect time for elementary-aged kids to develop confidence and independence through real-world practice. With a slower pace and fewer school demands, families can focus on teaching life skills that stick—while having a whole lot of fun together.

Life skills aren’t just chores—they’re stepping stones toward independence, confidence, and resilience. This summer, give your kids the chance to learn in ways that will serve them well for years to come. And who knows? You might just find a few new helpers around the house.

I was blessed to be the only child of two public school teachers. During the summer we had the freedom to spend time with my grandmothers and my Dad would paint houses for his summer income. Learning to garden, canning, cooking, painting and, of course, reading filled my summers as much as free play in the backyard.

I was not even aware of the life skills my parents were leading me through but I so sure appreciate them now. The Engineer, who has a critical eye when it comes to things like painting the house, says that I am still the best painter he knows!

All you have to do is let your kiddos tag along while you do what you normally do. A few words of encouragement and some recognition will go a long way to building self-confidence in your kids!

Summer Is Ideal for Life Skills Learning

Without the structure of school days, summer provides open-ended time for exploration, creativity, and learning by doing. It’s the ideal season for children to try new tasks, take on responsibilities, grow into capable helpers at home and in the community and prepare for their future.

Create a Summer of New Skills Challenges

I have never known a child who wasn’t in a hurry to be a “grown-up”. Have you? Use that build in desire as a motivator for them to learn “grown-up” skills! Turn the entire summer into a low-pressure challenge. Choose one new skill to focus on each week.

Keep it playful and rewarding—think printable badges (that you can grab for free below!), sticker charts, or a homemade certificate at the end. Not only do these activities build competence, but they also help your child feel proud of their progress.

12 Weekly Skills Challenges for Kids

Each of these challenges is designed to be fun, achievable, and developmentally appropriate for elementary-aged children:

1. Laundry Pro

Learn to sort clothes by color, check pockets, start the washer, and fold clean laundry. Teach them the difference between towels, delicates, and everyday clothes.

2. Kitchen Helper

Teach your child to make a simple meal or snack—like sandwiches, smoothies, or scrambled eggs—while focusing on safety and cleanup.

3. Money Manager

Introduce the basics of budgeting with a small allowance or play store. Practice counting money and making change. Be warned, the kids will want to keep this going for hours! You can also get fun economics books from The Tuttle Twins to engage and inspire your children.

4. Garden Grower

Let kids help with watering, weeding, or planting flowers or vegetables. Talk about plant care and patience.

5. Thank-You Note Author

Practice gratitude by writing and decorating thank-you notes for friends, family, or community helpers. You can help your kids create adorable personalized note cards here.

6. Timekeeper

Help kids learn to read both digital and analog clocks, track daily routines, and stay on schedule with a simple planner.

7. Toy & Closet Organizer

Teach kids how to declutter by donating items they no longer use and organizing their space in a way that works for them.

8. Problem-Solving Pro

Present a small household problem (like a drawer that won’t close or a missing sock) and let your child come up with creative solutions.

9. Meal Planner

Let your child help plan a week of family dinners—choosing meals, helping with the grocery list, and prepping ingredients. You will have to monitor this process so you don’t end up having a week’s worth of Mac & Cheese or hot dogs or…

10. Pet Care Pal

If you have a pet, teach your child to measure food, refill water, and help with walks or clean-up.

11. Social Star

Practice making polite conversation, introducing themselves and others, shaking hands, and showing good manners at the table.

12. Neighborhood Navigator

Walk or bike around the neighborhood to learn landmarks and street names. Practice safe street crossing and understanding directions.

Celebrate Progress with Printable Badges

The goal isn’t perfection—it’s progress. Let your child try, make mistakes, and grow through experience. The more relaxed and playful you are, the more likely you’ll both enjoy the learning journey.

Create a sense of accomplishment by awarding a printable badge or certificate at the end of each challenge. Display them on the fridge or in a special notebook. At the end of summer, celebrate with a “Life Skills Graduation” and a fun treat to mark their achievements.

I’ve prepared some fun badges you can use to celebrate with your kiddos. Everybody likes to be recognized in a special way! Grab these for your summer adventure below!.

Printed hexagonal badges with red borders and colorful cartoon style images of kids performing daily chores

Grab Your Free Download Below

Throw your email in the box below and the link to your free download will appear as fast as the summer goes by.

Trending Posts for Intentional Parenting

  • How to Get Kids to Open Up
  • The Importance of Unstructured Play for Kids
  • Make the End of School Special with a Family Dinner to Remember
  • Dealing with Childhood Fears – A Parent’s Guide
  • Handling Sadness, Tragedy and Grief as a Family
  • Helping Kids Manage Anxiety

PIN THIS FOR LATER

April 16, 2025 0 comments
0 FacebookTwitterPinterestPocketEmail
Blonde child leaning inside a tire swing.
family funfamily lifeindoor activitiesMental Healthoutdoor activitiesparenting

The Importance of Unstructured Play for Kids

by Teach Mama April 16, 2025
written by Teach Mama

“Play” is the language of children and unstructured play is essential for healthy childhood development. When kids explore freely—building forts, inventing games, or daydreaming in the backyard—they develop creativity, problem-solving skills, and emotional resilience. Unstructured play with others (kids, siblings, family) encourages social and moral development. Unplugged and unscheduled time lets children follow their curiosity, build independence, and just be kids with their imagination leading the way.

I remember spending hours in my backyard as a kid. Swinging on the swing, playing with my friends in the little house my Dad built for me or just lying on my back watching the clouds roll by. I treasure the memory of these times and am seeking to put a little more unstructured play time back in my own adult life.

How sad would it have been had I never had those times to dream and to just be a kid!

What is Unstructured Play?

Unstructured play is just what it sounds like. Giving kids time to be kids. To follow a caterpillar or just sit and contemplate the world around them. We’re not talking about wasted time here. Oh no! Time spent in free, or unstructured, play is every bit as important as planned and “purposeful” pursuits for kids. The lack of purpose is…well it IS the purpose!

What Can Unstructured Play Do for Kids?

  • It gives them the power to create something new
  • It encourages creativity and seeing possibilities in everyday things
  • It encourages kids to cooperate in the name of having fun
  • It relieves stress
  • It promotes safe interactions with others through playing
  • It encourages problem solving
  • It fosters social skills and emotional development (being a good winner/loser, not cheating, taking turns etc.)
  • It helps kids express what is going on with them and work through situations they don’t yet have the words for

What Real Play Looks Like

We often teased my dad about being a penny-pinching Scotsman, but in reality he was a Depression Era kid who hadn’t had lots of bought toys. So while I did have purchased toys he made sure I also had lots of opportunities for much less expensive unstructured play.

I remember playing with the giant box the new refrigerator came in. I think I played with it for months! It was a castle, a spaceship, an airplane and a playhouse. I drew all sorts of things on the inside and outside of it, I cut windows and doors in it, I attached things to every surface of it. It was a very well played with box! Finally one day it just sort of disintegrated and had to be thrown out. Very sad until I realized there were a lot more boxes out there!

Heart-shaped blue sky hole in white clouds

One of the best things about unstructured play is that the child (or children) decides how the play goes. Give a kid a ball or access to WillyGoat’s school playground equipment and see what game they come up with! Watch kids play with action figures or dolls. No one but them is telling them how to play and yet they can very happily “play” that way for hours. Maybe your child will lay on a blanket in the backyard, finding dinosaurs, rabbits and sailing ships in the clouds.

There are far too many examples of unstructured play than can be written in one blog post! So let’s look at some of the common characteristics. The first two can be a little difficult for adults to wrap their brain around!

  • Unstructured play doesn’t have a defined (apparent) purpose!
  • It isn’t designed by or controlled by adults. I can practically hear some of you saying, “Well some adult designed that doll or ball or little car!” Indeed they did, but the child decides how to play with it!
  • Pretending in unstructured play lets kids find new uses for things. So couch cushions and a blanket become a castle and a stick becomes a magic wand or fishing pole or light saber and the floor is suddenly lava!
  • There is little or no need for purchased toys although the ones they already have may be used in unstructured play.

Encouraging Play

There are a few guidelines around our house for unstructured play just for safety’s sake and for future usability of our household goods!

  • Ask to use something first. My kitchen drawers have all sorts of fascinating things to play with… but there are also some things that could either be dangerous or could be damaged. So always ask first.
  • When they are done playing everything needs to be put back to rights for the next play session and for mom and dad’s sanity! (What happened to my tea strainer??)
  • Define what a safe area for play is.

Sometimes, if you’re very blessed, you may be asked to join in the play. If so, it’s a great time to remember how to just be a kid and have fun!

Trending Posts for Intentional Parenting!

  • 16 Quick and Easy Last Week of School Activities
  • Help Your Kids Build Life Skills This Summer
  • 9 Things All Kids Must Hear Their Parents Say
  • Host an End of School Year Family Dinner
  • Is My Child Gifted?
  • Dealing With Childhood Fears – A Parent’s Guide
  • Noticing Your Kids … In a Good Way

PIN THIS FOR LATER

April 16, 2025 0 comments
0 FacebookTwitterPinterestPocketEmail
Happy kids getting off of a yellow school bus
Activitiesfamily lifeparentingprintablesschoolteaching

16 Quick and Easy Last Week of School Activities

by Teach Mama April 7, 2025
written by Teach Mama

The last week of school is a perfect time to celebrate, reflect, and have fun! These easy, low-prep activities help teachers and parents create joyful end-of-school-year moments kids will remember-without the stress of big projects or plans. Simple ideas packed with meaning, laughter, and connection.

As the year winds down, it’s tempting to shift focus to summer schedules and upcoming plans. But taking just a little time to look back, reflect, and celebrate what’s passed can help kids—and adults—feel more grounded, grateful, and ready to begin the next chapter.

The best part? You don’t need glitter, glue guns, or elaborate parties. Just a little intention, a few simple ideas, and the heart to make it count.

Make the Last Week of School Memorable

Whether you’re teaching a classroom full of students or guiding your own child at home, these simple, low-prep ideas can help you end the year on a high note without adding to your to-do list.

Classroom Ideas That Keep Things Fun and Focused

When attention spans are short and structure starts to slip, these easy activities can help keep your class engaged without the need for complex materials or prep work. Don’t worry! There won’t be a test. You can download this list below!

  1. Memory Booklets – Staple together five to ten blank pages and let students turn them into personal memory books. Encourage them to draw pictures, write favorite moments, or list friends they made this year.
  2. Autograph Wall – Tape up a big sheet of paper and let students take turns writing kind messages, doodles, or signatures. Take a picture! It makes a great keepsake and gives everyone a chance to say goodbye in a creative way.
  3. “I Will Never Forget…” Circle – Gather your students in a circle and pass around a small object, like a stuffed animal or talking stick. Each student can share one thing they’ll never forget about this school year.
  4. Summer Bucket List Poster – Let kids brainstorm all the things they hope to do this summer—from swimming to visiting cousins. Write them on sticky notes or draw them on a large poster you create together.
  5. Desk Awards – Give out silly, light-hearted awards like “Best Crayon Collection” or “Most Colorful Desk.” You can even have students suggest ideas for their classmates and vote.
  6. Read-Aloud Picnic – Take your story time outside. Bring a blanket and a favorite book, then read aloud while enjoying fresh air and a little sunshine.
  7. Teacher Notes – Write a brief but meaningful note to each student telling them what they meant to you and what you learned from them this past year.
  8. Teacher Time Capsule – Have each child write a note to their future self or next year’s students. Collect them in an envelope or box and set it aside for a future read—or hand it off to next year’s class.

At-Home Ideas to Make the Last Week Feel Special

If you’re a parent watching your child wrap up the school year, you can still make these final days feel fun and meaningful without a big party or special event.

  1. End-of-Year Interview – Take a few minutes to ask your child fun questions like “What was your favorite lunch this year?” or “What’s something you learned that surprised you?” Write down or record their answers and save them to look back on later.
  2. Photo Day – Recreate your child’s first day of school photo with a matching pose or outfit. It’s a great way to mark how much they’ve grown in just one school year.
  3. “Last Lunchbox” Surprise – Tuck a note, a sticker, or a favorite snack into their lunch on the final day. A small surprise can go a long way in making them feel loved and celebrated. You can download your free Last Day of School Lunchbox Notes below!
  4. After-School Celebration Walk – Take a walk as a family and talk about the school year. Ask your child to name their favorite moment, proudest achievement, or something they’ll miss.
  5. Backpack Cleanout Challenge – Make cleaning out their backpack into a race or scavenger hunt. Set a timer and see how quickly they can find and sort their supplies.
  6. Summer Wish Jar – Have your child write down a list of things they’d like to do this summer—big or small. Fold each wish and place it in a jar. Pull one out when you need a fun idea on a slow day.
  7. Schoolwork Art – Turn leftover worksheets into something creative—origami, paper airplanes, or a mixed-media art project. It’s a fun way to clear out clutter and give old papers new life.
  8. Kindness Chain – Write one kind thing your child did this year on a strip of paper each day and link them together. You’ll end up with a beautiful chain of their kindness and growth.

For parents who may want to mark the special occasion with the whole family, take a look at How to Host an End of School Year Family Dinner.

TeachMama wishes all of you the best school year memories and the best summer ever!

Printed page with the post activities list and a page of lunchbox notes for kids with colorful cartoon-style images on a wood background

Grab Your Free Download

Toss your email in the box below and the download link for your free Activities List and Last Day of School Lunchbox Notes printable will appear in your inbox like summer magic! Print on bright white card stock and you’re in business!

More End of School Year Tips and Tricks

  • Host An End Of School Year Family Dinner
  • Quick, Cool Teacher Appreciation Gifts
  • How To Make Super-Easy, Beautiful Flower Pens
  • Quick And Easy Inexpensive Thank You Gifts For Teachers
  • DIY Butterfly Pens: A Sweet Spring Garden Gift

PIN THIS FOR LATER

April 7, 2025 0 comments
0 FacebookTwitterPinterestPocketEmail
Photo collage with images of moon phases on top, oreo cookies with the icing carved into moon phases in the middle and a lunar landscape photo on the bottom
indoor activitiesoutdoor activitiesprintablesscienceStargazingSTEM

Fun and Tasty Moon Activities for Kids

by Teach Mama April 5, 2025
written by Teach Mama

Get ready for an out-of-this-world learning adventure! Studying the moon is a great way to spark curiosity and imagination in elementary students. From sharing lunar phases with cookies to exploring famous moon landmarks like the Sea of Tranquility with binoculars, kids will stamp their lunar passports and become moon experts!

Around this house we are space obsessed! The Engineer and I both remember watching all the early NASA rocket launches and the moon landing. The Engineer’s dad even designed a cryogenic valve for the Saturn rocket! Now we watch every. single. launch by Space X. We celebrate Lunar Landing Day (July 20,1969). We are invested!

With moon phase cookies, a lunar passport and a moon phase flip book, you and your kids can be invested too! Grab your free download below!

Start the Moon Learning Fun!

Nothing inspires wonder quite like the moon. It’s been inspiring people since the very beginning of … well, people! So start by simply “wondering”. I wonder how far it is from here to the moon. I wonder how long it takes to get there. I wonder why the moon seems to change shapes through the month. I wonder if the moon really is made of green cheese!

What other things do you and your kids wonder about the moon? These fun activities will answer at least some of your questions!

Printed Moon Phase Flip Book, Lunar Passport and open sandwich cookies with the icing carved to illustrate moon phases

Gather Your Supplies

  • Chocolate sandwich cookies (like Oreos)
  • Popsicle sticks
  • Binoculars or telescope (optional but fun!)
  • White card stock
  • Scissors and glue
  • Markers, crayons or colored pencils
  • Printable Lunar Passport (or make your own!)
  • Printable Lunar Phases Flipbook
  • Brass brads or binder clips
  • Books and videos about the moon (optional)
Labeled image of moon phases in a circle around a graphic image of Earth

Oreo Moon Phases

Ready for some “tasty” learning? Use cookies to demonstrate how the moon changes shape throughout the month!

Instructions:

  • Carefully twist apart 8 cookies, keeping the icing side whole if possible.
  • Use a popsicle stick to shape the icing into the phases in the image above and place on the free downloadable printout.
  • Arrange the cookie phases in a circle on the printable to show the moon’s cycle.
  • Talk about what each phase looks like in the night sky and when you might see it.
  • Find out what phase the moon is in tonight.
  • What phase comes next?

Tip: Label each phase and snap a photo of your cookie creation before everyone gobbles them up!

Child's hand holding the printed and assembled moon phase flip book open to a crescent moon

Phases of the Moon Flip Book

This hands-on craft helps reinforce how the moon appears to change over time, plus flip books are just plain FUN! You can grab your free downloadable moon phase flip book below!

Instructions:

  • Print on white card stock and cut out each frame
  • Use a hole-punch to punch each circle on the left edge
  • Stack the pages in order making sure the right edge of the pages are even
  • Use brads to fasten the stack of images together
  • Flip through it quickly to watch the phases change!
Lunar "passport" opened to the first page with a map of lunar features on the left-hand page and the Explorer's record on the right-hand page

Lunar Passport – Moon Map Exploration

Take your learning to the stars—literally! Create a Lunar Passport and “visit” famous spots on the moon. Some questions you can ask your kiddos before your trip:

  • What do you already know about the moon?
  • What would you love to learn?
  • How far do you think the moon is from Earth?
  • Do we ever see the back side of the moon?
  • How many times have people been to the moon?
  • Who was the first person to step foot on the moon?

Instructions:

  • Print the passport on white card stock. Set your printer for 2-sided mode so the front and back of the pages match.
  • Cut out along the dotted lines and fold on the solid lines.
  • Assemble book style in page order and and staple along the spine.
  • Color the landmark stamps and cut them out.
  • Have a moon viewing (with binoculars) on a dark full-moon night.
  • Find the landmarks marked on the passport lunar map.
  • Each time your child “visits” a spot, “stamp” their passport with one of the astronaut stamps!

More Moon Fun

Round out your lunar unit with these engaging activities:

  • Read books about the moon, both fiction and nonfiction.
  • Watch kid-friendly videos about the moon and space missions.
  • Use NASA’s virtual moon tools or explore a 3D moon model online.

Our Favorite Moon Books and Videos

  • Papa, Please Get the Moon for Me
  • The Moon Book
  • 50 Things to See on the Moon: A first time stargazer’s guide
  • The Apollo Missions for Kids
  • The Museum on the Moon: The Curious Objects on the Lunar Surface

For some great videos, try these. We love them!

  • The Moon for Kids
  • National Geographic Kids: Facts About the Moon
  • NASA Space Place: All About the Moon – This video has a really cool interactive feature where you and your kiddo can zoom in or rotate the moon view every which way. You can even view the far side of the moon!
Printed Lunar Passport open to the first page, mission "patches" with cartoon style astronauts, an assembled moon phase flip book and sandwich cookies with the icing carved into moon phases arranged around a printed Earth image

Grab The Download!

Throw your email in the box below to grab your own free moon fun printable!

More STEM Adventure for Kids!

  • Fun with Rockets for Kids
  • Help Your Kids Love Science
  • How to Raise Kids Who Love Math

PIN THIS FOR LATER

April 5, 2025 20 comments
0 FacebookTwitterPinterestPocketEmail
Terra cotta pot with red hearts and green dots painted on it planted with live yellow and red flowers on a wooden table
craftsfamily funholidaysindoor activitiesmother's day

Painted Flower Pots – A Simple and Special Gift

by Teach Mama April 3, 2025
written by Teach Mama

Celebrate Mother’s Day or any special occasion with a heartfelt, handmade gift! Painting and decorating flowerpots is a simple, creative, hands-on activity that elementary-aged kids will love. Plant vibrant flowers for a personalized touch that blooms with love and pride. This simple, personal project makes the perfect keepsake for moms, grandmas and every loved one!

In years past for Mother’s Day, I leaned on an old faithful, painted flower pots. But this year our eldest grandson and I worked on a special house-warming gift for his other grandmother who loves plants.

Paint a Pot – Create a Keepsake Gift!

You can’t go wrong when you take a little time to jazz up a clay pot, add some daisies and throw in a bushel of love! All you need are a few basic acrylic paints, a pot and saucer (the saucer is optional), and some seeds (or plants if you’re in a real hurry!).

What You Will Need

In order to make these pots, you need some pretty basic materials:

  • Craft paint
  • Paint brushes
  • Shaped sponges for stamping
  • 5″ or 6″ terracotta pot and saucer
  • Potting soil
  • Flower seeds or a plant
Child's hand painting a terra cotta flower pot white with a brush

Create the Painted Pot

Paint the Pot

Start with covering the brown pot in white paint (or whatever color you want as the background color). Then let dry. We were recycling a mismatched pot and saucer so this step was super important.

Big strokes with a flat brush and the challenge of covering the entire pot somewhat evenly is great fine motor skills practice for kids. Because this part of the activity isn’t all that mentally challenging it’s a great time to talk about important stuff… like Star Wars, world economics and if dragons really exist! Your kiddo may have different topics in mind, of course!

White flower pot on a wooden table with a child's hand brushing paint on a heart-shaped sponge stamp

Decorate the pot and saucer using sponges and paint!

Sponge stamps make decorating a whole lot easier for little folks, but even older kiddos will enjoy blending colors before stamping. I cut the shapes out of cheap kitchen sponges but you can buy them if you wish.

We experimented with repeating designs and layering design elements on paper first so we could pick which we liked best before committing.

To “blend” the colors paint them on the sponge before pressing it onto the pot. As pressure is applied the colors sort of squish together and automatically “blend”

We had large and small hearts, dots and leaves to chose from for our designs. I used some of the sponge scraps to make some straight and curved lines too when it seemed like we were going to need them. Then we watched Encanto and suddenly needed a large heart with heart shaped hole in it! Go figure.

When all the painting was finished to the grandson’s satisfaction and thoroughly dried we sprayed it with a nice clear coat to protect the paint.

Add the Plant

All that was left at this point was to fill the pot with potting soil and either seeds or a plant. We opted to go the plant route … because I am not the grandmother with green thumbs!

We added a nice housewarming card that he made and added a ribbon because how do you know it’s a gift if it doesn’t have a bow??

His “green thumb” grandma loved it!

Happy grandma and grandson with the painted flower pot gifts

Even more fun gifts

  • Super Easy DIY Flower Pens
  • Father’s Day Gift Guide
  • DIY Teacher Appreciation Gifts
  • Thumbprint Note Cards
  • Three Fun Fall Owl Crafts
  • Sweet DIY Spring Butterfly Pen Craft

PIN THIS FOR LATER

April 3, 2025 0 comments
0 FacebookTwitterPinterestPocketEmail
Family seated outdoors at a wooden table with red berry decorations, dinner set, candles and soft lights around them.
Activitiesfamily lifeindoor activitiesparenting

Host an End of School Year Family Dinner

by Teach Mama April 1, 2025
written by Teach Mama

Celebrate the end of the school year with a family dinner that honors your child’s hard work, growth, and accomplishments. This simple tradition sets aside a time for reflection, encouragement, and fun. Help your child end the year feeling seen, celebrated, and excited for what’s ahead. Here’s how to make it extra special!

Hosting an end of school year family dinner is a simple, powerful way to mark the close of a chapter. It reminds your child that learning is a journey, that effort is worthy of celebration, and that family is their biggest cheerleader.

We homeschooled our kids so we were able to craft celebrations for graduations, recitals, black belts and all of those little, and oh-so important, achievements. Grandparents and cousins attended and each celebration is a special memory.

Here are some tips that we learned along the way to help you create your next favorite time.

How to Host an End of Year Family Dinner

An end of year family dinner is more than a meal. It’s a chance to pause and appreciate the journey. Whether your child soared academically or simply showed up and tried hard each and every day, this dinner is an opportunity to recognize their effort in a supportive environment. It lets your kiddos know that effort matters, maybe even more than winning, and that family celebrates each milestone together.

Set the Tone

Start by choosing a night that works for everyone and let your child know this dinner is in their honor. Involve them in planning the meal. It could be their favorite food, a backyard picnic, or something as simple as pizza with a homemade dessert.

Add a few decorations, like streamers or a handmade “congratulations” sign, to make it feel like the special time it is.

Share Highlights and Reflections

During the meal, invite each family member to share something they noticed or appreciated about your child’s effort during the school year. These can be academic achievements, character growth, or funny stories that will become family legends. Even in the years that are a little more challenging, kids can and should still be honored for their efforts.

Give your child a chance to share their favorite memories, proudest moments, and what they’re most excited about for next year. You can grab your free conversation starter printable below to help get this going. These fun, thoughtful questions help everyone—from kindergartners to grown-ups—share their favorite memories from the year.

Add a Personal Note

Write your child a short end-of-year letter and read it aloud at the table. A note from you about their perseverance, creativity, or kindness will leave a lasting impression.

You can also create a simple “certificate” celebrating a unique strength or growth area—like “Most Curious Question-Asker” or “Awesome Math Mind.”

Keep It Light and Joyful

This dinner doesn’t need to be formal or fancy. Play music, share laughs, and enjoy being together. The goal is to make your child feel seen and appreciated. You are building a family that says, “We celebrate you!”

Make It a Tradition

Stick with it! These end-of-year dinners will become part of your family’s rhythm—something your child looks forward to with pride. They will remember the feeling of being celebrated at home even more clearly then any report card or school assembly.

I wish you and your family the same joy we have shared along the way!

Printed page with End of Year Dinner Conversation Topics on wooden planks

Grab Your Free Download!

Download your free End-of-Year Dinner Conversation Starters to make this a celebration your family will always remember! Just drop your email in the box below and the download link will appear in your inbox faster than the school year flew by!

Related Posts for Intentional Parenting

  • 16 Quick and Easy Last Week of School Activities
  • How to Write a GREAT Thank You Note
  • 9 Things All Kids Must Hear Their Parents Say
  • 2 Tricks to an Organized School Year
  • Is My Child Gifted?
  • Dealing With Childhood Fears – A Parent’s Guide
  • Noticing Your Kids … In a Good Way

PIN THIS FOR LATER

April 1, 2025 0 comments
0 FacebookTwitterPinterestPocketEmail
Bright green silk butterfly on an ink pen in a bucket with colorful silk flowers
craftsteacher appreciation

DIY Butterfly Pens: A Sweet Spring Garden Gift

by Teach Mama March 14, 2025
written by Teach Mama

Welcome spring with a fun and easy craft! These butterfly pens make a sweet and simple garden-inspired gift perfect for teachers, parents, or friends. Bright, whimsical, and practical, they add a touch of springtime charm to any desk.

For Teacher Appreciation Week, for Mother’s Day, as a birthday party favor, or for any occasion, these butterfly pens are indeed a sweet spring garden gift!

How to Make Butterfly Pens– A Sweet Spring Garden Gift

No glue, no sewing, no lengthy prep, these butterfly pens are totally quick and so easy.  And so beautiful.

And the really cool thing is that they’re easy enough that kids can get involved no problem. They can show their love and appreciation by helping to create these, while working their fine motor skills along the way.

With a little trip to the craft store, or visit to Amazon, you’ll have everything you need–and some pieces you may have under your roof already.

Another big win for these guys is that they make use of all that mixed-up, almost-on-the-outs PlayDoh that you’ve had sitting around.

Play-do tubs, green duck tape and silk butterflies on a white table

Gather Your Supplies

  • Butterflies: I used Monarch Feather Butterflies
  • Duct tape: green duct tape did the job for us
  • Pens: blue or black ballpoint pens
  • Grass: green crinkle cut paper leftover from Easter baskets
  • Flowers: inexpensive silk flowers for the garden
  • Buckets: small, silver tin buckets
  • Playdoh: or use your old stuff–the mixed up cruddy colors that the kids don’t want to play with anymore
  • Hot glue / Hot glue gun

Biggest tip? Spend the extra on good-quality butterflies. So worth it.

Orange silk butterfly

Here’s how to make these beautiful butterfly pens:

1. Make weights for your pails.

The pails are light. The pens are light. So if you don’t weigh them down somehow, they’ll tip over and just be a pain in the neck.

We just scraped together baseball-sized globs of old Play-Doh, rolled them into balls, and shoved them in the bottom of their silver pails.

Silk butterfly wired to the barrel of an ink pen

2. Wrap Butterflies around the pens. 

The way these butterflies are made makes it really easy to wrap them onto the pens.

Take the caps off of the pens and start from the top, wrapping the butterfly wire around the pen.

Green silk butterfly on a pen wrapped with green duct tape

3.  Wrap the pen with Duct Tape.

This may be the most difficult part of the whole process, and it’s not even that difficult. Just tricky.

One thing to remember is that they do not need to be perfect. They can’t be perfect. And the more we remind ourselves of this, the more fun  you’ll have doing it.

We cut the Duct Tape long enough to leave a teeny, tiny bit over the top and then we cut it short enough so that it ended before the curve of the pen tip.

Totally impossible to make these completely flat, so we went with the bumpy, wavy look

Tip: One thing we were careful to do was to flatten the very tip of the wire and then double-up on the tape.

Otherwise, if we didn’t, the pointy part of the wire would poke fingers as they used the pen. Ouch. Lucky it was an easy fix!

Green crinkle-paper grass in a silver bucket

4. Fill the pail with grass.

So easy. Plop it in.  Bam. Done.

Just don’t skimp on this because otherwise it’ll look strange. If you want to put a big bunch of glue on the Play-Doh to keep the grass in place, that works, but we found that we didn’t need to do that.

Green, blue and red silk butterflies in a silver bucket with green crinkle grass and colorful silk flowers

5. Add your butterflies and flowers to the little gardens.  So fun.

The very first thing the kids did was pick the colors of their butterflies, so when it came time to add theirs to the garden tins, they knew exactly which three to grab.

No need for glue; the butterfly pens stick in pretty tightly among the crinkle-cut grass. Woot!

Add just a dab of glue to the flowers so that they don’t fall out.

We love them.

They couldn’t be more beautiful, and really, each one of the kids was so proud.

And so was I.  Here’s to hoping that everyone who receives one loves her little butterfly garden!

And that’s it–just a little spring craft in the name of Teacher Appreciation and Mother’s Day. But really? It’s a super-cute something that could be used for any occasion!

We made one for each teacher, one for each grandmother, and one for great-grandmother. Shhhhh.

Though we made flower pens for our teachers and grandmothers and great-grandmother last year, the response was so great that we thought we’d do it again.  New teachers meant it wasn’t a repeat gift for them, but I’m betting that the ‘mothers’ used their flower pens so frequently, it just might be time for replacements!

Happy butterfly-garden building!

Want a few more fun gifts to give for Mother’s Day or Teacher Appreciation Day?

  • Sweet Flower Pen Craft
  • Cool, Quick Teacher Appreciation Gifts
  • Finger Print Note Cards
  • Quick Thank You for Teachers

PIN THIS FOR LATER


March 14, 2025 9 comments
0 FacebookTwitterPinterestPocketEmail
Plastic containers with clamp-on lids filled with candy and vinyl letters saying love and joy
schoolteacher appreciation

Quick and Easy Inexpensive Thank You Gifts For Teachers

by Teach Mama March 14, 2025
written by Teach Mama

No matter how or when you do it, it’s an important time of the year to offer a sincere ‘thank you!’ to teachers. And what better time to that than National Teacher Day (May 6) and Teacher Appreciation Week (the first full week in May)? These fun and inexpensive gifts are sure to make every teacher feel appreciated!

As a mom of three, I know that often it’s really hard to scrape together the cold, hard cash for all of your kids’ teachers’ gifts.  Especially if you include your kids’ extra-curricular teachers, or their para-educators, support teachers, and coaches, there are a lot of people who support your child’s education. You might also want to add in the dedicated people who teach your children at church or synagogue.

Quick, Easy, and Simple Teacher Gifts

Quick and Easy Inexpensive Thank-You Gifts for Teachers

These are simple but sweet. And seriously functional.

Plastic containers filled with candy

Simple thank you’s for teachers that are fun, frugal, and functional.

What teacher couldn’t use a well-made plastic container they can reuse over and over?

And what teacher couldn’t use some sweets? Especially if you know what their favorites are!

This year for our little teacher thank-you gifts we went with the Systema Klip-It, but Rubbermaid and other food storage brands are equally good options.

We used bold, vinyl alphabet stickers and added the following words to one side of each container. If you have mismatched leftover letters from scrapbooking or other projects those would work too and add a touch of whimsy.

  • thank you
  • love
  • joy
  • peace
  • encouragement
  • motivation

And then we filled each small container with hard candy.  Add a little curly ribbon and Bam! Done!

Plastic container filled with wrapped candy

Have your child write a small note to the teacher and include it with the gift.

Have your child write a short happy note saying what that teacher meant to them this year and it’s sure to bring a smile to his or her face!

Notes make a big difference for teachers–for anyone, actually.  I keep all the thank you cards and notes of appreciation from over the years in a box near my desk. On days when nothing seems to be going right it is amazing how encouraging and rewarding it is to reread a few of them!

Pink plastic container tied in a gold ribbon with the word peace in white letters


We can and should be thankful every single day for the gifts that our our kiddos’ teachers because we know how difficult and challenging their jobs are. We desperately need more and more really great and gifted teachers!

To be able to reach children and teach children? Not easy.  Not easy in the least. Let’s show them how much we appreciate what they do!

You better believe we’re saying thanks… A HUGE THANK YOU!

More End of School Tips and Tricks!

  • Butterfly Pens – A Sweet Spring Craft
  • Host an End of School Year Family Diner
  • 16 Quick and Easy Last Week of School Activities
  • Quick Cool Teacher Appreciation Gifts
  • Super Easy Beautiful Flower Pens

PIN THIS FOR LATER

March 14, 2025 17 comments
0 FacebookTwitterPinterestPocketEmail
Egg shapes printed on white card stock on a wooden table. Each egg has an upper case letter on the top and a lower case letter on the bottom.
easterholidays

Alphabet Egg Hunt

by Teach Mama February 24, 2025
written by Teach Mama

Easter is the perfect time for hands-on learning, and this Easter Alphabet Egg Hunt activity helps young learners practice recognizing and matching uppercase and lowercase letters in a fun and engaging way. With a free printable template, children can cut, match, and play while reinforcing early literacy skills in an interactive way.

Easter Alphabet Egg Hunt – A Fun Printable Upper and Lowercase Activity

What You’ll Need

  • Printable Easter Egg Letter Match Template (download below)
  • White or colored cardstock
  • Scissors
  • Markers, crayons, or colored pencils
  • A laminator (optional for durability)

How to Create the Easter Egg Letter Match Game

Print and Cut Out the Egg Shapes

  • Download and print the Easter Egg Letter Match Template on white or colored cardstock.
  • Cut out each egg, using the dark printed lines.

Write or Color the Letters

  • Use different colors to help reinforce recognition or let children color the eggs themselves.

Cut the Eggs in Half

  • Carefully cut each egg in half using the lighter lines provided

Mix and Match the Pieces

  • Scramble the egg halves and challenge children to find the matching uppercase and lowercase pairs.
  • For an added challenge, mix in multiple letters and see how quickly kids can complete the matches.

Make It More Engaging

  • Laminate the pieces for durability and long-term use.
  • Hide the egg pieces around the room for an Easter egg letter hunt before matching them.
  • Time the challenge to see how quickly kids can match all the pairs.
  • Have children say the letter sound aloud as they find the matches to reinforce phonics skills.

Download the Free Easter Egg Letter Match Printable

Get started right away with this free Easter Egg Letter Match printable. Just throw your email in the box below and the download link will appear in your inbox as if by magic.

Looking for More Great Easter-Themed Content?

  • Easter Egg Pattern Matching Game
  • Resurrection Rolls: Teach Kids the Easter Story
  • Lent Cards for Christian Families
  • Easter Sensory Bin
  • Best Books for Easter Baskets 
  • Egg-Dyeing 101

PIN THIS FOR LATER

February 24, 2025 6 comments
0 FacebookTwitterPinterestPocketEmail
A box of crayons and egg-shaped printed on white card stock decorated with colorful patterns on a wooden table
easterholidays

Easter Egg Pattern Match Game

by Teach Mama February 24, 2025
written by Teach Mama

Make Easter extra special with a fun and educational Easter Egg pattern matching activity perfect for three-year-olds! Older kids can color and decorate the eggs, then the younger kiddos can match patterns, shapes, or colors for hours of engaging play. This hands-on activity boosts creativity, fine motor skills, and early learning, all while celebrating the joy of sharing and helping others at Easter!

Sometimes, especially during a school break, you need an activity that will occupy older kids as well as the younger ones. These kid-made pattern eggs are simple but full of love.

Easter Egg Pattern Match Game–For Kids, By Kids:

Pattern matching is a really important skill for the pre-school set because it leads a little later on to letter and letter group recognition. But for right now, it’s just a really fun game for the littles and great way to encourage older kids to help make learning fun.

This is like the Alphabet Egg Hunt–Uppercase and Lowercase Letter Match set but because it’s for pre-readers it is obviously without the letters.

Get Ready

Print out the eggs on bright white card stock so they are nice and sturdy. I like using the cardstock also because it holds up to markers better and allow the colors to *pop*. We found out that having the pattern go across the crack line before we cut them apart worked much better than doing each half separately.

If you use stickers you can cut through those too. If your kids don’t want to cut through stickers (and some kids are like that) then just make sure there are enough matching stickers for each half.

You might want to include several eggs that have the same colors, basic shapes and same layout so that the littles have to look a little more closely to make a match. You could throw some letters on a few just to get them started on letter recognition, although at this point it’s still mostly shape recognition so pick letters with distinctive shapes like S A and B. Using their name on the eggs is also fun.

Then if you want them to really last go ahead and laminate them after the kids decorate them. (I may have mentioned a time or two how much I love laminating and this is the machine I use).

I love how this activity encourages big kids to create for and teach little kiddos. Planning ahead and creating the top and bottom pattern to match is also a good brain stretcher for them!

Include the Whole Family

The rest is pretty simple. Let the kids mix up the egg halves and then see who can match the most the fastest or just enjoy the process.

So there you are, just a quick little something you can print out and make ahead of time or bring to your Easter gathering, and have cousins, siblings, aunts, uncles, and friends create for the little ones of the crew!

I hope you have a happy and blessed Easter season!

Want Your Own Easter Egg Pattern Match Game Printable?

Just throw your email in the box below and the download link will appear in your inbox like magic.

Looking for More Great Easter Themed Content?

  • Alphabet Egg Hunt 
  • Resurrection Rolls: Teach Kids the Easter Story
  • Lent Cards for Christian Families
  • Easter Sensory Bin
  • Best Books for Easter Baskets 
  • Egg-Dyeing 101

PIN THIS FOR LATER

February 24, 2025 5 comments
0 FacebookTwitterPinterestPocketEmail
Egg cartons cut to form small baskets and colorful candy eggs on green stained rice
easterholidays

Springtime Easter Sensory Bin

by Teach Mama February 24, 2025
written by Teach Mama

Spring is the perfect time to bring hands-on learning into play! This Easter-themed sensory bin engages children in counting, sorting, and fine motor skill development while keeping them entertained. With simple materials and easy setup, this activity is great for parents looking for a fun and educational way to celebrate the season.

Our kids always loved the hunt…for Easter Eggs! You can extend the playtime beyond Easter Sunday and add a hidden dose of learning at the same time!

Springtime Easter Sensory Bin: Egg Hunt and Counting Fun

egg carton sections, robins eggs candy package and rice stained green

What You’ll Need

  • White rice
  • Rubbing alcohol or white vinegar
  • Green food coloring
  • Candy eggs (Whopper eggs, jelly beans, or foil-wrapped chocolate eggs)
  • Egg carton
  • Pipe cleaners
  • Permanent marker
  • Large plastic bin, water table, or sensory table

How to Set Up the Sensory Bin

Dye the Rice

  1. Place white rice into a large zip-top bag.
  2. Add a small amount of rubbing alcohol (or white vinegar if you are concerned about using rubbing alcohol) and a few drops of green food coloring.
  3. Seal the bag securely and shake until the color is evenly distributed.
  4. Spread the rice onto a cookie sheet and allow it to dry completely overnight.
section of egg carton cut to form a small basket with a pipe cleaner handle and colorful candy eggs

Make the Mini Easter Baskets

  1. Cut out individual sections of an egg carton to create small baskets.
  2. Poke a hole on each side of each basket and thread a pipe cleaner through to form a handle.
  3. Write numbers 1–5 on the front of each basket using a permanent marker.
Hiding candy eggs in a bed of green stained rice

Set Up the Egg Hunt

  1. Fill the plastic bin with the dried green rice.
  2. Bury 15 small candy eggs in the rice, hiding them for a fun sensory search.
  3. Encourage children to dig through the rice, find the eggs, and place them in the baskets according to the number written on each.

Encourage Exploration and Play

Once the egg hunt and counting game are complete, let children continue to explore the bin. Adding small spring-themed toys like wind-up chicks or plastic bunny figurines can extend the fun and provide new ways to engage with the sensory materials.

This activity promotes counting, number recognition, and fine motor skills while offering a calming sensory experience. It’s a great way to celebrate spring and Easter while incorporating hands-on learning.

Looking for more sensory play ideas? Try adding different textures, colors, or themed objects to your bins to extend the fun!

Looking for More Great Easter-Themed Ideas?

  • Lent Cards for Christian Families
  • Easter Word Search Printable Activity
  • Must-Have Books for Easter Baskets
  • Easter Egg Dyeing 101
  • Teach Kids About Easter with Resurrection Rolls
  • Easter Egg Printable Pattern Match Game

PIN THIS FOR LATER

February 24, 2025 0 comments
0 FacebookTwitterPinterestPocketEmail
Egg carton with multi-colored egg dyeing cups on a table
easterfamily funfamily lifeholidaysindoor activities

Easter Egg Dyeing 101

by Teach Mama February 24, 2025
written by Teach Mama

Easter egg dyeing is a cherished tradition, but for many families, it also means stained hands, spilled dye, and frustrated parents. Fortunately, a few simple tricks can make the experience fun and stress-free. With a little preparation and some creative ideas, egg dyeing can be an activity everyone enjoys—without the mess and frustration.

When I was a kid, dyeing Easter eggs was a pretty rudimentary – and messy – process. I have great memories, and the stain did eventually wear off of my hands, but the tools available today make it just as much fun and a lot less messy!

How to Dye Eggs Without the Stress and Mess

Have the Right Tools and Workspace Ready

A little preparation goes a long way in making egg dyeing run smoothly. Gather everything needed before starting to avoid unnecessary mess and chaos.

You’ll need:

  • 6-10 hard-boiled eggs per person
  • Egg dye tablets
  • Plastic tablecloth to protect surfaces
  • Small cups or bowls for dyeing
  • White vinegar
  • Whisk (a surprising but helpful tool)
  • Egg dipper or spoon
  • Paper towels
  • A wire drying rack or the back of the egg-dyeing kit box (many double as drying racks)

Note to parents: PAAS has been around for 140 years and offers a great egg dyeing kit for families that includes color tablets, cups, egg dipper and magic crayons. You CAN assemble egg dyeing supplies yourself but the PAAS kit is so complete and so helpful, why would you? Grab a couple of these kits for your Easter egg dyeing fun. You’ll thank me!

Egg dye tablets rubbed on a paper towel

How to Dye Eggs

Once everything is set up, use this quick tip for identifying dye colors: Rub each tablet on a damp paper towel to reveal the shade before dissolving them in water.

To prepare the dye, place each tablet in a cup that matches its color. Dissolve the dye tablets by adding one tablespoon of vinegar to each cup—except for pink, which becomes more vibrant without vinegar. Once dissolved, add about half a cup of water to each cup, and the dye is ready to use.

Egg in a wire dipper over and then into a cup of dye

Dye the eggs by dipping them one at a time, using the egg dipper or a spoon to move them around. The longer an egg stays in the dye, the deeper the color will be. Once the desired color is reached, remove the egg, blot off excess dye with a paper towel, and place it on the drying rack.

Making Egg Dyeing Easier for Kids

Boiled egg inside a small whisk over and then into a cup of egg dye

Egg dyeing is more enjoyable when kids can participate with confidence. Simple adjustments can make the process easier for small hands.

  • Show children how to use the egg dipper by placing the smaller end of the egg in the loop for better balance.
  • If the dipper is tricky to use, a whisk makes an excellent alternative. Simply place an egg inside the whisk, and kids can dip it without worrying about it slipping.
  • Provide a stable spot for eggs while decorating. The built-in stands in egg decorating kits work well, but homemade solutions like bottle caps or an egg carton lid can also do the trick.
  • If handling fragile eggs is a challenge, dye them ahead of time and let kids focus on decorating them, much like frosting a pre-baked cake.

For a fun family activity, try assigning each person an egg to decorate for someone else. Personalizing eggs with initials or designs makes the experience even more meaningful.

Making Egg Dyeing Even More Fun

Egg dyeing is about creativity and experimentation. Simple techniques can turn ordinary eggs into works of art.

  • The often-overlooked “magic crayon” included in many dye kits is a great tool for writing letters, drawing shapes, or creating designs before dyeing. The wax resists the dye, revealing the design once the egg is colored.
  • Encourage color blending by dipping eggs in multiple colors to create unique shades and effects.
  • Stickers can be used in two ways—either as decorations on finished eggs or as a resist to block color while dyeing, leaving behind fun shapes once removed.

With a little planning and creativity, egg dyeing can be a fun, stress-free activity that brings the whole family together. Whether using traditional dyeing techniques or trying new decorating tools, the joy is in the process—not in perfection.

Looking for Even More Great Easter Themed Content?

  • Lent Cards for Christian Families
  • Easter Word Search Printable Activity
  • Must-Have Books for Easter Baskets
  • Easter Sensory Bin
  • Teach Kids About Easter with Resurrection Rolls
  • Easter Egg Printable Pattern Match Game

PIN THIS FOR LATER

February 24, 2025 1 comment
0 FacebookTwitterPinterestPocketEmail
Girl in a blue shirt sitting at a table holding up a coin
countingmathprintables

Teach Kids About Money

by Teach Mama February 24, 2025
written by Teach Mama

Learning about money is a foundational math skill and incorporating poems and songs can make it both engaging and memorable. Counting pennies, nickels, dimes, and quarters teaches kids number sense and money math, while recognizing patterns in 1’s, 5’s, and 10’s strengthens skip counting and early addition skills.

Sometimes young kids don’t really understand all the excitement about MONEY, but they need to! These activities are all about making money math fun with poems and songs. Using a collection of printable poems and songs, you and your kiddo can explore different coin values, practice skip counting, and reinforce basic money math concepts in a playful way.

After reading and singing, take it a step further by incorporating hands-on activities like cutting out a piggy bank, sorting coins, and even acting out the poems for extra learning fun.

Teach Kids About Money: Fun Poems & Songs for Learning About Coins

Piggy bank and coin images printed on white card stock and an image of a sasquatch with the poen Sasquatch chase printed on white card stock

What You Need

Print the Free Songs and Poems Worksheet (get it below). I love using bright white cardstock so the colors really pop!

Gather a few pennies, nickels, dimes, quarters and half-dollars. Have ten or more of each coin.

Find an old coffee can or any can with a plastic lid if you want to make and decorate your own piggy-bank.

Money Math Activities to Try at Home or in the Classroom

Skip Counting with Coins – Use real or play money to practice counting by 1s, 5s, and 10s. Lay out pennies, nickels, or dimes and chant along with a money poem.

Coin Sorting & Value Matching – Label the cups in a muffin pan (or disposable plastic cups) with coin names and values. Then have children sort a mixed pile of coins by matching them to their corresponding values and names.

For parents and educators seeking trusted coin-related resources and insights, US Gold and Coin offers valuable information that complements this hands-on learning activity.

Sing & Clap to Money Songs – Some kids learn better through kinesthetic activity. A great way to do this is to reinforce coin values and addition skills by singing money-themed songs while clapping to the beat, strengthening rhythm and retention.

Create a Piggy Bank Craft – Print, cut out and assemble the piggy bank and coins from the printable, then use it for a fun “save, spend, give” math discussion. I love using bright white cardstock so the colors really pop!

Make and Decorate a “Piggy Bank” – Using a cleaned out or new paint can (or other plastic or metal container with a lid) make a unique bank. We have a free printable sheet of money themed images (get it below) to help get them started.

If your child wants a literal “piggy bank” here is a wooden pig bank and a pink pig bank they might like. (and they can still decorate them if they want to).

Read books about Money- These are some of our kids’ favorites, but you may find others that work better for you. My First Piggy Bank, Berenstain Bears- Let’s Talk About Money (those Berenstain Bears have several books about money!), Little Critters- Just Saving My Money and The Coin Counting Book.

Read & Act Out Money Poems – After reading, encourage kids to act out the concepts—pretending to buy items or exchange coins to demonstrate understanding.

Record & Watch a Money Readings – Let kids record themselves reading or singing money poems and tongue-twisters from the printable. Watching their performance helps with fluency, confidence, and self-correction.

Coin Counting Challenges – Give kids a set of coins and ask them to make a specific amount (e.g., “How many ways can you make 25 cents?”).

Money Exchange Game – Trade pennies for nickels, nickels for dimes, and so on to show how smaller denominations add up to larger ones.

Play a Board Game about Money – You may already have a favorite, but if you’re looking for some new games to reinforce money concepts, here are some good ones: Clumsy Thief and Clumsy Thief Junior and Exact Change.

Have fun with your kiddos while reinforcing math skills and financial literacy. Make learning about money a fun and hands-on experience!

Want Your Own Free Vault of Money Poems and Songs?

Just deposit your email in the slot below. It’s a sound investment and it only makes cents…

Looking for More Great Learning Tools?

  • Four Sums In A Row: Quick And Easy Math Game
  • Color Puzzles: Fun Math And Logic For Kids
  • How To Raise Kids Who Love Math
  • Equals 26: A Tricky Triangle Math Game

PIN THIS FOR LATER

February 24, 2025 7 comments
0 FacebookTwitterPinterestPocketEmail
Three sock puppets on a wooden table with thread and buttons scattered around them
Activitiescraftsfamily funfamily lifeindoor activitiespretend play

No Sew Sock Puppets

by Teach Mama February 24, 2025
written by Teach Mama

A sock puppet isn’t just a craft—it’s a doorway to creativity, storytelling, and hours of imaginative play! With just a few household items, kids can design their own puppet characters and bring them to life. Whether it’s a silly monster, a friendly animal, or a royal prince, each puppet has a personality just waiting to be discovered.

Sock puppets are the perfect indoor play activity. An old sock, scrap yarn, bits of fabric, some buttons and a little imagination and there is no limit to the fun. We turned these out in just a few minutes and they were so cute, I just had to share them with you! Gather your supplies and get ready for hours of fun!

Hot glue gun, thread, yarn buttons, communion cups, oil bottle lids and three socks on a wooden table

Turn an Old Sock into a Fun Sock Puppet

What You’ll Need

  • A clean sock (any color or size) – you know, the ones left behind when their mate made a break for it!
  • Felt or fabric scraps
  • Googly eyes or buttons
  • Yarn (I love varigated yarn because from one ball of yarn there are so many color options!), feathers, bows, etc for hair
  • Hot glue (with adult supervision)
  • Scissors
  • Marker
  • Fabric or acrylic paint
  • Empty communion cups, essential oil lids or whatever you have around to “lift” the eyes or form a funny nose (totally optional)
Red sock puppet with dark button eyes and nose and yarn hair

How to Make a Sock Puppet

  1. Pick Your Sock – Look for a sock that fits comfortably over your hand. Dig through the odd sock pile—this is the perfect way to use up those lonely socks missing their match!
  2. Make a Face – Your knuckles will fit into the heel of the sock and the toe will be tucked back into the sock (kind of in your palm) Use the marker or pencil to mark where the eyes will go and remove the sock. Hot glue on googly eyes or buttons, or get creative by cutting eyes or eyelashes out of felt. One kiddo insisted their puppet needed three eyes—because, of course, it was an alien!
    • Quick note: If you have wee ones in the house, you may want to sew the buttons on to keep them out of little mouths!
  3. Add a Nose – Cut out felt shapes or a button (or that spare communion cup you might have in your purse *wink wink*) for a nose, or use markers or paint to draw them. One fun variation is making a puppet with a wide-open mouth with maybe a couple of front teeth, perfect for pretend puppet shows with lots of “talking.”
  4. What about Ears? – Felt or fabric scraps are wonderful for forming ears. We’ve tried long floppy dog ears and folded triangle standing ears. Both were super cute!
  5. Create Hair (Optional) – Yarn makes great hair! Let kids decide whether their puppet needs a wild, spiky look, long braids, or even a mohawk. One child gave their puppet a full head of purple yarn curls and declared it a “rock star.” Feathers are also an amazing option for hair. One year we used the remains of an old feather boa for hair. It had great movement! But even something silly like one of those plastic dish scrubbers or pipe cleaners twisted into coils would be fun.
  6. Remember Accessories! – Maybe your puppet will need glasses (pipe cleaners to the rescue!) or jewelry or a crown or … well the list is practically endless! This is another place to let your kiddo’s imagination go wild! And nothing is permanent so if they decide tomorrow to change it, that is completely acceptable.
White sock puppet with yarn hair, a red button nose and blue button googly eyes

Time to Play!

Once the puppet is ready, it’s showtime! Kids can put on a puppet show behind a couch, invent funny voices, or even use their puppets to “interview” family members. One rainy afternoon, the kids put on a puppet news broadcast complete with weather updates and a breaking news story about missing cookies!

The best part? Sock puppets never get old—just switch up their accessories, and they’re ready for a new adventure!

Looking for other indoor activities for kids?

  • Minute to Win It Games
  • Bake a Scripture Cake
  • 150 Things for Kids to Do
  • Musical Hearts Game

PIN THIS FOR LATER

February 24, 2025 14 comments
0 FacebookTwitterPinterestPocketEmail
Baked crescent roll with hollow cavity inside
easterholidays

Teach the Easter Story to Kids with Resurrection Rolls

by Teach Mama February 23, 2025
written by Teach Mama

Looking for a hands-on way to share the story of Jesus’ resurrection with your child this Easter? Resurrection Rolls are the perfect activity! This interactive cooking project teaches kids the profound message of the Easter story in a way they can see, touch and taste.

Over the years we’ve talked about lots of deep things with the kids. Religious topics are the deepest. And sometimes they can be difficult to put into words kiddos can easily understand. The Easter story is like that, full of meaning but a little complex for young children to grasp.

Resurrection Rolls transform the story into an easy-to-understand, hands-on experience that will leave a lasting impression. Using simple ingredients, you can guide your child step-by-step through the key events of Good Friday and Easter Sunday while creating a memorable treat.

A Sweet and Simple Way to Teach the Easter Story

Glass containers of brown sugar and butter, Crescent Roll package, marshmallows and a cookie sheet on a white counter

What You’ll Need

Before you begin, gather the following ingredients and tools:

  • Large marshmallows (representing Jesus)
  • Crescent roll dough (representing the tomb)
  • Melted butter (representing the oils)
  • Brown sugar and cinnamon (representing the spices)
  • Baking sheet
  • Oven preheated to 375°F

Step-by-Step Instruction

Introduce the Story

Begin by talking with your child about the events of Good Friday and Easter Sunday. Ask open-ended questions like, “What do you remember about Jesus’ story?” or “Why do we celebrate Easter?” This sets the stage for a meaningful activity.

You can read the story for yourself in the Gospel of John, Chapters 19 and 20.

Collage of four photos with a child's hand dipping a marshmallow into butter then rolling it in sugar and cinnamon, a sugared marshmallow sitting on a piece of crescent dough and the crescent roll rolled around the marshmallow

Preparing the Marshmallow (Jesus)

Say:

“This marshmallow represents Jesus. After Jesus was taken down from the cross, He was prepared for burial with oils and spices.” (John 19:40)

Have your child roll the marshmallow in melted butter (the oil) and then in a mixture of brown sugar and cinnamon (the spices).

Wrapping the Tomb

Say:

“Next, we’ll wrap Jesus in the tomb. The crescent roll represents the tomb where His body was placed, and the entrance was sealed with a large rock.” (John 19:41-42)

Help your child wrap the marshmallow tightly in the crescent roll dough, ensuring all edges are sealed. Explain that this symbolizes the tomb being securely closed.

Baking the Resurrection Rolls

Place the rolls on a baking sheet and bake at 375°F for about 12 minutes. While the rolls bake, read the Easter story from a favorite children’s Bible, retell it in your own words or read it from your Bible if your children are old enough to understand the language. Pause to ask questions and connect the steps of the recipe to the story.

The Surprise Ending

When the rolls are done baking, let them cool for a moment before cutting them open. Say:

“When we open the tomb, we’ll see something amazing—just like when the disciples found that Jesus had risen!”

Cut into the roll to reveal that the marshmallow has disappeared. Celebrate with your child and talk about the miracle and meaning and importance of the resurrection.

TeachMama wishes each and every one of you a safe, blessed and “hoppy” Easter!

Looking for Other Great Easter-Themed Content?

  • Lent Cards for Christian Families
  • Easter Word Search Printable Activity
  • Must-Have Books for Easter Baskets
  • Easter Sensory Bin
  • Egg Dyeing 101
  • Easter Egg Printable Pattern Match Game

PIN THIS FOR LATER


February 23, 2025 9 comments
0 FacebookTwitterPinterestPocketEmail
Newer Posts
Older Posts

About Me

About Me

Hi! I'm Hannah.

A mother of one, I am passionate about inspiring mamas and educators with hands-on, meaningful learning ideas that make everyday moments fun, purposeful, and filled with curiosity.

Follow Teach Mama

13.4K Fans Like
2.8K Subscribers Subscribe
132K Followers Follow Us

Recent Posts

  • Effective Techniques for Teaching Complex Historical Topics

    June 13, 2026
  • 4 Neighborhood Adventures That Teach Kids Real-World Skills

    June 12, 2026
  • What Does an Urgent Care Visit Cost in Manhattan Without Insurance?

    June 12, 2026
  • Future Trends Influencing Enterprise Learning Management System Adoption

    June 10, 2026
  • How to Survive Your Husband’s Grad School Years Without Going Broke

    June 9, 2026
  • How Technology is Reshaping the Rules of Education

    June 9, 2026

LEARN

PLAY

CRAFTS

PRINTABLES

About Me

A mother of one, I am passionate about inspiring mamas and educators with hands-on, meaningful learning ideas that make everyday moments fun, purposeful, and filled with curiosity.

Useful Links

  • About
  • Contact

Popular Posts

  • Words 3 Ways: Learning Sight Words For Kindergarten

    May 17, 2012
  • Quick Trick: Magnetic Letters (How To Use Them With Your Kids!)

    December 1, 2010

Recent Posts

  • Effective Techniques for Teaching Complex Historical Topics

    June 13, 2026
  • 4 Neighborhood Adventures That Teach Kids Real-World Skills

    June 12, 2026
  • Facebook
  • Pinterest
  • Youtube
Teach Mama
  • Reading
  • Early Literacy
  • Writing
  • STEM
  • Activities
  • Digital Literacy

Shopping Cart

Close

No products in the cart.

Close