Teach Mama
  • Reading
  • Early Literacy
  • Writing
  • STEM
  • Activities
  • Digital Literacy
Top Posts
Best Slime Bundles for Creative Play: 5 Must-Have...
Learning Through Everyday Routines and Special Adventures
How to Talk to Kids About Goals and...
Making Everyday Learning Count: Turning Small Moments Into...
Raising Kids Who Understand the Balance Between Needs...
Family Learning Projects That Spark Conversations About Money
How Long Do Typical Summer Camps Last?
Bright Smiles for Life: How to Teach Kids...
Which Standing Balance Activities Work Best in Occupational...
How to Recognize the Early Signs of Dyslexia...
Teach Mama
  • Reading
  • Early Literacy
  • Writing
  • STEM
  • Activities
  • Digital Literacy
Teach Mama
Teach Mama
  • About
  • Contact
  • Contact
  • disclaimer
  • terms of use
  • privacy policy
  • Site-Map
Copyright 2021 - All Right Reserved
stamp to spell | use stamps for early literacy learning and spelling | teachmama.com
alphabetearly literacy

Word Building, Letter Writing, and Stamping To Spell

by Teach Mama January 9, 2014
written by Teach Mama

post contains affiliate links


 Originally published on 2.23.11 but republished because it’s that important.

During Maddy’s homework time yesterday, Owen had one task on  his mind: he wanted to write a get-well letter to his buddy who recently had surgery.  He knew exactly what he wanted to write–he told me at least two times during the day what his letter would say, and we knew exactly what we wanted to put in his pal’s little ‘get well quick’ package.

But my O-man wanted to make his letter special. He wanted to make it fancy he said, because he wanted to really cheer his buddy up.

So I brought down the alphabet letter stamps–our favorites from Melissa & Doug–and I asked if he wanted to stamp his letter.  Score! He did, so he got stamping. . .

. . . and while Cora initially began her own letter to Owen’s friend, she quickly switched gears and decided that she instead wanted to ‘stamp names’. So stamping names my little Cora did.

All the while, Maddy and I rocked out her homework, and I’ll tell you, overall, homework time went pretty smoothly for us.

  • Word Building, Letter Writing, Stamping to Spell: Before Owen began, he dictated his letter to me.  I wrote it down and placed it next to his blank card and the alphabet stamps.

I asked,  Do you want me to make lines for you, Owen?

No, I know what to do, he said.  And apparently he did. He got rolling and only stopped when Maddy mentioned something to him about spaces between words.

You should really try putting two fingers on the paper and use that as the space between words so it’s not all one big word on the page. That’s what my teacher taught me last year.

stamp to spell | teachmama.com

Owen tries out Maddy’s ‘two fingers for a space’ trick.

I confirmed her suggestion, and Owen started using his two tiny fingers as spaces. He got hung up when there wasn’t enough room on the page for the ‘u’ in ‘you’ so I tried to squeeze it in for him. It didn’t work:  Now it looks like a ‘q’ Mommy. Come on. Really, what am I good for anymore?

So I did what I could to fix it and he didn’t ask me for help again.

stamp to spell | early literacy | spelling | teachmama.com

stamp to spell | teachmama.comMy sweet, sweet Owen was so proud of his letter.   And he should be.

And I really didn’t need to, because he did know what he was doing. Sure, he moved back and forth between uppercase and lowercase letters, but at this point, that’s no big deal. He used his eyes to follow the words on the letter I wrote, found the correct letter stamp in the set, and then marked that letter on the page. That’s not easy.

Sure, he got tired and decided to omit a whole line of his message, but that doesn’t matter. It wasn’t an easy task, and he worked hard.

He stamped some flowers, dogs, hearts on the front of the card, and he added his own few hearts for his buddy.  If that doesn’t cheer a guy up, I’m not sure what will.

stamp to spell | early literacy | spelling | teachmama.com

stamp to spell | early literacy | spelling | teachmama.com

  • Stamping Family Names: While Owen stamped his letter, Cora stamped our family’s names.

Lately, she’s brought down our Family Name Chart at least once a week; she’s traced names, doodled on the page, anything.  Sometimes she just has the chart next to her as she colors.  Maybe because she likes the ‘older’ pictures of our family? (Cora was maybe a year old when I made it. . . )

The Family Name Charts are here to download if you’d like. They include three charts: one with MOMMY, DADDY and 3 blank spaces; one with Mommy, Daddy, and 3 blank spaces; and one with 5 blank spaces.

new family name chart (in Word, so you can change it yourself), or new family chart–BLANK ( as a pdf, so you can write in the names yourself).  Enjoy!

Cora began with Maddy’s name; she said, I need an ‘M’, I need an ‘M‘.  And when she found it, she stamped it.  Then she’d continue: I need an ‘A’, I need an ‘A’, I need the ‘A’. . . as she searched for it in the box.

stamp to spell | early literacy and letter recognition | teachmama.com


stamp to spell | early literacy | letter recognition | teachmama.com

Once Maddy was stamped, she went on to Owen, but before she started, I drew four little lines for her.  You can put the letters right on these lines so each letter is in the right place, I said.  I did the same for her name and Brady’s.

It was hard enough for her to follow the letters from the sheet, to the stamp set, to the paper, and keep them all in the correct spot, so I thought the little lines would give her a little help.


stamp to spell | early literacy and letter recognition | teachmama.comCora stamped family names.

And that’s it.  Cora stamped out family names, Owen stamped his buddy’s note, and when Maddy was finished with her work, she stamped a few fancy pictures for her pals.  Quick, easy, and worthwhile time spent for everyone, building words, writing letters, and stamping to spell, all the while practicing fine motor skills and spelling.

Our kiddos don’t always have to write in order to learn letters and words; in fact, sometimes when we mix things up a bit, they’re even more interested in ‘playing’ and (secretly) learning.

Want some other cool ideas for creating words and sending messages? Check out:

  • write around the room
  • wiggly words
  • trace, copy, recall
  • names everywhere
  • sky writing
  • story-card writing
  • magnadoodle messages
  • paint bag writing
  • free fence writing
  • water painting
  • sandy beach writing
  • real-life letters
  • sticky finger writing
  • stick writing
  • paint carving

Have fun and feel free to link up any other ideas you have–I’m always up for more sneaky fun ways of spending time with my kiddos!


fyi: affiliate links are used in this post

January 9, 2014 12 comments
0 FacebookTwitterPinterestPocketThreadsBlueskyEmail
20 questions homemade party game
holidaysnew year's

20 Questions Game: Homemade, Personal, And Fun Party Game For Kids Of All Ages

by Teach Mama December 29, 2013
written by Teach Mama

While the kids are busy shakin’ their party shakers or rockin’ out to some Bingo Bonanza, the adults can have their New Year’s Eve fun, too.

Actually, everyone can have fun with this homemade game of 20 Questions.

No matter the crowd, when there’s a game to play, the mood’s lighter, there’s a little more laughter, and there’s a little more festivity in the air.  20 Questions is a super game for getting folks to chat, having kids listen and think , and practicing questioning skills.

This party game is seriously one of our faves.  And our version is personal–so famous faces mix with familiar faces–and it’s a total riot.

20 Questions is a great, homemade party game or activity to pass a quiet afternoon at home.

Here’s the skinny. . .

It’s funny.

20 Questions With Kids–Homemade Party Game

Actually, everyone can have fun with this homemade game of 20 Questions.

20 Questions is the perfect game or activity to pass a quiet afternoon at home or a fun game for a Friday with friends. And in the era of instagram and social media, it’s the personal things like a homemade (or even print-at-home) game to bring back the good ole childhood days of impromptu get-togethers with pals or connecting with other humans on a deeper level.

I created this game last year to bring to a New Year’s Eve party with some friends, but we’ve pulled it out several times through the year. It’s fun.

And the kids totally love it more than throwing a movie on the screen.

20 questions homemade party game

20 questions homemade party game

How to play 20 Questions with Kids

1. Each player takes a turn grabbing a card from the pile. 

That player then holds the card up on his or her forehead so that all the other players can see who or what is on the card but the player cannot.

2. The player holding the card tries to figure out the identity of the person on the card by asking close-ended questions to the other players, much like the questions in Guess Who?.

Here’s where 20 Questions come in. 

Closed-ended questions are questions that can be answered with a ‘yes’ or ‘no’. That’s it. So the player holding the card must be strategic:

  • Is my person a male?
  • Does my person appear on television? 
  • Is my person a child?
  • Does my person have long hair? 
  • Is my person fictional or real?

And remembering the answer to each question will help determine the questions that are asked next.

20 questions homemade party game


20 questions homemade party game

What makes our 20 Questions Game Different

Our cards are full of fun, famous faces.

Oprah, Elmo, Taylor Swift, and Punky Brewster along with tons of other sports figures and familiar faces from kids’ programming.

But even more fun is adding friends and family to the cards. 

We’ve added our kids’ faces, friends’ faces, teachers ‘ faces, and coaches’ faces, and it’s all in good fun. Pulling a card out with a face that is actually at the party makes the laughter a bit more hearty and questions a little more hysterical.

We’ve added adults and children, babies and grandparents. 

And it’s no secret–watching the expression on people’s faces as they recognize the people on the cards is priceless.

20 questions homemade party game

You Can Make Your Own 20 Questions Game 

Our cards feature:

  • Oprah
  • Robert Griffin, Jr. III
  • Caesar Milan
  • Derek Jeter
  • Joey Lawrence
  • Snooki
  • Jessica Rabbit
  • Donald Trump (from way back when–before he was president and when he was still funny)
  • Mario (from Mario Bros)
  • Luke Skywalker
  • Shrek
  • Bullseye (dog from Target)
  • Tyra Banks
  • Kristen Wiig
  • Carrie Underwood
  • Jennifer Anniston
  • Bradley Cooper
  • Mike Tyson
  • Darius Rucker
  • Adam Levine
  • George Clooney
  • Matthew McConaughey
  • Ryan Gosling
  • Chevy Chase
  • Channing Tatum
  • Beastie Boys
  • Denzel Washington
  • Morgan Freeman
  • Jamie Foxx
  • Jennifer Garner
  • Punky Brewster
  • Snoop Dogg
  • Faith Hill
  • Albert Einstein
  • MC Hammer
  • Marilyn Monroe
  • Michael J Fox
  • Jennifer Lopez
  • John Cusack
  • Matt Damon
  • Minnie Driver
  • Michael Phelps
  • Simon Cowell
  • Tiger Woods

And remember, we also include: teachers, neighbors, family, friends, pets–you name it!


20 questions homemade party game

20 Questions helps kids of all ages to practice their questioning and thinking skills.

It’s a blast. Sometimes games like these–without a game board–make parties a ton more fun. And the set of cards is small enough to fit in a sandwich bag and throw in your purse or diaper bag for just about any day of the year.

Have a super party–wherever and however you celebrate!

Please share it, add your own, and have a blast wherever you celebrate the New Year or need an ice-breaker game. I’d be thrilled if you pinned this post, tweeted it, facebooked it, or emailed it to a pal.

Need some more fun New Year’s ideas?

Need some more fun New Year’s ideas?

Check out:

  • New Year’s Family Interview
  • New Year’s Bingo Bonanza
  • Easy, Affordable New Year’s Traditions
  • New Year’s Shakers
  • Scratch Off Tickets 
  • New Year’s Pinterest board
  • New Year’s Eve Guess The Word
December 29, 2013 5 comments
0 FacebookTwitterPinterestPocketThreadsBlueskyEmail
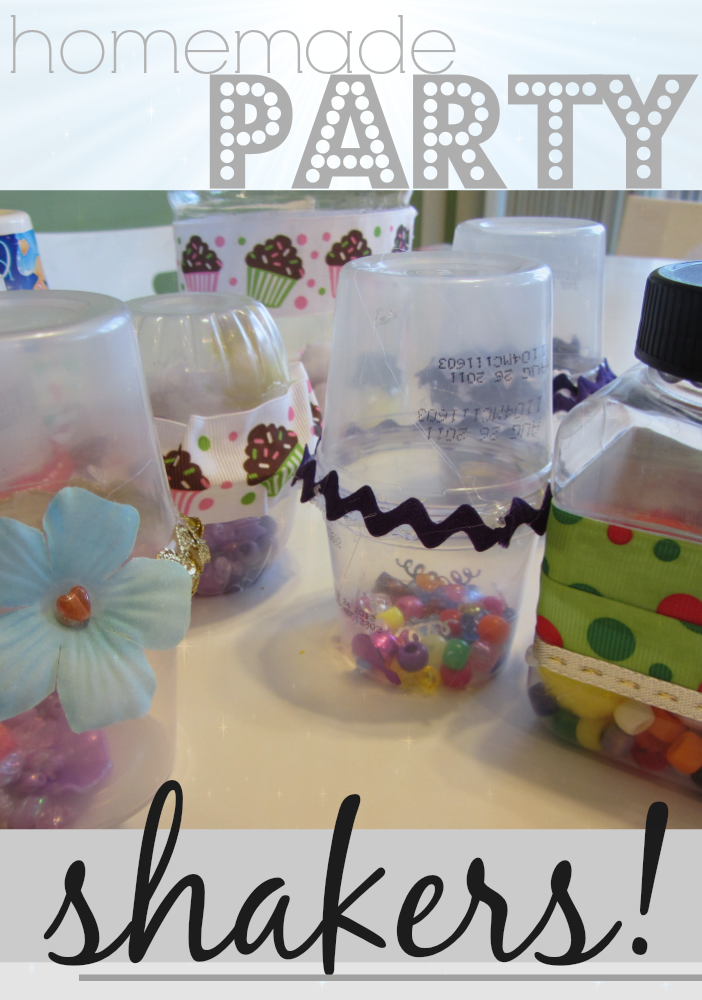
easy homemade new years shakers
holidaysnew year's

Easy, Homemade New Year’s Eve Shakers

by Teach Mama December 26, 2013
written by Teach Mama


Any time we can use recyclables for learning or play, it’s a win in my book.

So each year as New Year’s Eve approaches, we clean out our recycle bin and put some of those small containers to use for easy, homemade shakers!

All you need are a few containers, beads, and ribbon, and you and your kiddos will be rockin’ and rollin’, shakin; and celebrating on New Year’s Eve—or any time of the year.

Here’s the skinny. . .

Easy, Homemade New Year’s Eve Shakers:

Really, we’ve been making these for years and take them to every New Year’s Eve shindig we’re invited to.

easy homemade new years shakers

We often leave them at the party or make enough for every child to have one. Maddy, Owen, and Cora love making them because they’re simple and easy to personalize.

All you’ll need are a few things.

easy homemade new years shakers

You’ll need the following supplies to make New Year’s Noisemakers:

  • Clean, dry recyclables (from applesauce or fruit cups, yogurt or jell-o)
  • Beads or anything that will make sounds when shaken
  • Baubles or anything fun (small silk flowers, jewels, etc)
  • Ribbon
  • Hot glue (this is a job for adults!)

How to make New Year’s Shakers:

1.) What we do first is dump out all of the containers and play match-up. 

Have the kids find pairs of every container. It’s not necessary that the pieces match exactly, but it makes gluing them easier.

easy homemade new years shakers

easy homemade new years shakers

2.) Then fill! 

Add beads and baubles to one container, and have fun with it!  The container need not be totally filled. Fill only about ¼ of the way full so there’s room to shake and make some noise.

3.) Once the kids have filled the bottom of their shaker,  it’s time to  glue! 

I hot glued around the perimeter of the container and then secured the other container, rim to rim.  The hot glue should seal the edges so that when it is shaken, the beads will stay in.

easy homemade new years shakers

easy homemade new years shakers

4.) Then add ribbon.

The kids can choose a ribbon from our ribbon box, and I add it to the middle of the shaker, where both containers meet. I secured it with hot glue.

And that’s it.

easy homemade new years shakers

easy homemade new years shakers

5.) Make them fancy, make them plain.

Make them out of two containers or make them out of one—it doesn’t matter. Though if I do make a shaker out of another recyclable with a lid, I’m sure to hot glue the top shut so that a little guy won’t grab it, open it, and try to eat those beads.

I love giving the kids a challenge when it comes to making these. Sometimes I’ll see if they can make:

  • single colored shakers
  • bi-colored shakers
  • black & white shakers
  • flower garden shaker
  • rainbow themed shakers

easy homemade new years shakers

easy homemade new years shakers

It’s fun. And if we can add a little learning to the mix, why not?

Here’s to a happy, healthy 2014 full of fun and learning!

Need some more fun New Year’s ideas?

Check out:

  • New Year’s Family Interview
  • New Year’s Bingo Bonanza
  • Easy, Affordable New Year’s Traditions
  • 20 Questions Game
  • Scratch Off Tickets 
  • New Year’s Pinterest board
December 26, 2013 0 comments
0 FacebookTwitterPinterestPocketThreadsBlueskyEmail
books as gifts
christmasholidays

Books As Gifts: Holiday Ideas For Kids

by Teach Mama December 20, 2013
written by Teach Mama

post contains affiliate links


For any occasion, books are my go-to gift.

From baby showers to birthdays, graduations from preschool or highschool, for well-wishing or comfort-giving, books are a rockstar way to show people you care.

This holiday, my pal Allie and I have been sharing a ton of our book-giving recommendations over at the Scholastic Raise a Reader blog.

I’m sharing only a few of our picks here.

Please hop on over to Scholastic’s Raise a Reader to learn more about the books, picks, and ideas.

Here’s the skinny:

  • Books as Gifts–Holiday Ideas for Kids:

boxed sets for toddlers

great boxed sets for toddlers

book sets like:

  • Boynton’s Greatest Hits Volume 1 & Volume II
  • Llama, Llama Library
  • Busload of Pigeons Books, by Mo Willems

 —————————————————-

gifts for all kinds of princessesprincess books: gifts for every kind of princess

books like:

  • The Paper Bag Princess, by Robert Munsch
  • Do Princesses Wear Hiking Boots?, by Carmella LaVigna Coyle
  • Not All Princesses Dress in Pink, by Jane Yolen and Heidi E. Y. Stemple

—————————————————-

best reading gifts for digital kidsbest reading gifts for digital kids

gifts like:

  • Ultimate I-Spy Wii game
  • Goosbumps HorrorLand for Nintendo DS
  • Magic School Bus Oceans for Nintendo DS

 —————————————————-

10 ebooks for older readers10 eBooks: must-haves for older readers

I love the Storia eBook versions of these books for older readers (or check out the hardcopies below):

  • I Survived the Sinking of the Titanic, by Lauren Tarshis
  • 39 Clues: Maze of Bones, by Rick Riordan
  • Aquamarine, by Alice Hoffman
  • Gregor the Overlander, by Suzanne Collins
  • Heartland #1: Coming Home, by Lauren Brooks

 —————————————————-

book sets for kids who love adventure and mystery

book sets for kids who love adventure and mystery

book sets like:

  • The Magic Treehouse books 1-4, by Mary Pope Osborne
  • Percy Jackson and the Olympians, books 1-5, by Rick Riordan
  • Encyclopedia Brown books 1-4, by Donald J. Sobol
  • Harry Potter boxed set, by J.K. Rowling

 —————————————————-

find best bookshow to find the perfect book gift for kids: using Scholastic’s Book Wizard

Not sure what to get but know for sure your child has some favorite authors, themes, or genres?

Check out Scholstic’s Book Wizard for more recommendations, catered specifically to your loved ones’ needs and levels!

Just a start here, friends. Just a start!

 —————————————————-

fyi: affililate links are used in this post

December 20, 2013 0 comments
0 FacebookTwitterPinterestPocketThreadsBlueskyEmail
kcup advent calendar
christmasholidays

K-Cup Advent Calendar: Make It A Thoughtful, Thankful Holiday

by Teach Mama November 28, 2013
written by Teach Mama

We’re longtime fans of the advent calendar and and longtime fans of coffee.

When we stepped up our game last year and sprung for a Keurig, every day became a little more awesome, starting our day with a rockin’ cuppa java.  But those discarded k-cups?

As a longtime lover of recyclables, my guilt at adding to our world’s landfills started to grow exponentially with each tossed k-cup.

So for the past few months, I’ve been racking my brain for ways to use our empty k-cups for crafts and learning. Much like we’ve used recyclables in the past, I knew they would come in handy.

Somehow.

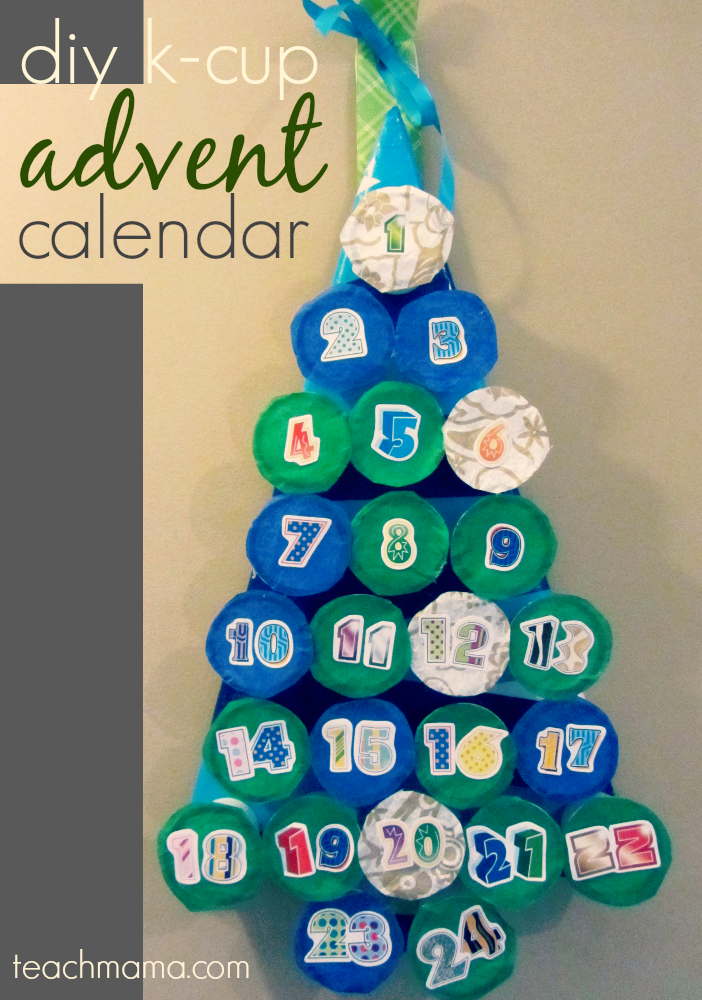
We’ve got a lot of things brewing, but most timely, is of course, our diy k-cup advent calendar.

Super-cute, inexpensive, homemade advent calendar using k-cups.  Bam.

We love how it turned out. I’m confident that this sweet calendar will help us to keep this advent season a thoughtful, thankful one for our whole family.

Here’s the skinny. . .

  • K-Cup Advent Calendar–Make it a Thoughtful, Thankful Holiday:

Though it looks a little involved, you can pull this diy k-cup advent calendar together in a fraction of the time it will take you to gather 24 empty k-cups.

Really.


kcup advent calendar teachmama.com


Each little cup holds 3 things: a kiss, the day’s advent activity, and a little reminder to be thankful.

So start collecting.  Brew yourself a cafe mocha or a pumpkin spice coffee, and read on.  Then get crafting.

You’ll need:

  • 24 clean, empty k-cups
  • 3 pieces of cardboard
  • duct tape (I used light blue, dark blue, and green)
  • tissue paper
  • number stickers (optional)
  • hot glue gun
  • pushpins
  • ribbon
  • Hershey’s Kisses (or other small treat)
  • green cardstock

Once you’ve got your supplies together, you’re ready to go.

1. Clean your k-cups: Cleaning them is a cinch.

For coffee k-cups:


kcup advent calendar cleaning kcups


kcup hot chocolate cleaning

For hot chocolate k-cups:


kcup advent calendar teachmama.com

Let them dry completely.


2. Create your advent activity calendar.  We use the same basic one each year–our advent activity calendar.  It’s a holiday-time calendar that includes tons of our favorite holiday activities, like cookie-baking, gift-making, and carol-singing while giving us ample opportunities to reflect, give back, and be thankful.

You can download our advent activity calendar 2013 here as a easy, quick printable or as an advent activity calendar 2013 word doc that you can modify and make your own.

Be sure to print out two copies–one that you can keep as a reference and the other that you can cut.  Each day of advent will have one square of the calendar tucked inside.

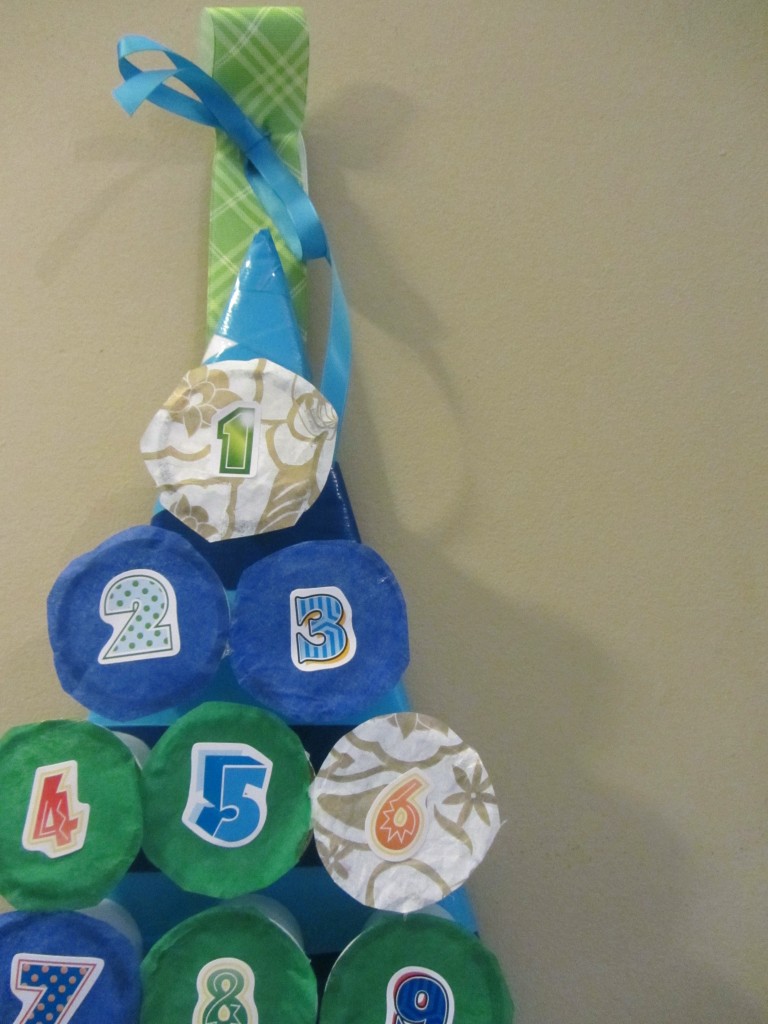
3. Make your tree.  Your tree is what your k-cups will rest on, and it needs to be sturdy enough to survive your kids’ handling.

kcup advent calendar tree


  • Make your cardboard tree. Each of our sides are 18″, and the bottom is 10″. Our tree trunk is midway between the bottom, and it’s 3 1/2″ long and 2 3/4″ high.
  • Cut three cardboard trees. Remember, the tree needs to be thick.
kcup advent calendar tree


  • Using the duct tape, tape your tree together.
  • Grab your ribbon and loop it then staple it to the back of the tree.

4.  Make your thankful discs. I used my Fiskars medium squeeze punch for my circles, but you could totally use anything. I cut 24 discs out of our cardstock, and then I walked over to our Thankful Graffiti Board and copied exactly what I saw there onto the circles.

kcup advent calendar grateful disc


kcup advent calendar grateful disc


kcup advent tree - 44


I wanted our family to remember what we expressed gratitude for through November into the whirlwind that sometimes is December, and I knew that after the treat was taken out and advent activity taken, we’d have a whole lot of time to stare at empty cups.  Here’s to hoping the thankful discs are a pretty, simple reminder of all of the greatness in our lives.

5. Cut tissue paper circle and number them. Trace the open end of a k-cup onto tissue paper and cut it out. Then cut 23 more circles all the same size. Number each circle from 1-24.

kcup advent calendar teachmama.com


kcup advent calendar teachmama.com


Each number represents a day in the month of December.

kcup advent calendar teachmama.com


kcup advent calendar teachmama.com


kcup advent calendar teachmama.com


6. Assemble your diy k-cup advent calendar!

kcup advent calendar how to


  • Use a tiny dab of hot glue to secure the thankful disc to the inside of each k-cup.
  • Using the pushpins, pin each k-cup into the tree. The rows should be: 1 k-cup; 2 k-cups; 3 k-cups; 3 k-cups; 4 k-cups; 4 k-cups; 5 k-cups; 2 k-cups. If you measured your tree the same way I did, your cups should fit tightly together.
kcup advent calendar how to


kcup advent calendar how to


kcup advent calendar how to


  • Load ’em up! Put the correct advent activity in each day along with a Hershey’s Kiss into each cup.
  • Make 5-6 tiny dots of hot glue around the circumference of each k-up and secure the tissue paper on it.
kcup advent calendar how to


kcup advent calendar how to


Hang, and you are ready to rock and roll!

kcup advent calendar how to


kcup advent calendar


And that’s it!

We think it’s pretty cool.

Look forward to other ideas down the road for using k-cups.  And feel free to share your own–let’s put those little guys to good use, shall we?

Happy, healthy, peaceful advent season to you!

fyi: affiliate links are used in this post

Want a few more holiday-inspired gift ideas or activities? Check out: 

  • Best Books to Give as Gifts for Everyone
  • Best Gifts for Kids and Families 2014
  • Best Gifts for Kids and Families 2013
  • Best Gifts for Kids and Families 2012
  • Best Gifts for Kids and Families 2011
  • Holiday Fun Fact and JOKES Lunchbox Notes (with Hannukah!)
  • Holiday Time Fun Fact Lunchbox Notes
  • Little Holiday Notes and Jokes
  • Holiday Notes for Families
  • The Polar Express tradition
  • Scratch-off Cards
  • K-Cup Advent Tree
  • New Year’s Family Interview
  • Happy Holidays Backyard Birds 


fyi: Some of the links in the post above are “affiliate links.” This means if you click on the link and purchase the item, I will receive an affiliate commission. Forever and always I recommend only products or services I use personally and believe will add value to my readers. I am disclosing this in accordance with the Federal Trade Commission’s 16 CFR, Part 255: “Guides Concerning the Use of Endorsements and Testimonials in Advertising.”  For more information, please see teachmama media, llc. disclosure policy. 

November 28, 2013 2 comments
0 FacebookTwitterPinterestPocketThreadsBlueskyEmail
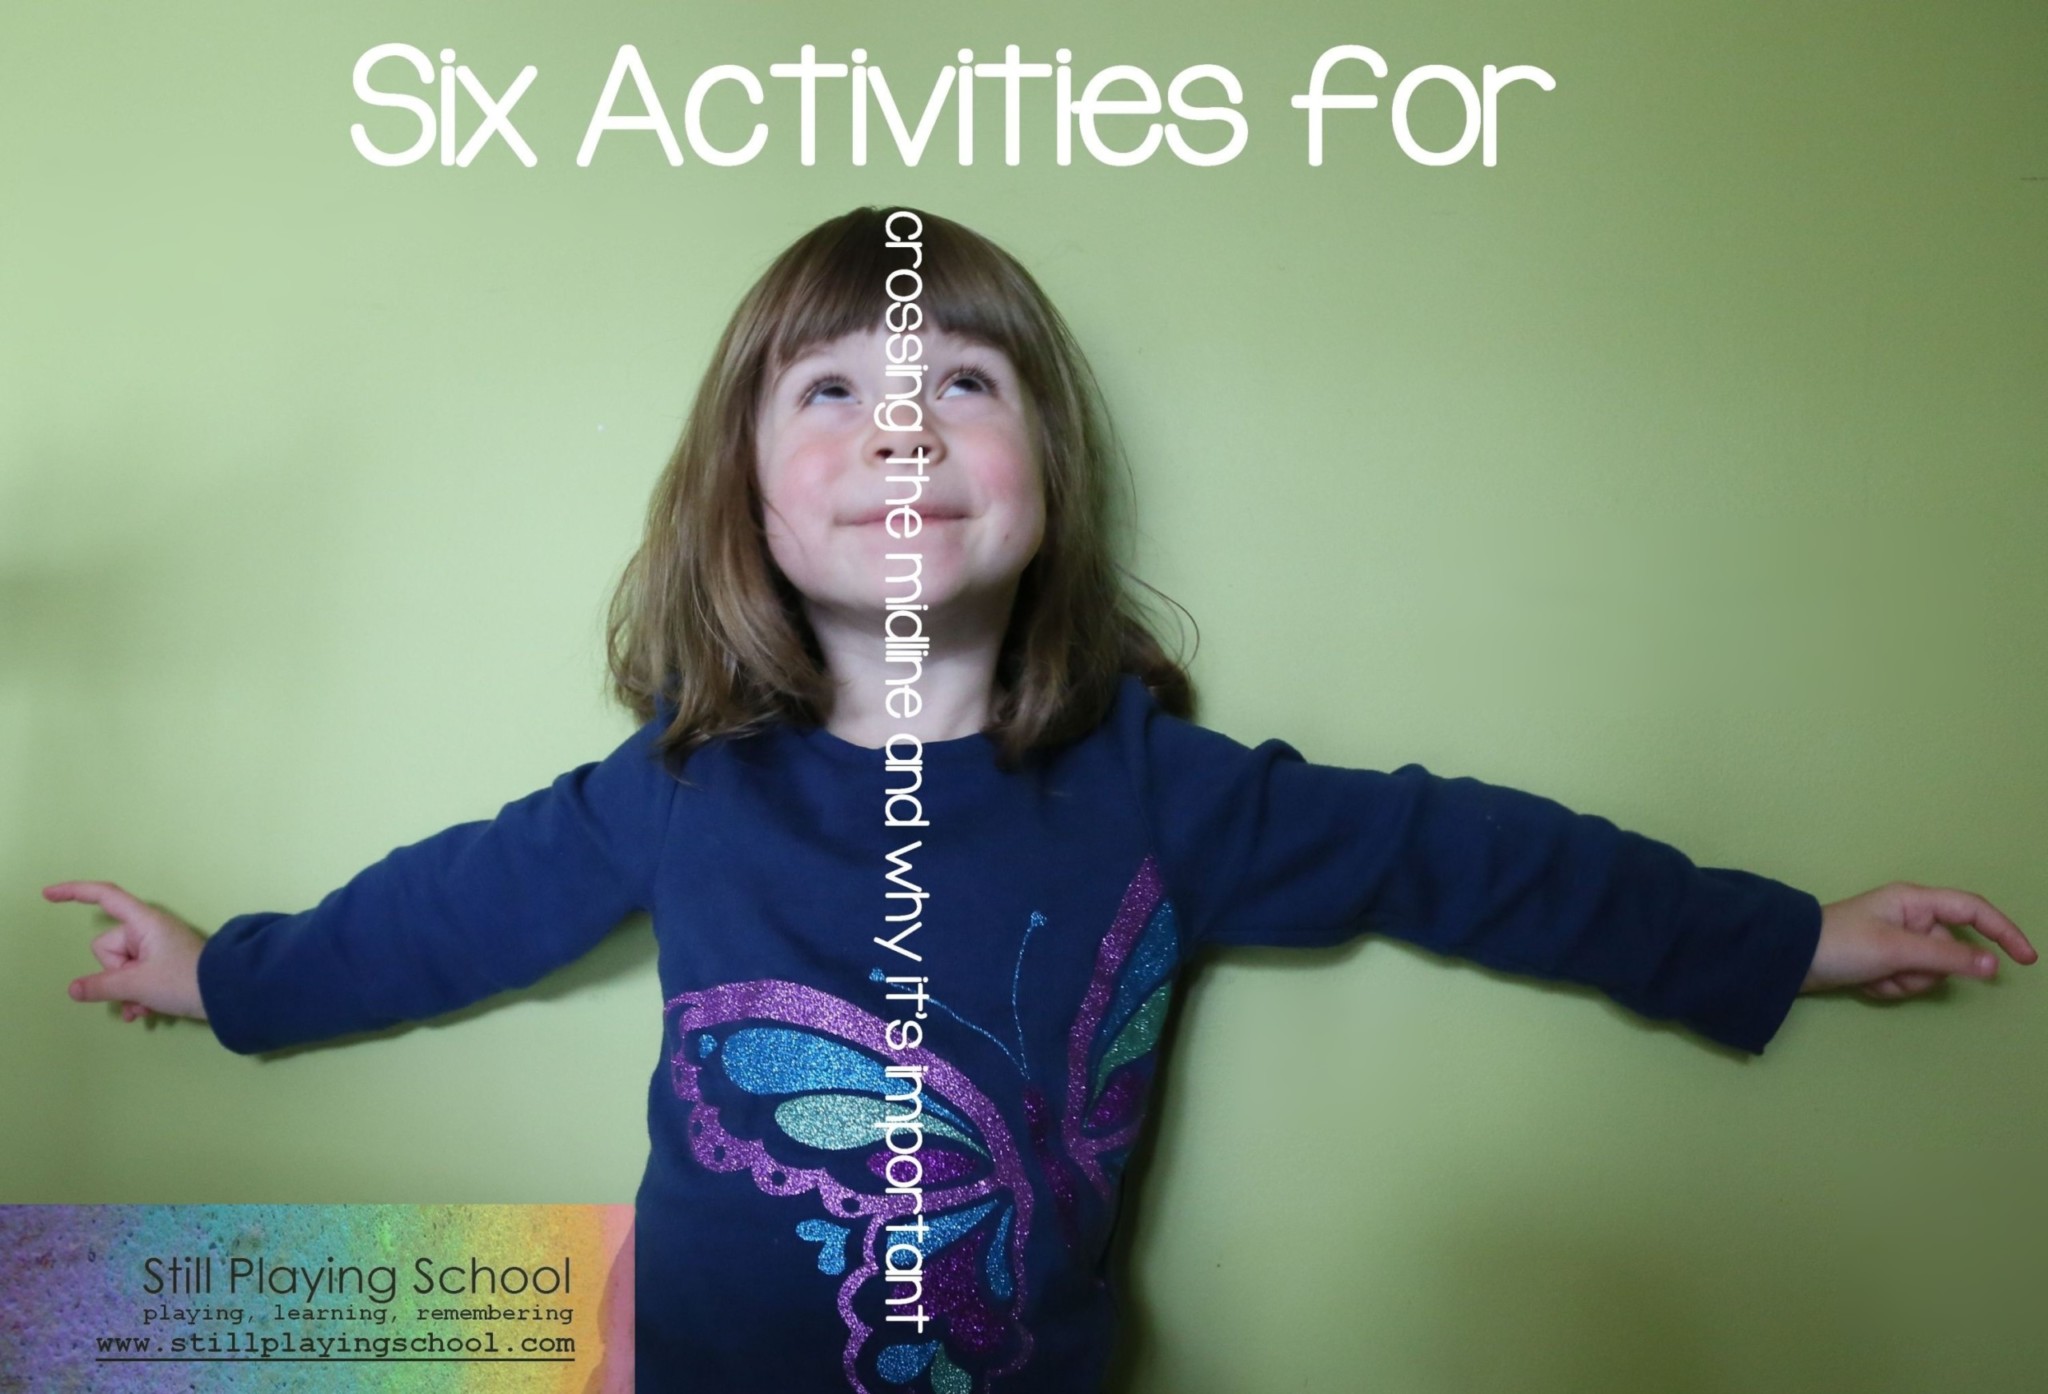
Five Activities for Crossing the Midline (and Why It’s Important)
foundations

Five Activities For Crossing The Midline (And Why It’s Important)

by Teach Mama November 1, 2013
written by Teach Mama

The following guest post is written by the amazing Devany LeDrew. Devany is a former Kindergarten who now shares adventures with her children–most often playing, learning, and remembering–on her blog Still Playing School. Check it out.

———————————

Our 10 month old son has been crawling for a few months so he’s already accomplished a pivotal achievement in learning to read and write.

Wait, what? A milestone in infancy is vital for literacy development?  Yes, because crawling is one of the first ways that babies practice crossing their midline!

Five Activities for Crossing the Midline (and Why It’s Important)

Let’s imagine an invisible line running down the human body separating the left side from the right called the midline.  When my baby crawls, he uses opposite sides of his body simultaneously. When my preschooler physically uses her body to cross that divide (by using her right hand to reach something on the left side of her body, for example) she is crossing her midline.

In both of these scenarios my children are using movements which cause their brains to communicate across their corpus callosum.  This thick cable of nerves allows their two brain hemispheres to communicate.  The practice is vital for higher level skills like reading and writing.  By moving in new ways, we build and strengthen new pathways in the brain.

Most children will naturally learn to cross their midline as they grow, but some need occupational therapy to work on this task.  There are creative, fun, and intentional ways to play while practicing crossing the midline!

Here are five to get you started!

1.  Crawl, crawl, crawl

I encourage my preschooler to crawl with her baby brother by getting down on the floor to crawl myself!  We build obstacle courses with pillows and soft toys to navigate while crawling.

Five Activities for Crossing the Midline (and Why It’s Important)

2.  Baby Cross Crawls

While you sing songs to your baby or child, intentionally touch his left foot to his right hand and vice versa.  You can tap to the rhythm of the music or teach body part names in this way.

You can challenge your older child to touch her left knee with her right elbow and vice versa.  This is trickier than it looks!

Five Activities for Crossing the Midline (and Why It’s Important)

3.  Wash Large Objects

My preschooler loves to help wash windows or our cars with special wipes or a sponge.  I ask her to hold the tool with both hands wiping back and forth in large motions as she cleans so that she is crossing her midline frequently.

4.  Dance, Sway, and Play with Ribbon Wands

You can create your own ribbon wands with a paint stirrer (or just hold a scarf in one hand for the same effect).  Model how to cross the midline while dancing for your child by making figure eights and rainbow arcs with the ribbon. A great song to practice moving and grooving with is Shake Your Reader Ribbons by Pam Schiller

Five Activities for Crossing the Midline (and Why It’s Important)

5.  Play Passing Games

Challenge children to pass a ball from a friend on the left to a friend on the right by moving their arms but not turning their whole bodies.  Friends may sit in a line or in a circle for this activity.  For two children, have them sit back to back and pass the ball from the left side across their bellies and back over to the right.


still playing school

For more from Devany LeDrew, please visit Still Playing School where she uses her background in early childhood to create a home based playful learning environment for her children. She is a former Kindergarten teacher who followed her passions to specialize in Educational Psychology & Literacy Education.  She is the mother of three, grieving the loss of one. Follow Still Playing School on Facebook and Twitter.

Thank you, thank you, thank you, Devany, for sharing!  I learned SO much from this piece!


Looking for more activities to promote fine and gross motor in your little loves?

Stop by and follow these great educational Pinterest boards, filled with indoor fun ideas to engage children in fun activities to promote the development of these foundational skills:

  • Sensory Activities  |  D @ Still Playing School
  • Preschool Activities  |  D @ Still Playing School
  • Handprint Projects  |  D @ Still Playing School
  • foundations  |  teachmama
  • movin’ and groovin’  |  teachmama


Check out a few other posts that may help you develop strong and healthy habits for your family:

  • wait time
  • my day, your day
  • frozen peas
  • kids who rock the kitchen
  • kids who rock the laundry
  • rest time
  • gem jars
  • arm circles
  • noticing kids
  • homework routine


Cheers, and happy reading during this incredibly exciting journey!

A few more literacy-related posts worth reading. . . (click on image to read!)
what to say when kids make reading mistakes teachmama.com.png
5 things to never say to emerging reader
literacy terms every parent must know
talk to kids about books
how to help kids choose just right books
Want a little more help with all things literacy?  
Follow Teach Mama’s board literacy on Pinterest.

fyi: Some of the links in the post above are “affiliate links.” This means if you click on the link and purchase the item, I will receive an affiliate commission. Forever and always I recommend only products or services I use personally and believe will add value to my readers. I am disclosing this in accordance with the Federal Trade Commission’s 16 CFR, Part 255: “Guides Concerning the Use of Endorsements and Testimonials in Advertising.”  For more information, please see teachmama media, llc. disclosure policy. 

November 1, 2013 7 comments
0 FacebookTwitterPinterestPocketThreadsBlueskyEmail
sweet spooky chocolate cookie ghosts
halloweenholidays

Quick And Easy Halloween Ghost Cookies

by Teach Mama October 22, 2013
written by Teach Mama


October has been an incredibly busy month for us, with me finishing up two classes on top of all of my other normal work.

However, our crazy schedule isn’t stopping us from having a whole lot of Halloween fun over here.

Our Halloween Banana Ghosts were a big hit way back when, so rather than stay healthy, I thought I’d mix it up a bit and really ‘up’ our sweet and fat intake and make Sweet, Spooky Halloween Cookie Ghosts.

White chocolate. Nutter Butters. Chocolate chips. Bam.

Actually, in all honesty, I wanted a quick and easy seasonal treat and I was craving Nutter Butters.  So that’s why we made them.

And because these cookies only need a handful of ingredients, there really is no recipe reading involved. But there’s a lot of basic sequencing with the repeated steps, so that is what I emphasized.

Cora was my helper, and by the time we were finished, yes we were covered in white chocolate, but we also had a full tray of fun ‘homemade’ cookies to share for Grandma’s birthday dinner that night.

Here’s the skinny. . .

  • Sweet, Spooky Halloween Cookie Ghosts:

Little hands are big helpers with these chocolatey treats, so be sure to gather your small helpers.

halloween cookie ghosts

You will need:

  • White chocolate chips
  • Mini milk chocolate chips
  • Regular sized milk chocolate chips
  • Nutter Butter cookies (or Vienna Fingers—any long oval cookie will work)
  • Cookie sheets lined with wax paper

spooky halloween cookies collage

1.  Prepare your cookie sheets by lining them with the wax paper.

Explain to your helper that you will need a spot to drop these sweet and spooky ghosts after they’re dipped, so you are thinking a head and preparing a spot for them.   The worst thing would be to have a drippy cookie with no place to put him to cool.


 spooky halloween cookies collage

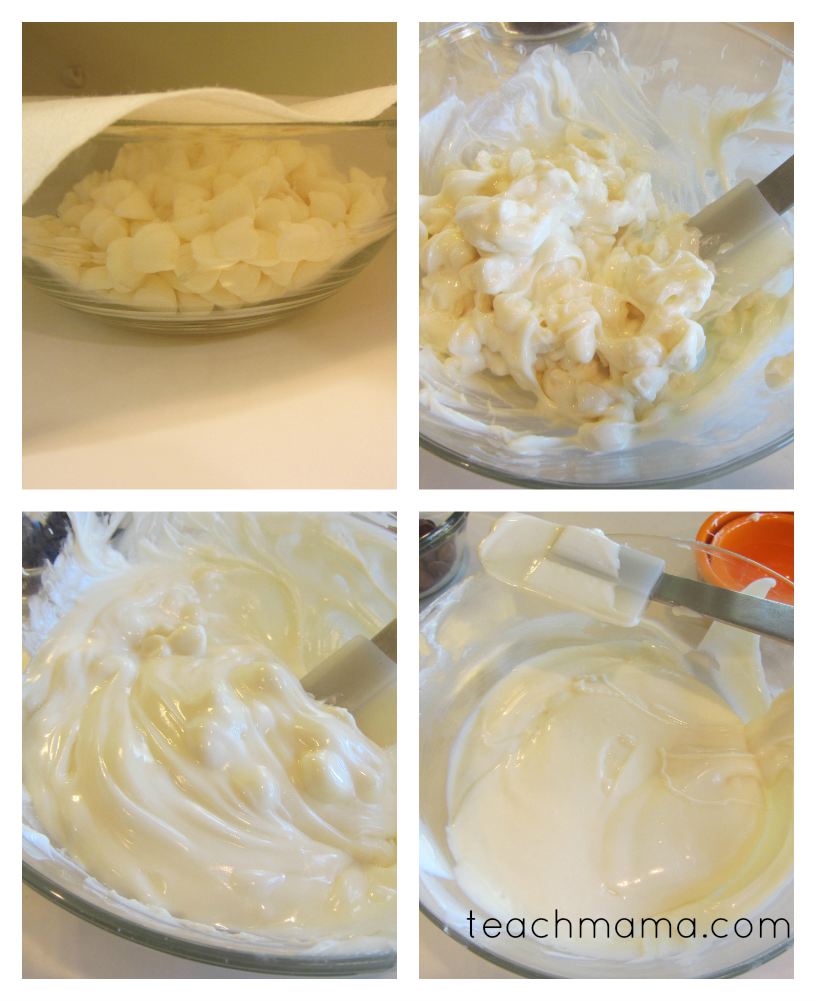
2.  Melt the white chocolate chips.

I explained to Cora that when melting chocolate, it is really important to do it slowly and carefully. We didn’t want to place them in the microwave on high for five minutes or the chocolate would burn and get crusty.

spooky halloween cookies collage

Rather, we put the bowl in the microwave for 45 seconds, took it out and mixed it.

We put it in the microwave again for 45 seconds, mixed and repeated until the chocolate was totally smooth and melted.


She loved mixing the chocolate with the spatula and watching it become more and more smooth.

spooky halloween cookies collage

3.  Dip a cookie in the chocolate.

Easy as that.  Dip, twist to make sure it’s covered on the front and back, and place on the wax paper.


spooky halloween cookies collage


spooky halloween cookies collage

4.  Place the chocolate chip eyes and mouth onto the ghost.

We used mini chips for the eyes and regular-sized ones for the ‘BOO!’ mouth.

Cora did this job almost entirely by herself because her tiny fingers were better for the job. And of course I let her know that.

spooky halloween cookies collage

spooky halloween cookies collage

As we built our ghost cookies, I was careful to use sequential words like first, second, third, next, after, and last.

I tried to use words like before and after, left and right, top and bottom. Easy words I know she knows and covered in pre-k and Kindergarten but that I want her to use and remember.

halloween cookie ghosts


halloween cookie ghosts


I wanted to squeeze in as much meaningful everyday math vocabulary as I could, not only because it’s important for Cora to learn, but also because it’s great for her to use these words ‘in action’.  And really? It’s great for kids to have as much at-home practice of their at-school learning as possible.

For our family, some of the most fun and memorable learning has been done in our kitchen–over sweets.

Anyway, perfect no matter how much time you have to prep, these Sweet, Spooky Halloween Cookie Ghosts will sure to be a hit with kids of all ages.


Want a few more fall-inspired learning ideas?

Stop by and follow these great educational Pinterest boards:

  • halloween  |  teachmama
  • fall | teachmama

Or check out these popular Halloween posts:

  • Halloween class party ideas
  • what to to with Halloween candy
  • Halloween word search
  • Halloween GHOST bingo
October 22, 2013 0 comments
0 FacebookTwitterPinterestPocketThreadsBlueskyEmail
new ideas for halnew ideas for halloween treatsloween treats teachmama.com
halloweenholidays

New Ideas For Halloween Treats: Alternatives To Candy

by Teach Mama October 21, 2013
written by Teach Mama
Halloween is traditionally a time for sweets, sweets, and more sweets, but who says kids must eat candy from dawn till dusk just because that’s how it’s always been done?
This year, though my kids will certainly have their fair share of sweets (we are a sweet-tooth family after all), I’m really trying hard to think outside the box a bit as far as Halloween treats are concerned.
Thanks to my friends from Melissa & Doug, I’m stretching the limits of treat-giving and treat receiving, and I’m going for small, hands-on toys that encourage creative play and fun.

As a Room Parent for one of my kids’ classes, I’m not planning on handing each child yet another bag of sweets to shove in their backpacks on the very day they’ll walk the streets of their neighborhood, grabbing more candy than they can hold. Not this year.

Instead, I’m mixing it up. Thinking outside the Halloween treat box.  Thinking about some alternatives to candy.

I’m handing the kids a few new Halloween treats: bubbles, stickers, tattoos, crafts, and small toys. These are sure to be items that the kids–and parents–will be happy to see, as they won’t mean more sugar for our kids’ little bodies.

Here’s the skinny. . .

New Ideas for Halloween Treats  — Alternatives to Candy:

Some of newish ideas for Halloween treats for home or at school. . .

new ideas for halloween treats scratch art


Scratch Art: I think any of the Scratch Art Classroom Kits would be a great crafty activity for Halloween at home or Halloween class parties.

In particular, the Gold and Silver Scratch Art Trading Cards are super-cool for making Jack O’ Lanterns that look like they really glow!

new ideas for halloween coll 1

Or kids could get funky, creating Scratch Art to complement their costumes!

————————————————-

————————————————-

new ideas for halloween treats

 Tattoos! Kids love, love, love tattoos, and the great thing about these My First Temporary Tattoos sets are that each comes with over 100 tattoos!

We easily tore apart the tattoos on each sheet–jewels, flowers, and more in the Jewelry Set and sports, trucks, animals, and more in the Blue Tattoo Set.

new ideas for halloween treats

new ideas for halloween treats

These are super for goodie bags, for handing out to the Trick-Or-Treaters, or as a ‘Tattoo Station’ at a class party.

————————————————-

————————————————-

new ideas for halloween treats

new ideas for halloween treats

new ideas for halloween treats

Snakes, Bugs, & Lizards:  Yes, snakes, bugs, and lizards are super fun additions to Halloween if you ask me.  As a family that prefers silly over scary, these little guys are perfect for hiding around the house and seeking for extra Halloween fun or for adding to goodie bags or baskets.

They come in packs of six (Sack of Snakes), ten (Bag of Bugs), and seven (Litter of Lizards), so they totally work as affordable Halloween goodies.

————————————————-

————————————————-

snake turtle butterfly bubbles

Bubbles! Kids love bubbles, and they’ll especially love these bubbles with silly animals on top. For the extra-special Trick-Or-Treaters in your life, the Mombo Snake Bubbles would be a great replacement for that larger-sized candy bar or treat!

————————————————-

————————————————-

new ideas for halloween treats

new ideas for halloween treats

Scratch Art Light Catchers: These totally rock.

They really do.

I think they’d be awesome as a Halloween class party activity.  No matter the shape, kids will love doing this non-messy activity (and teachers and Room Parents will, too!), and kids have a sweet end product to take home and display.

Melissa & Doug has anything from Flower Light Catchers to Dolphins, or Butterflies to Sailboats, and honestly, kids won’t care what they have. I’m willing they’ll just be excited to grab a stick, grab a sheet, and start scratching!

————————————————-

————————————————-

 That’s just what we’ve got up our sleeve this Halloween season. I’m totally thrilled.

What new ideas for Halloween treats do you have? What are your super-fab alternatives to Halloween candy? Please share!

Want a few more fun halloween party ideas?

  • halloween class party
  • more halloween class party ideas
  • GHOST bingo!
  • spider web craft
  • pumpkin match 
  • halloween word search
  • halloween ghost cookies
  • boo! your neighbors
  • alternatives to halloween candy
  • halloween joke notes
  • halloween learning
  • hats, cats, and pumpkin grid game
  • dinner in a pumpkin
  • candy experiments


fyi: Some of the links in the post above are “affiliate links.” This means if you click on the link and purchase the item, I will receive an affiliate commission. Forever and always I recommend only products or services I use personally and believe will add value to my readers. I am disclosing this in accordance with the Federal Trade Commission’s 16 CFR, Part 255: “Guides Concerning the Use of Endorsements and Testimonials in Advertising.” For more information, please see teachmama media, llc. disclosure policy.

October 21, 2013 0 comments
0 FacebookTwitterPinterestPocketThreadsBlueskyEmail
easy cotton ghost: halloween craft for little ones
holidays

Pulled Cotton Ghosts: Halloween Craft For Little Ones

by Teach Mama October 18, 2013
written by Teach Mama

post contains affiliate links


The following guest post is written by the incredibly busy Theresa of Capri + 3.  Theresa is a mom of four toddlers, and her family’s story is an amazing blessing. Her blog chronicles their adventures.

——————————

I am stopping by from Capri + 3 to share a fun and easy Halloween craft, perfect for little hands.

I love the change in the weather, the aroma of cinnamon and pumpkins and festive fall decorations.  We have three boys and a girl who will turn three in November and they love to do arts and crafts projects.

Since Halloween is approaching, I thought it would be fun to make fluffy pulled cotton ghosts.  We have made pulled cotton ghosts before and glued them onto black paper. This year, I decided to shake things up and make them three dimensional using recycled toilet paper rolls.

That way they can ‘haunt the mantle’ or greet goblins coming to ‘trick or treat’ on Halloween night.

  • Pulled Cotton Ghosts–Halloween Craft for Little Ones:


You will need:

  • Cotton balls
  • One recycled toilet paper roll
  • White glue
  • Scotch tape
  • One sheet of white printer paper
  • Pen
  • Scissors
  • One pair of large google eyes
  • Black felt or black paper cut into the shape of a mouth

First, set the TP roll on edge and draw a circle larger than the roll and cut it out (or have your older child to this).

Ghost--TP Roll with paper on it

Then, cut slits around the circle and tape it on one end so that it blocks the hole in the cardboard tube.


Give your children cotton balls and have them pull them apart to make fluffy cotton.  This is a great fine motor activity and can also be very relaxing if you want to get in on the fun!

Ghost--Pulling Cotton Ryder

 Capri making her ghost

Then, add glue all around the cardboard tube and on the white paper located on the top.  Have your children glue the pulled cotton onto the ghost.   The great thing about this project is that the cotton can be layered so that it no longer resembles the shape of the cardboard tube (just add more glue).  Then, have your child glue on the eyes and mouth.

Our little ones love to look up and see their pulled cotton ghosts ‘haunting’ the mantle.’


capri plus 3Theresa and Greg struggled with infertility and were fortunate to have a happy outcome to their journey.  Theresa started Capri + 3 as a way to share their infertility success story to bring hope to other couples facing challenges in starting their families and to document their children’s childhoods.  It has morphed into a blog about parenting multiples, arts and crafts activities for children and so much more.  Capri, Grayson, Xayden and Ryder  were all born in November of 2010.

Facebook  |  Google+   |  Pinterest |  Twitter 

Thank you, thank you, THANK YOU, Theresa,  for sharing!

Looking for more activities for ringing in Halloween (and sneaking in a little learning) with your littles?

Stop by and follow these great educational Pinterest boards:

  • fall  |  Capri + 3
  • toddler crafts  |  Capri + 3
  • halloween  |  teachmama
  • fall | teachmama
Or check out any of teachmama’s Halloween posts!
fyi: affiliate links are used in this post
October 18, 2013 4 comments
0 FacebookTwitterPinterestPocketThreadsBlueskyEmail
paper plate math puzzles
mathnumbers

Paper Plate Puzzles: Fun Number Learning For Kids

by Teach Mama October 14, 2013
written by Teach Mama


The following guest post is written by mom of five, Annette of Tips From a Typical Mom.   Annette covers everything under the sun on her blog, and it’s all done well.  Check it out.

paper plate puzzles: fun number learning for kids

Hi Everyone!  I’m so excited to be doing a guest post for Teach Mama.

I am a preschool teacher, and one of the hardest things for me to find are manipulatives that have to do with learning numbers.  So I decided I’d make my own.

  • Paper Plate Puzzles–Fun Number Learning for Kids:

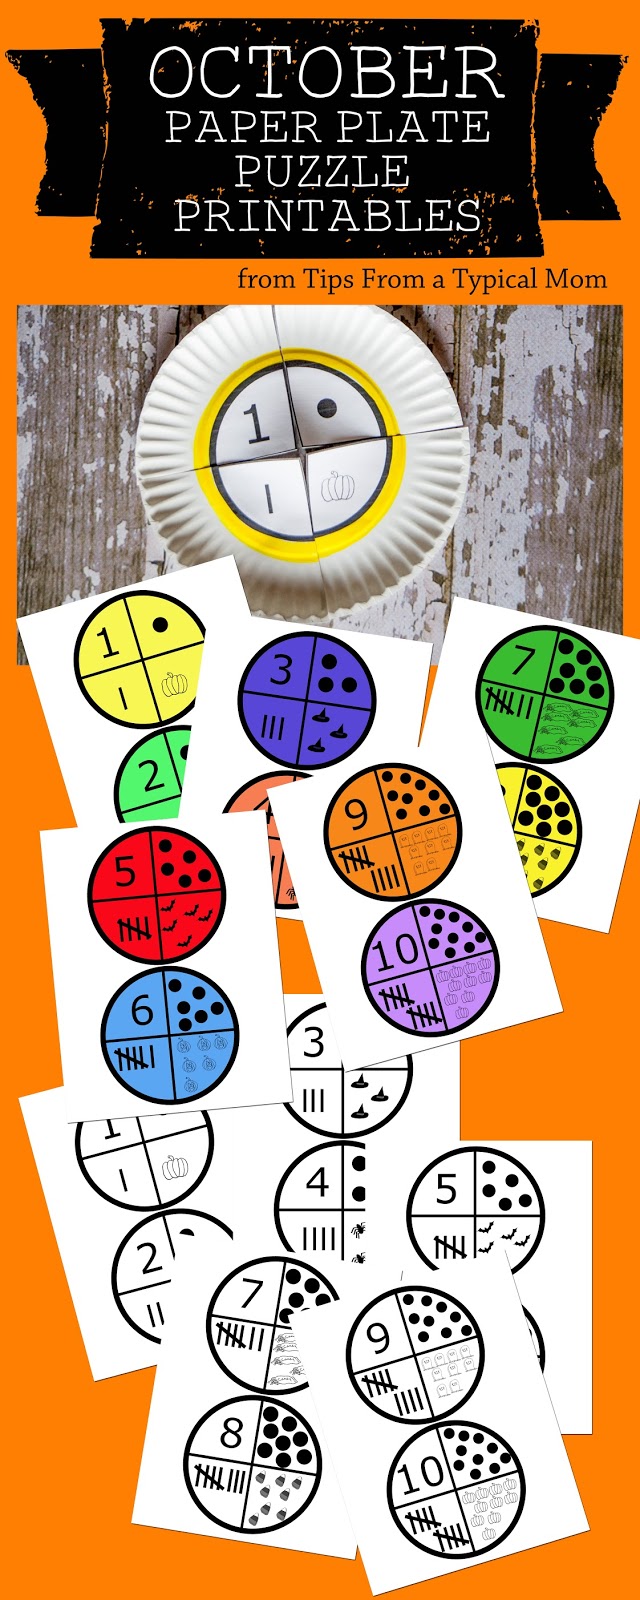
These cute paper plate puzzles are so inexpensive and easy to make, and your kids will love to play with them.  I have made them in black and white, so you can either leave them that way or color them.

You can print them with a colored background for easier matching.

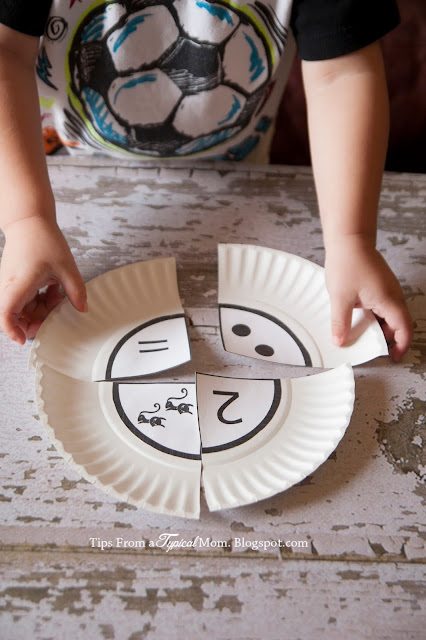
My 2 1/2 year old son is just learning his numbers, so I colored around the outside of the printable so he could match the pieces easier.  He knows all the yellows go together!

Then I count the dots, tally marks and pictures with him and help him trace the number with his finger.

These are so easy to make!

All you need are:

  • the cheap flimsy paper plates,
  • glue,
  • scissors and
  • the printables.

Just print, glue, and cut.  You’re done!


Do you want to make Paper Plate Puzzles for your little ones?

  • DOWNLOAD B&W VERSION HERE
  • DOWNLOAD COLOR VERSION HERE


Annette is a blogging mother of 5 over at Tips From a Typical Mom.

She is also a preschool teacher, photographer, soccer mom and loves her Paragliding Hubby!  She loves to share freebies, recipes, parenting tips, and household tips on her blog.

You can find her on Pinterest, Facebook, Twitter, and Instagram.

Thank you, thank you, THANK YOU, Annette  for sharing this cute and clever activity!

Looking for more activities that make math hands-on, fun, and engaging for your little ones?

Stop by and follow these great educational Pinterest boards, filled with more fab sneaky learning ideas:

  • quiet time activities |  Annette
  • preschool  |  Annette
  • math  |  teachmama
  • math is fun |  Allie McDonald
  • math madness & stem  |  Zina

Or check out the following math-happy posts:

  • everyday math
  • 3 quick,  hands-on, totally cool math games
  • math bingo

What’s your favorite, hands-on way of helping kiddos learn numbers? Please share!

October 14, 2013 3 comments
0 FacebookTwitterPinterestPocketThreadsBlueskyEmail
readingword consciousness

5 Great Reasons To Read Words Out Of Context

by Teach Mama October 11, 2013
written by Teach Mama


The following guest post is written by Becky Spence of This Reading Mama. Becky is a busy homeschooling mama of four littles, and she constantly shares super content on her site.  I’m always in awe of her.  Do take a peek!

———————————

  • 5 Great Reasons to Eead Words OUT of Context:

It is important to “marinate” young children in books. You may have even seen the poster that lists the top 10 ways to help kids become better readers ~Read, Read, Read… But as important as it is to read words in context (within the text), it is also a good idea to pull words out of their context and ask readers to study them. This is especially true for young readers and struggling readers.

Here are five great reasons to read words out of context:

1. The Reader Relies too Heavily on Context

Have you ever noticed your reader using the picture or the context of the sentence to figure out unknown words?

This strategy is a normal part of literacy development (and is encouraged when kids are young), but it can develop into a problem if those young kids grow into older kids who are not equipped with proper strategies to decode unknown words. In this way, relying too heavily on context negatively impacts fluency and comprehension.

2. Focusing on Word Patterns

Teaching phonics by patterns is my absolute favorite way to teach phonics. I love to use words sorts because they are hands-on, developmentally appropriate, explicit, and flexible. To prepare a word sort, words are pulled out of context and studied by the pattern that they share (for example: rain, braid, train, and maid all share the AI pattern). Other word patterns, such as AY, are compared to the first pattern. This way of teaching phonics is so effective because it equips readers of all ages to look for patterns as they read (a.k.a. reading by analogy), the strategy proficient readers use.

3. The Reader has Memorized the Book

Sometimes, our children pick up books and “read” them to us. We begin to wonder, “Does she really know the words or has she just memorized the book?” This is especially true of early reader books with predictable text. Pulling the words out of context helps readers slow down and really focus on the words. One of my favorite activities to help young readers do this is writing down the words from a few sentences in the book (or the entire book, if it’s shorter), cutting them apart, and asking your young reader to re-build the sentences.

rebuilding sentences from an early reader


My son (at age 4), an early reader, loves doing this on our pocket chart. We rebuild sentences from texts quite a bit. He even likes to make a game out of it! (If you have an early reader, my Reading the Alphabet curriculum has this activity built into every lesson.)

4. Building Fluency

When readers recognize words by sight (within one second of seeing the word), they are more fluent readers. When readers are more fluent, their minds are freed up to focus on the meaning of the text–the purpose of reading. It’s a chain reaction. Am I saying that we should teach all words by sight? Absolutely not! (refer to reason #2). But some words are better learned by sight, especially those common words that kids see all the time in reading, such as the, of, have, etc. Teaching words by sight words does not need to be boring or even include flash cards. It can be fun and interactive! When you can make it multi-sensory, all the better!

5. Supporting Readers Before and After They Read

Sometimes, certain words need to be pulled out of context and introduced before reading. This is especially true of:

1-longer words that the reader would not know or have the strategies yet to figure out on his own or

2- words that, while the reader can figure them out, he does not understand the meaning.

To do this, I glance through the book ahead of time and jot down about three to four words that jump out at me as being difficult words. I jot them down on a dry erase board or piece of paper. Before my second grade son reads the book, I display and read those words to him. We discuss the meaning of the words and/or the features of the word.

Words can also be pulled from the context of the book after reading. For example, if your child continuously read a word incorrectly (without changing the meaning of the text), jot that word down. After your child finishes reading, display the word from the text and the word he said instead side-by-side and talk about each word. For example, if your child read steps instead of stairs, talk about what a good mistake he made because these two words share the common feature of st. But be sure to go a little further in the word. Explore how the middle and ends of those words are different. Doing this helps readers slow down and focus on the patterns within words.


While there are some great reasons to read words out of context, please hear me shout it from the rooftop that kids need to be taking what they learn out of context AND applying it to real reading and real writing (in context)!

The ultimate goal of reading and writing words out of context is to help readers comprehend and create texts in context. That sounds like a great goal to me!


HeadshotNew-150

Becky Spence a homeschooling mama of 4 little blessings. She is the author of This Reading Mama, where she shares reading and writing activities as well as free literacy curricula and printables. You can connect with her on Facebook, Twitter, Pinterest, and Google +.


Thank you, thank you, THANK YOU, Becky,  for sharing your reading expertise with us!


Looking for more activities for building strong reading skills in your children?

Stop by and follow these great educational Pinterest boards:

  • Reading the Alphabet |  Becky, This Reading Mama
  • Word Study/ Phonics |  Becky, This Reading Mama
  • literacy  |  teachmama
  • Reading Activities  | The Educators’ Spin on it
  • Early Literacy  |  Allie, of NTFC

Or check out the following early literacy blog posts:

  • alphabet ideas  |  teachmama
  • sight words  |  teachmama
October 11, 2013 0 comments
0 FacebookTwitterPinterestPocketThreadsBlueskyEmail
teaching left handed kids to write: grasp, stages, positioning
tripod gripwriting

Teaching Left Handed Kids To Write: Grasp, Stages, Positioning

by Teach Mama October 8, 2013
written by Teach Mama

post contains affiliate links


The following guest post is written by Christie Kiley. Christie has the job I find amazing and awe-inspiring: an Occupational Therapist.  The work of these professionals is absolutely incredible. Christie is an O/T and mom of two teeny-tiny ones; she writes MamaOT.com. Check it out.

———————————

I am so honored that Amy invited me to share some tips with you today about how to teach lefties to write!

As a pediatric occupational therapist, I work with kids on handwriting all the time. I have found that people are often intimidated or confused about how to teach left handed children to write. To be honest, there really isn’t that much difference between teaching right-handed and left-handed children to write, though there are a few important things to keep in mind. If you are teaching a left-handed child to write, don’t be scared!

Here are a few tips for teaching left handed children to write:

  • Teaching Left-Handed Children–Developmental Stages:


teach left handed kids to write


1) Remember that hand dominance is not expected to fully develop until the Kindergarten years, between ages five and six. If you have a toddler or preschooler who is exhibiting a left-handed preference, it’s possible he could still switch over to become a fully right-handed writer by the time he reaches Kindergarten and begins formal writing instruction. Don’t “force” your kiddo to be left handed because you’re afraid of what might happen if he ends up switching to the other hand. If you allow him opportunities to explore using both hands, he will most likely develop a preference and eventually dominance that utilizes whichever hand demonstrates the greatest skill, strength, and dexterity.

2) If your child truly has established a left-handed dominance, make sure he knows and can verbalize the fact that he is left handed. Sometimes well meaning classroom volunteers and even teachers will switch kids’ pencil to their right hand because they may just assume the child is right handed. This can obviously impact kids negatively and confuse them, so teach them to be able to communicate the fact that they are left handed.

  • Teaching Left-Handed Kids–Grasp:

3) Encourage use of the “tripod” grasp (pinch pencil with index finger and thumb, rest it on the middle finger) just like righties do. This will help with developing dynamic finger movements and proper wrist position later down the road so your child is less likely to “hook” his wrist like lefties are known to do. Children in our current educational system often are not taught how to correctly hold their pencil. Many right handed kids can figure it out just fine but because positioning is a bit trickier for lefties, they may be more likely to develop bad habits that will make it harder for them to grasp and control the pencil as they get older and the writing demands increase.

left handed kids

4) Teach your lefty to hold the pencil in that tripod grasp about 1 to 1 1/2 inches above the tip of the pencil. When lefties move their fingers up the pencil a little higher, it allows them to see what they’re writing so they are less likely to have to hook their wrist in order to have a good view. This should also help them smudge their writing less. If your child keeps forgetting or doesn’t know where to place his fingers, put a sticker at the height he should pinch the pencil in order to provide an easy visual cue.

5) There is no need to purchase any sort of “special” pencils or grippers for your lefty unless it has been specifically recommended by an occupational therapist. Lefties are fully capable of grasping the pencil as maturely and efficiently as righties. However, it’s important for lefty kiddos to use left-handed scissors because of the way the blade is oriented; it allows kids to see where they are cutting and lefty scissors cut cleanly rather than folding or bending the paper. Don’t have access to lefty scissors? Just flip your right-handed scissors upside down in order to switch the blade orientation. This isn’t ideal as far as finger placement goes (thumb will then go in the large hole and the fingers will cram in the little hole), but it’s a quick fix if your lefty needs it. You can purchase left handed scissors by clicking here.

  • Lefties–Arm and Paper Position: 

6) As your lefty kiddo gets older and starts to write more (such as at the end of Kindergarten and moving into first grade and beyond), encourage him to angle his paper with the left corner pointed up. Righties tend to angle the right corner of their paper up, and lefties should do the same with the left side. It places their writing arm in a natural position to be able to write on the lines as they move from left to right without having to excessively hook their wrist.

7) Teach left handed writers to place their paper to the left of their body so they can see what they’re writing. When they finish writing across an entire line, their hand should either be slightly to the left of their midline or just in front of it. This allows them to move more naturally as they keep their wrist straight (rather than hooked), minimize smudging while writing, and see what they are writing.

left handed kids and writing

8) Encourage your child to utilize the right hand as the “helper hand”. Teachers do not always explicitly teach children to stabilize their paper with their non-dominant hand and, for some reason, this is especially true for lefties. The more consistently they stabilize their paper, the less likely it is to slide around and cause frustration while writing.

9) When teaching lefties to copy letters and words, make sure their model is either above where they are writing or directly to the right side of where they are writing so they can actually see it. Most worksheets place the model letter or word on the left side and then leave a blank space on the right for the student to write the letter or word. This is difficult for lefties because their left arm automatically covers up the model, so it may take them longer to complete or may lead to more mistakes because the model is covered up the majority of the time. Not fair to them! The popular handwriting program “Handwriting Without Tears” recognizes this unique need when it comes to the positioning of models and they have customized all of their worksheets so that they are accessible for both righties and lefties. Thank you, HWT!

  • Teaching Left-Handed Children to Write–Letter Formation:

10) Letter formation is generally the same for lefties as it is for righties. Be sure to teach your child to write the letter “o” in the same direction as righties, which is in the counter-clockwise direction. This will help him with his overall speed and fluency of writing later on down the road. The only real difference in formation is that lefties can “pull” their little lines backward to cross their letters (like for lowercase “f” and “t” and for capital “A” “E” “F” “H” “J” “T”) by going from right to left rather than “pushing” from left to right. This is really just to make it less likely that they will tear the paper but if they are able to draw those little lines from left to right like righties, it will also help their writing speed and fluency in the long run.

Regardless of whether your child is left handed or right handed, kids in the preschool years should be focusing mostly on fine motor play as opposed to actually using a pencil and writing letters. Be sure to focus on activities that encourage him to pinch with his thumb and index finger (strengthening those tripod muscles), coordinate the use of his right and left hands together (cutting goes in this category), and generally develop the foundational fine motor strength and skill needed for later writing. Crayons, markers, chalk, paintbrushes, sponges, and other non-pencil writing utensils should be preschoolers’ main tools for coloring and drawing. Additionally, short non-pencil tools are preferred because they help develop that good tripod grasp by naturally encouraging children to pinch with those tripod fingers rather than using additional fingers or a fisted grasp.

———————

———————

I hope these tips are helpful for you and your child as you dive into the world of left handed writing!

00mamaotChristie is a mama to two precious kiddos (a newborn and a toddler) and an OT to many. Join her on her blog (MamaOT.com) where she shares helpful tidbits learned from life as both a mom and a pediatric occupational therapist. Want even more helpful tips? Then swing her Facebook, Pinterest, or Twitter (@mamaotblog) to find even more helpful tips and tricks.

****


Thank you, thank you, thank you, Christie, for sharing!

Looking for more activities to promote fine and gross motor in your little loves?

Stop by and follow these great educational Pinterest boards, filled with indoor fun ideas to engage children in fun activities to promote the development of these foundational fine motor skills:

  • Occupational Therapy Pinterest Board|
  • Kid Blogger Network Pinterest Board |  KBN
  • Pediastaff Pinterest Boards  |
  • foundations  |  teachmama


fyi: affiliate links are used in this post

October 8, 2013 11 comments
0 FacebookTwitterPinterestPocketThreadsBlueskyEmail
ten apples up on top
booksreading

Math And Writing: Ten Apples Up On Top

by Teach Mama September 30, 2013
written by Teach Mama

post contains affiliate links


The following guest post is written by Jackie Higgins, of Ready-Set-Read. Jackie is a great friend and longtime we teach member, now a member of the we teach advisory board.

———————————-

I’m Jackie, an early literacy blogger, reading specialist, and mom of preschoolers. I’m also a book-a-holic. According to my husband, I have too many children’s books. Is there such a thing?

In our house, I use books to teach basic preschool concepts as well as connect to our experiences. This fall my boys have experienced visiting an apple orchard. We’ve read books about apples and done much of our learning at home based on apples. I prepared for our thematic unit by finding many wonderful picture books about apples at my local library.

You can view my complete list of apple books in my apple unit.

After I found the books my boys loved, I created activities using math, science, and language objectives. As Amy would say it was a great way to “sneak” learning into our day.

Plus, research shows that using thematic units helps kids to connect to what they are learning in a meaningful way.  I’m so thrilled to be here today on Teach Mama to share one of our faves from our apple unit, Ten Apples Up on Top by Dr. Seuss.

Ten Apples up on Top Book Review

Ten Apples up on Top by Dr. Seuss is a rhyming counting book. In the story, a lion, a dog, and a bear compete to see who can balance the most apples on top of their heads. Most kids think this story is so funny. It has a loud, crazy ending. Your kids will join right in with the “kaboom!”

This is a great book for helping kids learn to count objects to 10.  The rhyming text and use of high frequency words makes it a great choice for beginning readers as well.


Book Activity for Ten Apples up on Top

apple unit math activity


After reading the book, Ten Apples up on Top, we decided to challenge ourselves to see how many apples we could stack on top of our heads. I created apple bean bags for this activity. I cut red felt in circles, stuffed it with beans, and sewed around the circle. The beanbags were pretty easy to make with basic sewing skills. With a little imagination, any size or color of bean bag can be an “apple” up on top, though.  There’s no need to create apple bean bags unless you really want to.

We even created a few “challenges” similar to the book. We tried balancing our apples while hopping, while walking, and while dancing.

After a few tries, the boys recorded the number of apples they were able to balance. We used those in our counting and writing activity.


Math and Writing with Ten Apples up on Top


apple unit math activity

After our balancing apples challenge, we created a math craft. The boys glued apple clip art on top of a boy face. They carefully counted out the apples to match their score from the game above. Then, they practiced writing numbers.

They are preschool and kindergarten aged so I provided a print out of the sentence. “______ had ___ apples up on top.”  I helped my youngest fill in the blanks with his name and number, but my kindergartener was able to practice writing his name and practice number formation.  My preschooler really wants a beard, so he added that as well! More advanced children could practice writing a complete math sentence to describe their pictures.

I provided my kids with faces to color for their project, but many kids would be able to draw themselves with apples up on top. If you are interested, all of the clip art is included in my apple unit.


Extending the activity

The week after we completed this project at home, my son’s kindergarten class read Ten apples up on Top and did a similar activity.  His class was learning to compare numbers. They chose how many apples to put up on top. Then they compared that with a partner. This would be a fun way to introduce math terms such as greater than, less than, equal/same.

Fall is a great time to explore apple themed books and activities. Books can simply be enjoyed together or parents and teachers can work in learning activities to extend the learning. We loved learning about apples and learning basic concepts through our apple unit. Next month we are off to the pumpkin patch, so I guess I better head back to the library. After all, you can never have too many great children’s books!

****

Looking for more book activities?

Stop by and follow these great educational Pinterest boards:

  • Preschool Themes   |  bookblogmomma
  • Classic Children’s Books   |  bookblogmomma
  • Early Literacy    |  bookblogmomma
  • Fall Activities for Kids   |  bookblogmomma
  • literacy   |  teachmama


ready set read buttonCome visit with Jackie at Ready-Set-Read for more ways to engage your children with books. You can also find Jackie busily pinning on Pinterest, tweeting on twitter, and chatting about the best Children’s literature on facebook and Google+.


Huge and happy thanks to the amazing Jackie Higgins for sharing her expertise with us! Please check out her blog, follow her, friend her, and favorite her–you’ll be glad you did!

fyi: affiliate links are used in this post

September 30, 2013 1 comment
0 FacebookTwitterPinterestPocketThreadsBlueskyEmail
signs for early literacy learning
environmental printreading

street signs for early literacy and math skill building

by Teach Mama September 28, 2013
written by Teach Mama

signs for early literacy learning

I’ve shared time and again the importance of using what is around you–environmental print–for early literacy and math skill-building.

Signs are everywhere, and they’re free.

And they can really help our little ones to become excited about reading.

Don’t believe me?

Try it.

I’m over at Scholastic Raise a Reader chatting about some ways you can use signs for your own little ones’ early literacy learning.  Check it out: Signs–Easiest Reading Your Kids Should Ever Do.

Want a little more?

Here’s the skinny. . .

  • Street Signs For Early Literacy and Math Skill Building:

Check out these few posts about the same subject.


alphabet and reading on the roadAlphabet & Reading on the Road

———————————————————

street signs for learningSigns, Signs, Everywhere are Signs

———————————————————

street sign mathStreet Sign Math

———————————————————

Happy street sign reading!!

September 28, 2013 0 comments
0 FacebookTwitterPinterestPocketThreadsBlueskyEmail
make rainbow loom bracelets without the loom
Best Of Teach Mamafamily funfamily life

how to make rainbow loom bracelets without the loom

by Teach Mama September 2, 2013
written by Teach Mama


Join over 5,000+ subscribers who receive fun, free ideas

for making learning FUN and meaningful each week!


post contains affiliate links


make rainbow loom bracelets without the loom


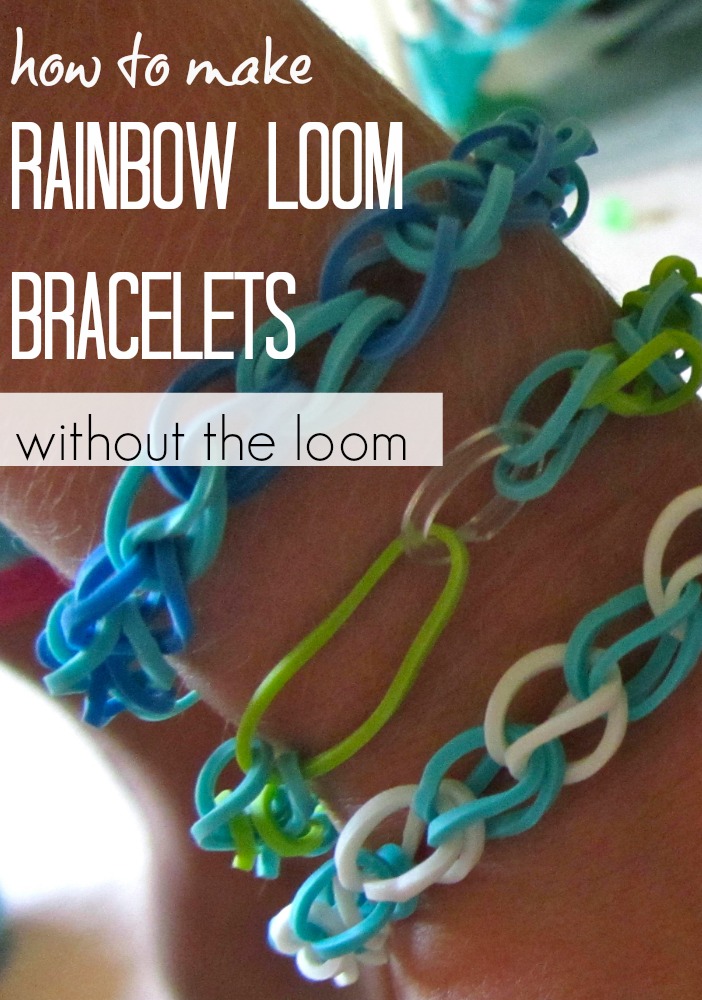
In our little space in this big world, Rainbow Loom bracelets are all the rage.

They’re everywhere. They’re all around.

Boys, girls, moms, dads, grandmas and grandpas, cousins, aunts, uncles, and pets are wearing them.

And boys, girls, moms, dads, grandmas and grandpas, cousins, aunts, uncles, and pets are making them.

And for a long time, we stayed back. But now? We’re knee-deep in Rainbow Loom bracelets.

But before we had the actual Rainbow Loom, we made Rainbow Loom bracelets without the loom. Simple, easy, and a lot of fun.

Takes a bit of learning, but after kids get the hang of it, they’ll be making them 24/7. And teeny, tiny rubber bands will be all over your house too.

Here’s the skinny. . .

  • How to Make Rainbow Loom Bracelets Without the Loom:  All you need are a few things.

You’ll need:

  • the teeny refill bands (like super-small rubber bands)
  • C-clips (super-small plastic clips that look like ‘C’s
  • wooden craft stick (or something to hold spots)
  • plastic craft organizer to keep your super-small supplies

And that’s it.

The idea behind Rainbow Loom bracelets is that you’re simply looping teeny bands together. Like the cool kids back in the ’80’s did with the gummy bracelets.

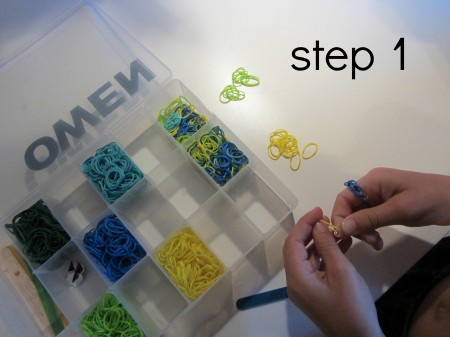
Step 1:  Gather your materials and lay out the colors you’ll need.

rainbow loom bracelets without the loom step 1


 ——————————————————

Step 2:  Place one band inside the C-clip.

rainbow loom bracelets without the loom step 2


 ——————————————————

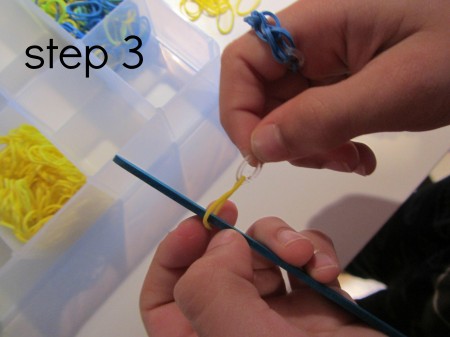
Step 3:  Place the first band inside a popsicle stick. (Sounds strange, but the popsicle stick makes it easier for small hands!)

rainbow loom bracelets without the loom step 3


 ——————————————————

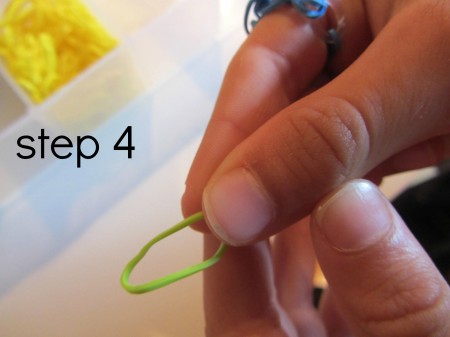
Step 4:  Grab a second band. New color. Woot!

rainbow loom bracelets without the loom step 4


 ——————————————————

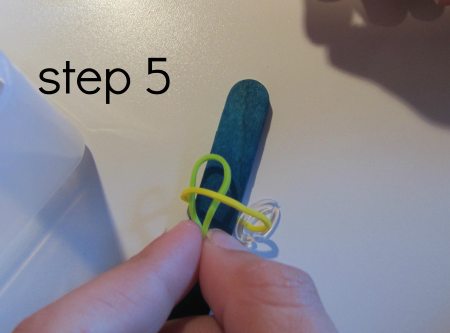
Step 5:  Pinch band two and slide it under the first band.

rainbow loom bracelets without the loom step 5


 ——————————————————

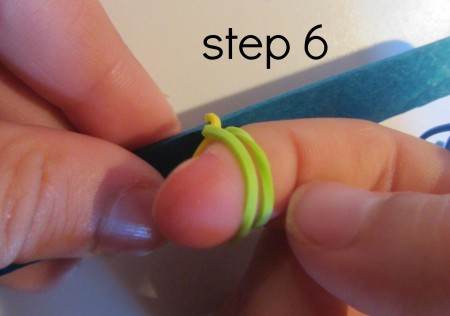
Step 6:  Pinch the two ends of band two together.

Slide your finger through it and take the stick out of the first band.

rainbow loom bracelets without the loom step 6


 ——————————————————

Step 7:  Slide the stick through the second band, just like you did in


rainbow loom bracelets without the loom step 7


 ——————————————————

Step 8:  Reapeat, repeat, repeat!

And when finished, join the ends with the C-clip. Easy peasy.

rainbow loom bracelets without the loom step 8


  ——————————————————

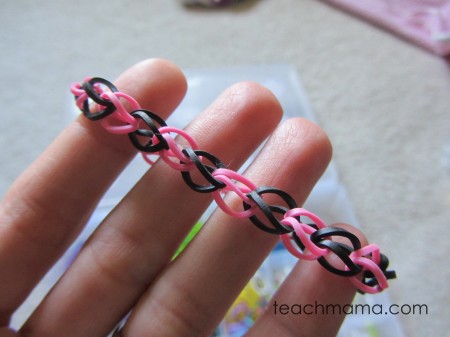
Finished bracelets?  So cute.

Are they perfect? Nope. But the kids love them, are proud of them, and love making them for friends and family.

And that’s been so fun to watch.

rainbow loom finished bracelets


Bracelets and rings. . .

rainbow loom finished bracelets


. . . bracelets and rings. . .

rainbow loom finished bracelets


 . . . and more bracelets and rings.

And the most fun part? Organizing all of the bands in a fancy, schmancy (totally inexpensive!) little plastic box or craft supply organizer.

We bought ours at a local dollar store. So fun. And the kids absolutely loved decorating and personalizing theirs.

rainbow loom maddy's box


rainbow loom maddy's box


rainbow loom avery's box


And that’s it. So fun.

So simple. And all the rage.

Still need convincing? Check out 5 Reasons Kids Should Have the Rainbow Loom and Parents Love It.

Already loving the Rainbow Loom but want a few cool ideas for bracelet-making? Check out 9 Band Bracelets for Kids to Make from my friends at Kids’ Activities Blog! 

Check out Homemade Name Necklaces for Girls and Boys!

fyi: Affiliate links are used in this post, which means that if you’re into getting your kids set up with Rainbow Loom bracelets and want to use these links, awesome. We get a itsy-bitsy, teeny, tiny cut and every little bit helps!

September 2, 2013 3 comments
0 FacebookTwitterPinterestPocketThreadsBlueskyEmail
school RULES! super-silly lunchbox joke notes
family lifelunchbox love notes

school RULES! super-silly lunchbox joke notes

by Teach Mama August 24, 2013
written by Teach Mama

It has been such an amazing summer.  I am desperately, terribly, incredibly sad to see it go.

But here we are.  Marching forward.


At my kids’ request, I whipped up another batch of lunchbox love notes.  This time, they’re silly, wacky, crazy, funny, and giggle-inducing.

They’ve asked for more jokes.  So fun.

And since school’s starting in a minute (waahhhh!), what better way to ring in the new school year than by celebrating their good, ole school days with School RULES! Lunchbox Joke Notes?

Right?  Right.

And really, the jokes help to keep things light for this mama who has a hard time with change.

Here’s the skinny. . .

School RULES! Super-Silly Lunchbox Joke Notes:

During our last summertime library trip, we grabbed a boatload of joke books, and I added the ones that were school-related to this 3-pager joke printable.

They’re funny.  I must admit.

school RULES lunchbox joke notes

school RULES lunchbox joke notes

And because Cora loves the pictures–and can still really benefit from using them to help her decode the text, as an early reader, I tried to add related art for each joke.

Amazing to think that last year’s Wordless Riddles Notes were mostly photos because she couldn’t read as much. Incredible what happens during that Kindergarten year! Our babies learn to read!

There are 24 superstar, hilarious, fabulous notes on these pages.

school RULES lunchbox joke notes

Cut the notes together if you have more than one kiddo. . .

school RULES lunchbox joke notes

then write a little love. . .

school RULES lunchbox joke notes

. . . and fold it so that the answer to the joke is hidden!

To make it easier for cutting (so I’m not spending three hours standing and cutting, standing and cutting), I simply grab three copies of the first sheet and cut those–three pages at once. Then I do the same for the second and third sheets.

I stack them in our cabinet so I can easily grab the first three on the pile, write a quick ‘Maddy, I love you! xoxo love Mom’ on the note–something short and sweet–and toss them in the lunchboxes.

The school RULES lunchbox joke notes are here to download and use for your own kiddos if you so choose. If you would, feel free to share with a buddy so that all kids get a little something silly in their lunch this year!

Print them here after throwing your email in the box below:

school rules lunchbox notes | teachmama.comschool rules joke lunchbox notes

I try to put the same note in each child’s lunch so I can make sure there aren’t repeats through the month, though that doesn’t always work.  Just clip them together in a little stack so they’re easy to grab when I’m making lunches two seconds before they leave the house.

I wouldn’t worry if your kiddo isn’t reading yet; you can still add lunchbox love notes and have your child ask the teacher to read it to him or her. I did that when Maddy, Owen, and Cora were teeny, and I really think that it helps kids build confidence, patience, manners, and communication skills.

Though teachers are super-busy, and we all know that, most likely he or she can find 15 seconds to read a silly note to a student.

And that’s it. Just a little something silly to get us moving in the right direction next week when school starts. Keeping it light for a few weeks of change.

Want a look at all of our lunchbox looooove notes? Here they are:

  • Wordless Riddles lunchbox notes
  • Halloween Jokes lunchbox notes
  • Hidden Pictures lunchbox notes
  • Disney Fun Fact lunchbox notes
  • Fun Fact lunchbox notes
  • Budgie Fun Fact lunchbox notes
  • Happy, Happy Day lunchbox notes
  • Homemade lunchbox notes
  • Parent Notes for lunchbox or anywhere
  • Holiday Fun Fact lunchbox notes
  • More Holiday lunchbox notes
  • Valentine’s Day Knock-Knock joke lunchbox notes
  • St. Patty’s Day Joke lunchbox notes
  • Springtime lunchbox love notes
  • Super-Sweet lunchbox love notes

Need more awesome Back-to-School lunchy ideas? Definitely check out:

  • our #weteach Back to School board on Pinterest. It’s totally fab. Tons of ideas for getting the school year off on the right foot!
  • our lunchbox love note board — all things lunchbox loooooove
  • the After School Activities board from my friends at Educators’ Spin on It

Here’s to a rockstar 2013-2014 school year and many more to come!

fyi: feel free to use the links below to more joke books if you’d like more silly  jokes in your life

August 24, 2013 3 comments
0 FacebookTwitterPinterestPocketThreadsBlueskyEmail
math, literacy, and creative summer learning: tabletop surprises
family funfamily lifeindoor activities

math, literacy, and creative summer learning: tabletop surprises

by Teach Mama July 28, 2013
written by Teach Mama

math, literacy, and creative summer learning: tabletop surprises

We’re week three into our tabletop surprises, and this week, we rocked some sneaky math, literacy, and creative thinking.

The kids woke up to some easy activities and ones that required more thinking—and two that required more movement. Sign language was one of the week’s activities.

The basis for tabletop surprises is just to let Maddy, Owen, and Cora find their own time to do these little activities that sneak in a little bit o’ learning and fun into their days.

They take all of five seconds to set up and prepare, and it’s a whole lot of pulling from resources that are around the house—from our own focused learning at home, or from my previous classroom teaching experience.

Fun stuff.

Here’s the skinny . . .

  • Math, Literacy, And Creative Summer Learning– Tabletop Surprises:   Set up and then go. That’s it.

We’re three weeks in. Here we go!

tabletop surprises sudoku

  • Sudoku: That’s right. Sudoku is hard. Number sense and critical thinking and logic all wrapped up into one pretty, griddy package.

Sudoku puzzles are logic-based number puzzles.

I found mine on KrazyDad, where I found the mazes a few weeks back.  Free. Tons of them. So worth checking out. I totally heart KrazyDad.

sudoku tabletop surprises

sudoku tabletop surprises

I printed some Easy ones for Monday’s tabletop surprises.   Even some of  Easy level ones were tough for the kids.

I’ll definitely throw Sudoku  in the mix again before the end of the summer because the puzzles were that hard for the kids. I’m not sure how we hadn’t tried them before, but Sudoku was on my mind from the cool outdoor Sudoku on this year’s we teach: summertime learning eBook.

Maddy, Owen, and Cora solved the Kid ones quickly—and they should have. They were super easy. But the Easy ones really challenged them. I think I need to learn more about how to solve them, some of the tricks and logic strategies myself, and then I’ll give them the skinny before trying this activity again.

My plan? To read up on the Sudoku Space site which has a pretty detailed explanation behind the puzzles.

tabletop surprises sign language cover

  • Learning With Sign language: I got these great sign language cards from a friend who moved a few years ago, and every so often I pull them out for the kids.

For our tabletop surprise on Tuesday, I simply gave them the following challenge:

1. Put the cards in ABC order.

2. Learn your name in sign language.

3. Learn two more words of your choice in sign language.

4. Show me what you’ve learned!

sign language cards tabletop surprises

sign language cards tabletop surprises

Owen ran with it and impressed Maddy, Cora, and I while we ate breakfast. He’s my early bird and usually gets his tabletop challenges finished before the girls finish breakfast.

Maddy and Cora move a little later, usually tackling the challenge after lunch or late afternoon.

Consensus was they liked this one.

Want to give it a go? Download and print one of the free sign language cards from the ASL site or these little sign language alphabet printables from abcteach.

tabletop surprises day money

  • Money counting and wrapping: Big fail on this activity.  We skip counted with coins and wrapped coins a while back, and they loved it. But this time?  Notsomuch.

I think the problem was that I didn’t have a lot of money out for them to play with—we didn’t have a ton of coins to actually play with or fill the coin wrappers. I get it. It’d be hard to spend time counting coins and then not actually have $2 in nickels to fill a wrapper completely.

Anyway, it was out on Wednesday, and they enjoyed sorting the coins from the non-coins (Chuck-E-Cheese tokens, foreign coins, random small, coin-like objects).  I think you can grab coin wrappers at any bank (at least you could a while back), or you can find them very inexpensive on Amazon.

tabletop surprises letter writing

  • Letter Writing: The other day, Cora received a little ‘hello’ note from one of her classmates, and it reminded me of how much kids—mine, especially—enjoy getting mail.

So on Thursday, I put out some note paper, pens, and envelopes and a little note that said:

Send a little ‘hello’ to

-Nana! -Cousins! -Grandparents!  -Friends!

tabletop surprises letter writing

tabletop surprises letter writing

letter writing tabletop surprises - 4

What got them stuck was the envelope and how to address it properly.  I made a little sample, and it helped a bit.  Spelling their cousins’ names? Also tough.

Clearly we need to do more practice here or at least I should update our Family Playing cards.  I’ll add it to my list.

I just liked how this got Maddy, Owen, and Cora thinking, writing, and sending a little love.  We need to do it more often, for sure.

tabletop surprises descriptive writing

  • Descriptive Writing: Inspired by our Stop, Observe, and Write activity from last summer’s Everyday Journals, I threw a card from the Everyday Journals on a clipboard along with some journals and notebooks.

We had breakfast out on the back porch, and then the kids took some time to find a quiet spot and write.

descriptive writing tabletop surprises -

descriptive writing tabletop surprises -

It was quick, it was easy, and my hope was that they would be able to tune into what they saw, heard, smelled, felt, and maybe even tasted as they sat, listened, and wrote.

The key? Modeling. You sit and write with them, sharing what you wrote so that they hear what descriptive writing sounds like.

And that’s it. Just an average, thoughtful, summer week.  And along with some trips to the pool and nearby parks, some errands and chores, it was a pretty sweet week.  Though it’s crazy, and I’m behind on all of my work, emails, and cleaning, I am thankful and blessed.

Stay on top of the Tabletop Surprises by checking out the past few weeks if you’ve missed them:

  • Tabletop Surprises Week One
  • Tabletop Surprises Week Two

Or check out some fun ideas from a our Smart Summer Challenge a few summers back.

July 28, 2013 2 comments
0 FacebookTwitterPinterestPocketThreadsBlueskyEmail
soap dough soap molds and crazy cool fun with soap
sciencescience experiments for kids

soap dough, soap molds, crazy cool fun with soap

by Teach Mama July 26, 2013
written by Teach Mama

post contains affiliate links


soap dough soap molds and crazy cool fun with soap


What happens when you put a bar of Ivory soap in the microwave?

Really. Ivory soap. Plain ole sweet-smelling, plain-jane white bar o’ Ivory soap?

In the microwave.

Try it.

Your kids will think you’re a rockstar, and everyone involved will be in awe.

Do it during a playdate, and your kids’ friends will forever tell tales of your awesomeness.

Children will think you’ve lost your mind and then will be starstruck by your science fabulousity.

Your disinterested, challenging kids will begin to respond to your every word, move, and idea.

The whole family will wait with wonder to see what you have up your sleeve next.

Actually, I can’t guarantee all that. But what I can say is that my kids, my husband, and I had a blast playing with soap ‘dough’–what you get when you blast Ivory soap in the microwave.

All you need is this soap, and you’re good to go. Inexpensive soap. That’s it.

Here’s the skinny. . .

  • Soap Dough, Soap Molds, Crazy Cool Fun With Soap: I’ll be honest. Owen wasn’t digging the soap experiment.

soap dough soap molds and crazy cool fun with soap

He was over-tired and got frustrated with Cora in the beginning of the whole thing and so he went out front and shot some hoops instead of soapin’ it up with Cora, Maddy, and me. But he did keep coming around, sneaking glances, and trying to play but not really.

So it’s simple, and it’s not perfect, but playing with Ivory soap was something I’ve wanted to do with the kids for a while now, after catching a few fab pins on Pinterest.

It’s been sitting there on our neat-o, FUN, new things for us to try board, and finally, finally? We did it.

After a busy morning and after rest and after a whole lot of free-bird summertime fun, I said, Hey! Remember we had ‘Fun Science Experiment’ on the calendar for today? Who’s up for checking out what I meant?

soap dough step 2

Maddy, Owen, and Cora found me in the kitchen, and we got rockin’ and rollin’.

I said, So we’re going to do something a little crazy today with this. And I handed them the bar of Ivory soap.

I also got out the only other things we’d need:

  • Ivory soap
  • cookie cutters
  • wax paper
  • liquid food coloring

I got a lot of Huh? and What? and Why? and Mom?

Maddy opened the bar of soap, and we all held it and smelled it and passed it around. And talked about how it smelled so pretty like Nana’s bathroom. (Because that’s the soap she uses and has used for as long as I can remember.)

Then I placed it on a piece of wax paper, put it on a microwavable plate, and stepped back.

soap dough microwave

What do you think will happen if we put this puppy in the microwave? I asked.

It might melt?

It will explode?

It will ruin our microwave!

I’m not sure you should do that, Mom.

I told them that I’d only heard about this experiment but never did it myself, so I was a little nervous. I pressed 1:30 on the microwave, and we all stepped back.

What happened was totally crazy and completely strange.

soap dough soap molds

soap dough soap molds

soap dough soap molds

We did it twice, with two bars of soap, and the ‘explosion’ looked completely different each time. It. Was. Nuts.

And though the edges were cool, the insides were HOT. Like hot, hot hot.

soap dough soap molds

soap dough soap molds

But the whole thing was light–like a cloud–when lifted. So the kids took turns holding it after it cooled. It was so totally fun.

After a bit of holding and observing, we took the fun outside.

I had read that you could break the soap apart, mix it, and form a sort of dough. Though I was not willing to throw it in our food processor or blender, I read that you could. We were going to put our kids to work and mix and mold on our own.

soap dough soap molds

We put the big lumps of soap on two trays, each covered with a piece of wax paper.

And then? We just broke it apart. We added a few drops of food coloring to each lump, blue to Maddy’s and green to Cora’s. (By this time, Owen was shooting hoops.)

We found that the warmer parts were more easily molded and moved, but with a bit of warm water, it became this awesome, smooth, soft, fragrant dough.

soap dough soap molds

soap dough soap molds

soap dough soap molds

It did take some work and a bit of muscle to get it into a working ‘dough’ and we had to go really, really light on the warm water. But after we found the right combo, we were able to use the cookie cutters to make fun, brightly colored soap shapes.

soap dough soap play with blue

soap dough soap molds

The O-Man even came back to get his hands in the dough after a while.

Maddy and Cora loved it. Though Cora set her sights on creating a soap mold princess crown and was disappointed that she couldn’t make it perfectly, Maddy went simple with cookie cutter molds and was better off.

Next time, I’d only bring out basic shape cookie cutters–our soap dough was a little choppy and chunky for detailed molds.

soap dough soap molds

soap dough soap molds

soap dough soap molds

So fun. So much soapy, doughy, moldable fun that we were beside ourselves.

The big question is why does Ivory soap behave this way in the microwave? I had not a clue. But my savvy-science friends do:

  • Steve Spangler, the oh-so-smart and creative science guy covers it here in Soap Souffle
  • Physics Central talks microwaving soap with diagrams and a detailed explanation
  • The Indianapolis Public Library blog also covers it with a few helpful links and references in books

And that’s it. Some sneaky science and fine–motor sensory fun on a cool (thankfully!) summer afternoon.

Do you have any other cool and easy science-experiments for kids? Let me have ’em!


fyi: affiliate links are included for your convenience

July 26, 2013 4 comments
0 FacebookTwitterPinterestPocketThreadsBlueskyEmail
tabletop surprises week one | ideas for free exploration and play each day of the week
family funfamily lifeindoor activities

tabletop surprises: simple, summer learning fun

by Teach Mama July 12, 2013
written by Teach Mama

post contains affiliate links


tabletop surprises week one


Summer is kicking us hard over here.

Actually, swim and dive are kicking us hard over here, like always.  And at five weeks in, between meets, practices, relays, pep rallies, and team events, our family has run a bigtime marathon.

So our Smart Summer Calendar and daily plan have morphed into something that is really, truly working out well for us: Tabletop Surprises.

Tabletop Surprises? Easy.

On their own time.  On my own time.

Creative learning and crafting opportunities for the kids on the craft room table.

Opportunities for open-ended play and learning–when it works best for them.

For now? It’s rocking.

Here’s the skinny. . .

  • Tabletop Surprises–Simple, Learning Fun:tabletop surprises button

What are Tabletop Surprises? If you follow me on Instagram, you’d know what I’m talking about because each day I’ve shared a quick photo of each day’s surprise each day of the week.

Tabletop Surprises are fun learning or creative thinking opportunities for the kids on our craft room table. Just sitting there.

Waiting for someone to come along and try ’em out.

How to I get the kids to actually sit down and do the activities?  A few ways:

1. The activities are fun and they want to do them;

2. At any given time, on any given day, I have been known to toss a few gems into the gem jars of people who have been spotted doing the activity. Not every day, but some days.

3.  I’ll join them. Kids–I truly believe–like to hang out with their parents. Especially if their parents are kinda cool or funny or at least act like they’re cool or funny. I like to hang out with my kids, so when they sit, if I can, I’ll join them.

Tabletop Surprises for this week:  Here we go. . . 

magnetic words

magnetic poetry tabletop surprise


  • Magnetic Poetry: Magnetic words by our friends at Magnetic Poetry, and this set is the Magnetic Poetry Really Big Words Set. All I did was put a bunch of words on three clean cookie sheets.

That’s it. I started with a funny sentence on each tray, and I let the kids take it from there.

They liked it. Tried to sneak in a little potty talk, but lucky for us the set doesn’t really lend itself to such.

focus of this activity: creative thinking, reading, speaking

———————————————————————-

tabletop surprises shape blocks pattern cards

shape pattern cards

  • Shape Blocks & Pattern Cards: Love, love, love this set.  There are dozens of great sets out there on the market, and I’m not even sure where ours came from.

I put the cards out on the table, threw some shapes into three separate containers to avoid grabbing and arguing, and crossed my fingers. Owen hit the table without asking me to play Wii, and he sat and worked until breakfast. Win!

focus: geometry, critical thinking, fine motor skills

———————————————————————-

tabletop surprises perler beads cover

tabletop surprises perler beads

tabletop surprises perler beads

  • Melty Perler Beads & Pegboards: I love these, and so do the kids. Perler beads are simply teeny, tiny beads that fit on small pegboards.

Kids can create patterns, letters, words, you name it, by placing the beads on the small pegs. When the creation is complete, you iron it to melt them together. Once it’s cool, it pops off of the pegboard and you have a little masterpiece.

focus: fine motor, patterning, creative thinking

———————————————————————-

tabletop surprises mazes

  • Mazes: I have fallen head over heels for KrazyDad and his amazing math site. Serious gold mine of printable puzzles, mazes, and so much more, it’s insanity.

All I did for today was dive into the maze area of his site, and I printed out mazes of varying difficulty.  I went for Easy, Intermediate, Challenging, and

Tough, and they all rocked.

tabletop surprises mazes

tabletop surprises mazes

Second day in a row that the O-Man chose unplugged fun vs the siren call of his Wii.

focus: critical thinking, fine motor, problem-solving

———————————————————————-

tabletop surprises magnets

tabletop surprises magnets

  • Magnets, Pipecleaners, & Paperclips: Easy, easy, easy. Magnets are so fun, and my kids have loved them forever and ever.

I used the disc magnets from way back when we made Bottle cap Ornaments, glass vase and some empty glass jars from the recycle box, colored paper clips, and pipe cleaners.

tabletop surprises magnets cover

tabletop surprises magnets cover

I cut the pipe cleaners into various sizes and threw them in the bottom of the glasses. I added some paper clips and scattered the magnets. Done. Invitation to explore.

Kids? Loved it.

focus: science, fine motor, critical thinking

———————————————————————-

Really? That’s it. So fun, so easy.

Next week we’ve got some really cool ideas up our sleeve for Tabletop Surprises.  Gotta love summer, and as the kids are yearning for more independence, I think this is the recipe for success.

Need some supplies for your own Tabletop Surprises? Click below:


fyi: affiliate links are included

July 12, 2013 8 comments
0 FacebookTwitterPinterestPocketThreadsBlueskyEmail
how to help kids choose just right books
reading

how to help kids choose just right books

by Teach Mama July 2, 2013
written by Teach Mama

how to help kids choose just right booksIt’s hard to watch a child struggle trying to read a book that is too difficult, especially when the kiddo is adamant about plowing through it.  Whether the struggles be with decoding the words on the page, with reading fluently, or with understanding what’s being read, it’s hard to watch.

Because though for many of us reading comes naturally and without thought, for others, reading is a continual struggle.  A long and laborious, difficult and painstaking process.

That’s why book choice is so important.

Muy importante.

Like really, really, really important.

Though children do need to be able to choose the books they read, if the child doesn’t choose a book that ‘fits’, it can really be downhill from there. He or she can get into a pattern of choosing books that won’t fit, making reading difficult and unpleasant.

But there are techniques and strategies that parents can employ to help guide children into choosing the ‘best fit’ books for their kids—books that match the child’s own strengths and abilities.

Nothing fancy or difficult, just a few quick reminders that your child can commit to memory that will ultimately provide him or her with skills that will make trips to the school library, media center, or book corner a whole lot more meaningful.

Here’s the skinny . . .

  • How to Help Kids Choose Just Right Books: I say it loud and clear right here. . .


And if you want the bookmarks to use for your own kiddos or classroom, please help yourself.

Best Fit Bookmarks: best fit books bookmarks

best fit bookmarks | teachmama.com

best fit books bookmarks | teachmama.com

I’d appreciate a pin, link back, tweet, or shout if you do choose to use them.  And if you have suggestions, I’d love to hear ’em!

(And if you choose to share them, which we hope you do, please link to this post instead of to the attachment page! Thank you!)

How do you help kids choose just right books? Let me know what has worked for you in the comments section below.

July 2, 2013 4 comments
0 FacebookTwitterPinterestPocketThreadsBlueskyEmail
Newer Posts
Older Posts

About Me

About Me

Hi! I'm Hannah.

A mother of one, I am passionate about inspiring mamas and educators with hands-on, meaningful learning ideas that make everyday moments fun, purposeful, and filled with curiosity.

Follow Teach Mama

13.5K Fans Like
2.8K Subscribers Subscribe
132K Followers Follow Us

Recent Posts

  • Best Slime Bundles for Creative Play: 5 Must-Have Collections in 2025

    October 13, 2025
  • Learning Through Everyday Routines and Special Adventures

    September 19, 2025
  • How to Talk to Kids About Goals and Future Dreams

    September 19, 2025
  • Making Everyday Learning Count: Turning Small Moments Into Big Lessons

    September 19, 2025
  • Raising Kids Who Understand the Balance Between Needs and Wants

    September 19, 2025
  • Family Learning Projects That Spark Conversations About Money

    September 19, 2025

LEARN

PLAY

CRAFTS

PRINTABLES

About Me

A mother of one, I am passionate about inspiring mamas and educators with hands-on, meaningful learning ideas that make everyday moments fun, purposeful, and filled with curiosity.

Useful Links

  • About
  • Contact

Popular Posts

  • words 3 ways: learning sight words for kindergarten

    May 17, 2012
  • quick trick: magnetic letters (how to use them with your kids!)

    December 1, 2010

Recent Posts

  • Best Slime Bundles for Creative Play: 5 Must-Have Collections in 2025

    October 13, 2025
  • Learning Through Everyday Routines and Special Adventures

    September 19, 2025
  • Facebook
  • Pinterest
  • Youtube
Teach Mama
  • Reading
  • Early Literacy
  • Writing
  • STEM
  • Activities
  • Digital Literacy

Shopping Cart

Close

No products in the cart.

Close